• Nav Social Menu

    • Facebook
    • Facebook Group
    • Instagram
    • Pinterest
    • RSS
    • Twitter
    • YouTube

Handmake with Love

Anna Helman | formerly Scrapping, Stamping and Stuff

  • Blog
  • Start Here
    • About Me
    • Learn to Make Cards
    • Why Shop With Me?
    • Testimonials
    • Connect On Social
    • Get Email Updates
    • Stampin’ Up! Giveaway Winners
  • Products
    • Shop Now
    • Catalogs
    • Clearance
    • Why Choose Stampin Up?
    • Paper Pumpkin Kits
    • Product Shares
    • Rewards Program
    • Stamparatus
    • Cut And Emboss Machine
    • Mini Cut And Emboss Machine
    • Blends Alcohol Markers
    • Blending Brushes
  • Ideas
    • Video Tutorials
    • Project Gallery
    • Card Ideas
    • 3D Projects
    • Scrapbooking
    • Tips & Techniques
    • Kits
    • Learn to Make Cards
    • Printable Catalog Tabs
    • Social Media
  • Join
    • Join My Team
    • Stampin Up Demonstrator Resources
  • Classes
    • Classes in the Mail
    • In Person Events
  • Contact
    • Contact
    • Connect On Social

How To Make A Shaker Card In 4 Simple Steps!

4 Feb

Have you ever created a shaker card? If you haven’t, you’re in for a real treat today. I’m sharing a detailed tutorial for how to create one of these amazing and impressive, yet simple cards. They look complicated to create, but they really aren’t. Let’s get started with how to make a shaker card!

Click to see how to make a shaker card in 4 simple steps! Shaker cards look complicated but they are quick and easy to create!

First I’ll talk quickly about what a shaker card actually is.

What Is A Shaker Card?

A shaker card is a card with a window in the front, which is popped up slightly to create a gap behind it to hold sequins, small beads, or other small items which can be shaken around inside. They have an interactive element with moving pieces that is especially exciting and impressive!

Click to see how to make a shaker card in 4 simple steps! Shaker cards look complicated but they are quick and easy to create!

Next let’s talk about what you’ll need to make a shaker card.

Materials Needed

To create a shaker card, you’ll need the following supplies:

Click to see how to make a shaker card in 4 simple steps! Shaker cards look complicated but they are quick and easy to create!
  • Card base
  • Overlay/frame piece with a shape cut out of the inside
  • Piece of acetate window sheet measuring the same size or just barely smaller than the overlay/frame piece
  • Foam adhesive strips
  • Glue or tape
  • Punches or die cuts to decorate
  • Shaker pieces – sequins, beads, or other small items

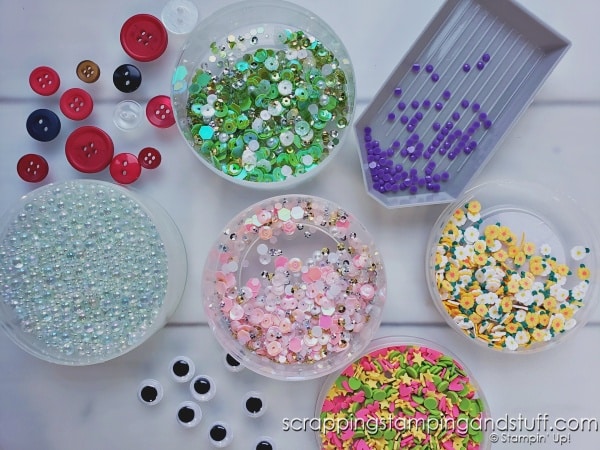
Let’s talk more about what you can use as the shakers in your card – there are so many options!

What Kinds Of Filler Can Be Used For A Shaker Card?

There are so many small items that can be used for shaker cards including sequins, beads, pearls, confetti, gilded leafing, baking sprinkles, google eyes, small pebbles or shells, sand, pompoms, and buttons. If it’s small and it shakes, you can probably use it!

Click to see how to make a shaker card in 4 simple steps! Shaker cards look complicated but they are quick and easy to create!

Another important part of a shaker card is the frame laying over the front. Let’s talk about how to prepare this piece now.

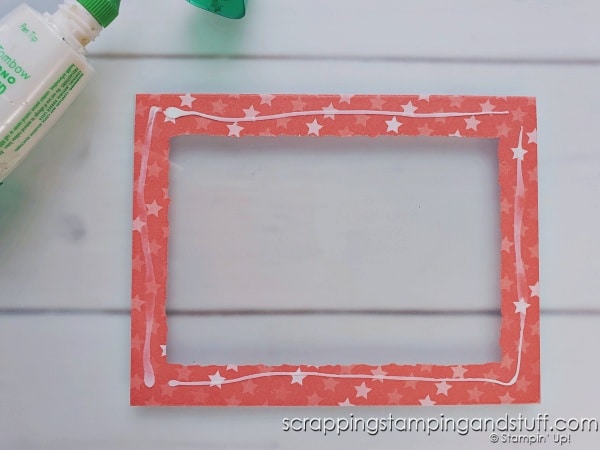
How To Prepare The Overlay Piece

You can use any size paper as the overlay, as long as it isn’t larger than the card base itself. You’ll need to cut at least one opening in this piece, which can be done with a punch, die, or trimmer. Keep in mind you want to keep a border strip around the edge that is large enough to hide a piece of foam adhesive.

Below you can see how I prepared the frame for my sample card using the plaid paper at the bottom.

Click to see how to make a shaker card in 4 simple steps! Shaker cards look complicated but they are quick and easy to create!

Here are several examples of pieces that would make good frames for a shaker card. The border on several of these is pretty narrow, but they would work if needed!

Click to see how to make a shaker card in 4 simple steps! Shaker cards look complicated but they are quick and easy to create!

Favorite Dies For Shaker Cards

Here are a few of my favorite die sets for creating the frame piece on shaker cards: Deckled Rectangles, Stitched Rectangles, Stylish Shapes, and Layering Circles.

Click to see how to make a shaker card in 4 simple steps! Shaker cards look complicated but they are quick and easy to create!

Sample Card Dimensions

Here are the cutting dimensions for the card I created:

  • Card base: 5 1/2″ x 8 1/2″, folded in half
  • Frame: 4″ x 5 1/4″, with a rectangle cut from the center
  • Window sheet: 4″ x 5 1/4″
Click to see how to make a shaker card in 4 simple steps! Shaker cards look complicated but they are quick and easy to create!

Next let’s talk about how to assemble a shaker card!

How To Make A Shaker Card

Create a shaker card using these four simple steps:

1. Prepare the card base. Fold it, and decorate as desired. This is what will show through behind the shaker window.

Click to see how to make a shaker card in 4 simple steps! Shaker cards look complicated but they are quick and easy to create!

2. Prepare the frame and attach window sheet to the back side with glue or tape.

Click to see how to make a shaker card in 4 simple steps! Shaker cards look complicated but they are quick and easy to create!

3. With the back side face up, create a border behind the frame with foam adhesive strips. Keep the strips away from the edges (so they don’t show) and make sure there aren’t any gaps at the corners (so your shakers don’t leak out!).

Click to see how to make a shaker card in 4 simple steps! Shaker cards look complicated but they are quick and easy to create!

Remove paper backing from the strips and set aside.

Click to see how to make a shaker card in 4 simple steps! Shaker cards look complicated but they are quick and easy to create!

4. Lay sequins on top of the card base. Then carefully lower the frame and attach to the card.

Click to see how to make a shaker card in 4 simple steps! Shaker cards look complicated but they are quick and easy to create!

It’s that easy to create a shaker card! Keep reading because I’ll share a few tips, more shaker card samples, and my video tutorial below!

Tips For Creating Shaker Cards

  1. Start simple – use a basic shape to cut the center and keep decorations on the card base to a minimum.
  2. When creating the frame, keep a nice wide border to make it easy to hide the foam strips.
  3. Don’t add too much filler material! When too much is included, it won’t shake much and you won’t see the background.
  4. Trim the acetate window sheet just a tiny bit smaller (maybe 1/16″) than the frame to make it easy to hide behind the frame.

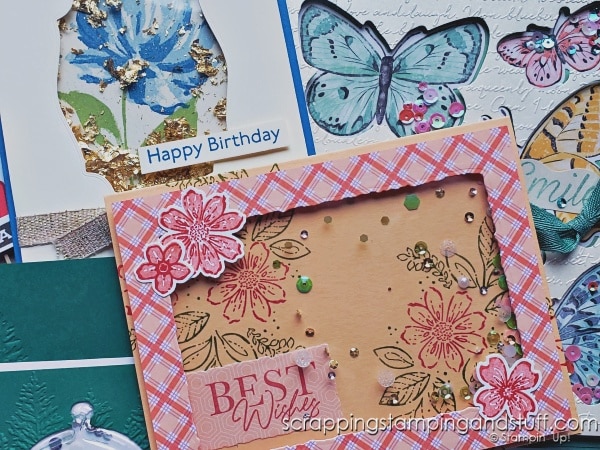
More Shaker Card Examples

Here are a few shaker cards I’ve created in the past. Take a look at them using the links below!

Click to see how to make a shaker card in 4 simple steps! Shaker cards look complicated but they are quick and easy to create!

Penguin Shaker Dome

Slimline Shaker Card

Gilded Leafing Shaker

Christmas Shaker Card

Butterfly Shaker

A Stepped Up Shaker Card With Liquid!

See even more shaker card ideas here!

Featured Stamps – Petal Park

The stamp and punch bundle I used to create my shaker card is called Petal Park, and I love that it allows me to stamp two colors for realistic looking flowers and leaves – and then punch three flowers at one time!

Click to see how to make a shaker card in 4 simple steps! Shaker cards look complicated but they are quick and easy to create!

How To Make A Shaker Card Video

Watch along here for step by step instructions on how to create a shaker card!

Do you need some supplies to make your next shaker card? Order below!

Supply List

Pick up some foam adhesive strips and other supplies for making shaker cards here!

Product List
Petal Park Bundle (English)
[160577]
Petal Park Photopolymer Stamp Set
[160571]
Petal Park Builder Punch
[160576]
Dandy Designs 12" X 12" (30.5 X 30.5 Cm) Designer Series Paper
[160836]
Pale Papaya 8 1/2" X 11" Cardstock
[155668]
Window Sheets
Window Sheets
[142314]
Cottage Rose Cling Stamp Set (English)
[159040]
Shaded Summer Cling Stamp Set
[155783]
For Everything Fancy Sequins
[159187]
Foam Adhesive Strips
[141825]
Multipurpose Liquid Glue
[110755]
Poppy Parade Classic Stampin' Pad
[147050]
Calypso Coral Classic Stampin' Pad
[147101]
Old Olive Classic Stampin' Pad
[147090]
Granny Apple Green Stampin' Pad
[147095]
Deckled Rectangles Dies
[159173]
Stampin' Cut & Emboss Machine
[149653]
Add All to Cart

Learn To Make Cards
Shop Supplies
Rewards Program
Join My Amazing Team

Thanks for visiting to learn about how to make a shaker card!

Sharing is caring!

Filed Under: Gallery, Tutorials Tagged With: stampin up petal park, technique

Previous Post: « Game Changer – How I Prep My Clear Stamps!
Next Post: Stampin Up Conversation Bubbles & My Updated Sentiment Tag Box! »

Reader Interactions

Leave a Reply Cancel reply

Your email address will not be published. Required fields are marked *

Recipe Rating


Primary Sidebar

Anna Helman

Independent Stampin' Up!® Demonstrator

  • Email
  • Facebook
  • Facebook Group
  • Instagram
  • Pinterest
  • RSS
  • Twitter
  • YouTube
Shop Stampin' Up!
Stampin' Up! catalogs
get updates
join Stampin' Up!
Stampin' Up! Rewards
Stampin' Up! special offers
Stampin' Up! clearance
Stampin' Up! 2025-2026 Annual Catalog
May 6, 2025 - May 4, 2026
View Online | Shop Online

Blog Archive

Categories

Footer

Important Links

  • Home
  • Shop Now
  • Get Updates
  • Join My Team
  • Rewards
  • Specials
  • Catalogs
  • Clearance

Anna Helman, Independent Stampin' Up!® Demonstrator

  • Email
  • Facebook
  • Facebook Group
  • Instagram
  • Pinterest
  • RSS
  • Twitter
  • YouTube

Get Ideas, Inspiration, and Special Offers!

Sign up to receive updates in your inbox

Thank you!

Please check your email for a special offer! 

.
All content on this blog is the property of Anna Helman, Stampin' Up!® Independent Demonstrator. Classes, services and projects offered here are not endorsed by Stampin' Up!® Projects, videos, photos, ideas and articles are shared for personal use only and may not be removed, duplicated or copied without permission. All artwork © Stampin' Up!®

Copyright © 2025 Anna Helman, handmake with love · Site Design by Catherine Carroll