• Nav Social Menu

    • Facebook
    • Facebook Group
    • Instagram
    • Pinterest
    • RSS
    • Twitter
    • YouTube

Handmake with Love

Anna Helman | formerly Scrapping, Stamping and Stuff

  • Blog
  • Start Here
    • About Me
    • Learn to Make Cards
    • Why Shop With Me?
    • Testimonials
    • Connect On Social
    • Get Email Updates
    • Stampin’ Up! Giveaway Winners
  • Products
    • Shop Now
    • Catalogs
    • Clearance
    • Why Choose Stampin Up?
    • Paper Pumpkin Kits
    • Product Shares
    • Rewards Program
    • Stamparatus
    • Cut And Emboss Machine
    • Mini Cut And Emboss Machine
    • Blends Alcohol Markers
    • Blending Brushes
  • Ideas
    • Video Tutorials
    • Project Gallery
    • Card Ideas
    • 3D Projects
    • Scrapbooking
    • Tips & Techniques
    • Kits
    • Learn to Make Cards
    • Printable Catalog Tabs
    • Social Media
  • Join
    • Join My Team
    • Stampin Up Demonstrator Resources
  • Classes
    • Classes in the Mail
    • In Person Events
  • Contact
    • Contact
    • Connect On Social

Amazing Slimline Shaker Card Tutorial

4 Feb

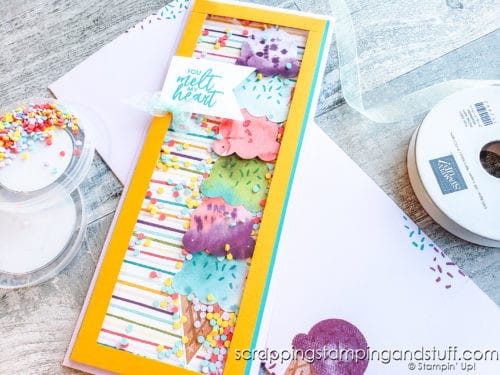
Hello, and thanks for being here with me today. I have an amazingly awesome mash-up of two very on-trend cards that I can’t wait to show you. This slimline shaker card is exactly what the title implies — a slimline card and a shaker card all in one. Both of these card styles are super popular, and I decided I needed to put them together with a fun, and really tall ice cream cone on the front! Hang with me for a bit, and I’ll share with you exactly how to create one of these cards.

Take a look at how to make this amazing slimline shaker card without special tools or dies!

Slimline Cards

If you don’t already know what a slimline card is, it is a long, skinny card that measure 3 1/2″ x 8 1/2″ instead of the normal 5 1/2″ x 4 1/4″ card front. It fits into a standard business-size envelope, and since it doesn’t fit in a regular envelope, I’ll share with you how to make a custom envelops for this type of card.

Take a look at how to make this amazing slimline shaker card without special tools or dies!

Why We Love Them

So, why is everyone so indulged with slimline cards? They are certainly all the rage these days, that’s for sure. I know one of the reasons I love these cards is because of their sleek shape. They fit in the hand nicely, they definitely make a bigger impact than a traditional A2 size card, plus I can create new and exciting layouts and designs with these cards because of the long skinny shape.

Slimline Card & Envelope Tutorial

Here’s a tutorial I’ve already shared about slimline cards. In it I share how to create a slimline card as well as how to custom make an envelope for your slimline card.
Now let’s talk about shaker cards and how to create an amazing birthday slimline shaker card.

Shaker Cards

Shaker cards, the name just sounds fun, doesn’t it? I know when I see a shaker card, the first thing I do is shake it — it’s just a natural reaction. I enjoy the fun of watching the confetti, sand, gems or whatever else might be in it, shake all around. If you don’t know what I’m talking about right now, a shaker card is a unique card that allows pieces of confetti, gems, etc. to float and shake freely in the card. Shaker cards are perfect for celebratory occasions such as birthdays or graduations. They bring the joy of throwing confetti without all the mess!

Take a look at how to make this amazing slimline shaker card without special tools or dies!

Slimline Shaker Card Tutorial

Below is a list of paper materials and measurements to make this slimline shaker card.

Paper Materials & Measurements

  • 7″ x 8 1/2″, scored at 3 1/2″ Purple Posy Card Base
  • 2 – 3 1/4″ x 8 1/4″ Bermuda Bay cardstock
  • 3″ x 8″ Ice Cream Corner Designer Series Paper
  • 3 1/8″ x 8 1/8″ White cardstock
  • 2 – 3/8″ x 3 1/8″ Mango Melody cardstock
  • 2 – 3/8″ x 7 3/8″ Mango Melody cardstock
  • 3″ x  8″ Window Sheet
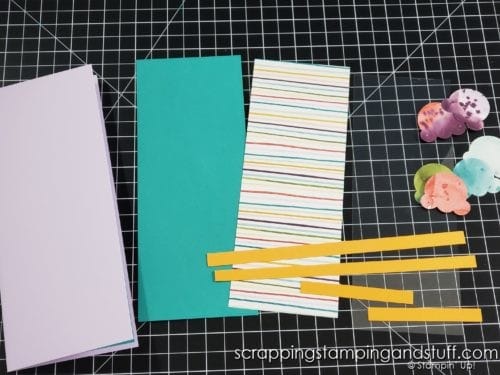
Building the Base

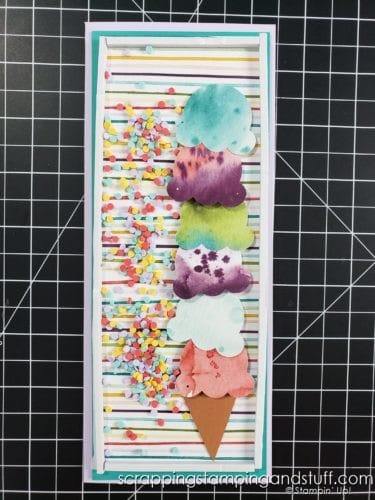
First, start by gluing the two Bermuda Bay cardstock pieces onto the card base, one on the inside and one on the outside of the card. Next, glue the white cardstock piece on the inside of the card, on top of the Bermuda Bay piece. Adhere the Ice Cream Corner Designer Series Paper (I used the striped option) onto the card front.

Take a look at how to make this amazing slimline shaker card without special tools or dies!

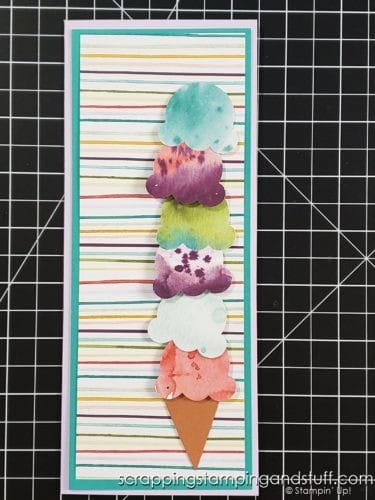
Next, let’s decorate the front. Reach for your Ice Cream Builder Punch and punch out seven ice cream scoops from the Ice Cream Corner Designer Paper (you’ll use six of these for the front and one for the inside). You can stamp sprinkles onto the scoops if you like — I did! Next punch out the ice cream cone, and stamp on the details. Adhere your ice cream scoops and cone in any way you wish to the front of the card. Check out how I positioned mine below.

Take a look at how to make this amazing slimline shaker card without special tools or dies!

Making the Shaker Portion

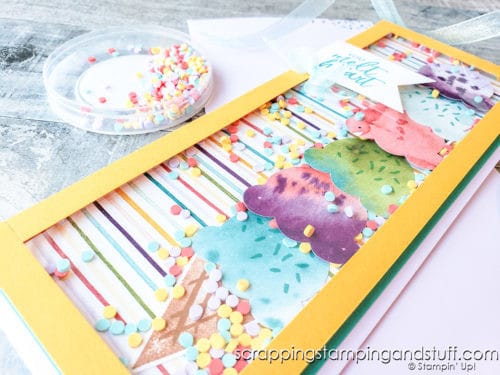
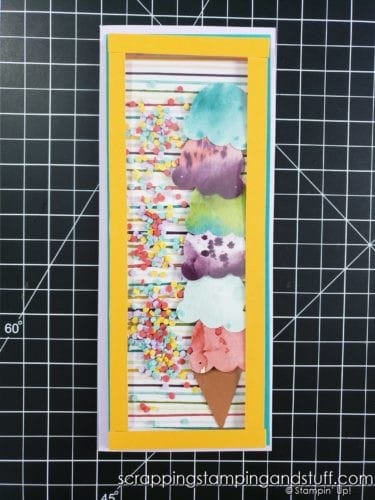
Let’s get started making the “shaker” portion of the card. Reach for your foam adhesive strips and attach them to the perimeter of the Ice Cream Corner Designer Paper. Add the sprinkles to the inside like I’ve shown in the picture below.

Take a look at how to make this amazing slimline shaker card without special tools or dies!

Next, remove paper backing from the foam strips and adhere the window sheet on top of the strips. With your Multi Purpose glue, add the Mango Melody cardstock strips on top of the window sheet.

Take a look at how to make this amazing slimline shaker card without special tools or dies!

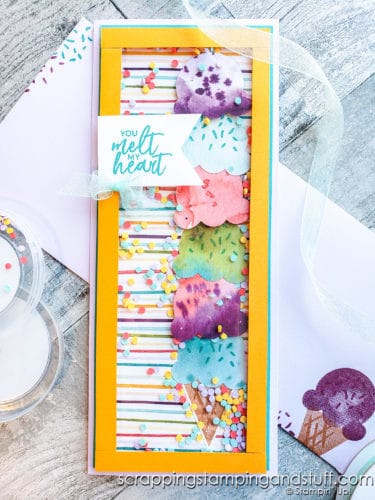
Now decorate with a sentiment and bow. See that adorable tiny bow that I used? I created it using a fork. If you want to know how to do this, or if you have trouble tying bows, check out my blog post and video, “How to Tie a Bow for Cards, Crafts or Gifts – 10 Tips for Tying a Perfect Bow Every Time”.

Here’s a picture of the finished product. Isn’t it just adorable?

Take a look at how to make this amazing slimline shaker card without special tools or dies!

I absolutely love slimline cards — and to turn one into a shaker card makes it even more special. I hope you’ve enjoyed today’s tutorial. Comment below with other ideas of what you would fill a shaker card with — I’d love to hear your ideas!

Take a look at how to make this amazing slimline shaker card without special tools or dies!

Slimline Shaker Card Video Tutorial

I’ve created a video of how to make this slimline shaker card if you’d like to watch along!

Don’t Miss Out!

Please make me your Stampin’ Up! demonstrator!  Earn rewards points towards free stamps PLUS a gift when you order. Use host code: Z23U72JU PLUS, with your first order, you’ll receive free catalogs in your thank you package!

Save hours of frustration in your craft room with this one little card making tool - the Stampin Pierce Mat!

Order the products I used and make this project yourself!

Sweet Ice Cream Photopolymer Stamp Set

Sweet Ice Cream Photopolymer Stamp Set
[154456]

Ice Cream Cone Builder Punch

Ice Cream Cone Builder Punch
[154241]

Ice Cream Corner Designer Series Paper

Ice Cream Corner Designer Series Paper
[154567]

Window Sheets

Window Sheets
[142314]

Purple Posy 8-1/2" X 11" Cardstock

Purple Posy 8-1/2″ X 11″ Cardstock
[150881]

Bermuda Bay 8-1/2" X 11" Cardstock

Bermuda Bay 8-1/2″ X 11″ Cardstock
[131197]

Mango Melody 8-1/2" X 11" Cardstock

Mango Melody 8-1/2″ X 11″ Cardstock
[146989]

Whisper White 8-1/2" X 11" Cardstock

Whisper White 8-1/2″ X 11″ Cardstock
[100730]

Foam Adhesive Strips

Foam Adhesive Strips
[141825]

Ice Cream Corner Sprinkles

Ice Cream Corner Sprinkles
[154568]

Stampin' Seal+

Stampin’ Seal+
[149699]

Multipurpose Liquid Glue

Multipurpose Liquid Glue
[110755]

Your Might Also Like:

Stampin Up Sweet Ice Cream Bundle & A Shaker Card Tutorial

Gel Water Shaker Card – OSAT Blog Hop

Stampin Up Many Messages Makes Hundreds Of Tags In Minutes!

Sharing is caring!

Filed Under: Cards, Gallery Tagged With: 2021 January-June Mini Catalog, birthday, ice cream corner designer paper, shaker card, slimline cards, Sweet Ice Cream Bundle

Previous Post: « The Stampin Pierce Mat Saves Hours of Frustration!
Next Post: Awesome Go-To Card Design For Quick, Beautiful Cards »

Reader Interactions

Trackbacks

  1. A Big, Bold Butterfly Shaker Card With The Butterfly Brilliance Bundle says:
    March 6, 2021 at 5:04 AM

    […] Amazing Slimline Shaker Card Tutorial […]

    Reply

Leave a Reply Cancel reply

Your email address will not be published. Required fields are marked *

Recipe Rating


Primary Sidebar

Anna Helman

Independent Stampin' Up!® Demonstrator

  • Email
  • Facebook
  • Facebook Group
  • Instagram
  • Pinterest
  • RSS
  • Twitter
  • YouTube
Shop Stampin' Up!
Stampin' Up! catalogs
get updates
join Stampin' Up!
Stampin' Up! Rewards
Stampin' Up! special offers
Stampin' Up! clearance
Stampin' Up! 2025-2026 Annual Catalog
May 6, 2025 - May 4, 2026
View Online | Shop Online

Blog Archive

Categories

Footer

Important Links

  • Home
  • Shop Now
  • Get Updates
  • Join My Team
  • Rewards
  • Specials
  • Catalogs
  • Clearance

Anna Helman, Independent Stampin' Up!® Demonstrator

  • Email
  • Facebook
  • Facebook Group
  • Instagram
  • Pinterest
  • RSS
  • Twitter
  • YouTube

Get Ideas, Inspiration, and Special Offers!

Sign up to receive updates in your inbox

Thank you!

Please check your email for a special offer! 

.
All content on this blog is the property of Anna Helman, Stampin' Up!® Independent Demonstrator. Classes, services and projects offered here are not endorsed by Stampin' Up!® Projects, videos, photos, ideas and articles are shared for personal use only and may not be removed, duplicated or copied without permission. All artwork © Stampin' Up!®

Copyright © 2025 Anna Helman, handmake with love · Site Design by Catherine Carroll