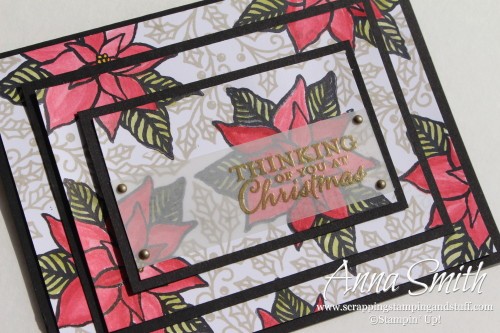
My ‘need to try’ stamping is long. Really long. I don’t think there’s enough time in this lifetime to do everything I want to with stamping! There are so many neat techniques, and many more yet to be invented, that I’ll just never get it all done! The good news- I just checked one ‘need to try’ off of my list- triple stamping (or triple step stamping).
I thought this technique would look nice with the poinsettias from our Reason for the Season stamp set. Here is my triple stamped poinsettia card.

The most complicated part of this technique is cutting cardstock to the correct sizes. It’s not hard- it just takes a minute or two. The dimensions of cardstock that I used are as follows.
Basic Black-
- 8 1/2 x 5 1/2″ (folded in half for card base)
- 3 1/4 x 4 1/2″
- 2 1/4 x 3 1/2″
Whisper White-
- 4 x 5 1/4″
- 3 x 4 1/4″
- 2 x 3 1/4″
Making the card is simple. First, I laid my three pieces of whisper white cardstock directly on top of one another, without any of the black cardstock in between. I used a little adhesive to hold them in place, but don’t use too much because you will be pulling the pieces back apart. I did all of the stamping on the white cardstock, then pulled the pieces apart and reassembled it with the black cardstock in between. I created the holly pattern in between the poinsettias using a stamp in the Embellished Ornaments stamp set.
I used a special technique to turn my silver mini brads to gold. Using tweezers to hold a brad, I touched it to the Versamark ink pad, then dipped it in gold embossing powder and heated it using my heat gun. In just a minute I had four gold brads!
The triple stamping technique could be beautiful using so many different stamp sets. I think the key is to pick a large image rather than a smaller one. Try it out and send me a pic!
Use the links below to shop for supplies. When you order, use hostess code 6RFN3PMW and I will send you a free gift!
Leave a Reply