• Nav Social Menu

    • Facebook
    • Facebook Group
    • Instagram
    • Pinterest
    • RSS
    • Twitter
    • YouTube

Handmake with Love

Anna Helman | formerly Scrapping, Stamping and Stuff

  • Blog
  • Start Here
    • About Me
    • Learn to Make Cards
    • Why Shop With Me?
    • Testimonials
    • Connect On Social
    • Get Email Updates
    • Stampin’ Up! Giveaway Winners
  • Products
    • Shop Now
    • Catalogs
    • Clearance
    • Why Choose Stampin Up?
    • Paper Pumpkin Kits
    • Product Shares
    • Rewards Program
    • Stamparatus
    • Cut And Emboss Machine
    • Mini Cut And Emboss Machine
    • Blends Alcohol Markers
    • Blending Brushes
  • Ideas
    • Video Tutorials
    • Project Gallery
    • Card Ideas
    • 3D Projects
    • Scrapbooking
    • Tips & Techniques
    • Kits
    • Learn to Make Cards
    • Printable Catalog Tabs
    • Social Media
  • Join
    • Join My Team
    • Stampin Up Demonstrator Resources
  • Classes
    • Classes in the Mail
    • In Person Events
  • Contact
    • Contact
    • Connect On Social

Blending Brushes And Embossing Make For Stunning And Simple Cards

20 Feb

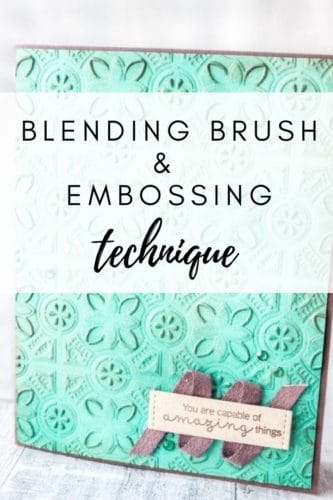
Blending brushes have become one of my favorite new tools to use on my card projects, and dry embossing using embossing folders is one of my old favorite techniques. I have a really neat technique I want to share with you today mixing the two together. The results are truly gorgeous, and will give your handmade cards that extra special touch. Let’s get started!

Have you ever combined blending brushes and embossing on your card projects? This technique is simple to use, and makes for stunning projects.

Let’s talk first about embossing in case we have any new papercrafters in the crowd today who aren’t familiar with this technique.

Embossing

Embossing is a beautiful technique often used in papercrafting which involves raising certain portions of the paper vertically to create texture in a particular design. To achieve this you’ll need a Cut & Emboss Machine as well as Embossing Folders. Click here to learn more about the fun of embossing. Here’s an example of a card I’ve embossed.

Make amazing chicken cards with the Stampin Up Hey Chick chicken stamp set and dies!

The other tool I used for today’s technique is blending brushes. Now, let’s talk about them!

Blending Brushes

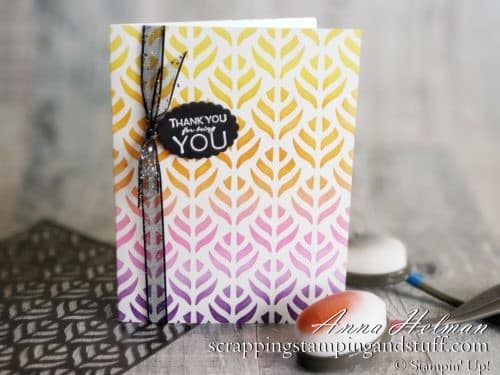
Blending brushes are tools that allows you to apply soft and even color to your projects using the ink colors already in your collection. Using a swirling motion, apply a brush to an ink pad to pick up color. Then, use the same circular pattern to begin applying color to your paper project, starting at the edges and moving inward. Whether you use one color or blend several together, the end result is beautiful. Below is an example of a card I created using blending brushes.

Stampin Up Blending Brushes are an amazing tool for blending ink with soft, even, and beautiful results.

Here’s the fun part…let’s put embossing and blending brushes together and see what we can create!

Using Blending Brushes And Embossing Together

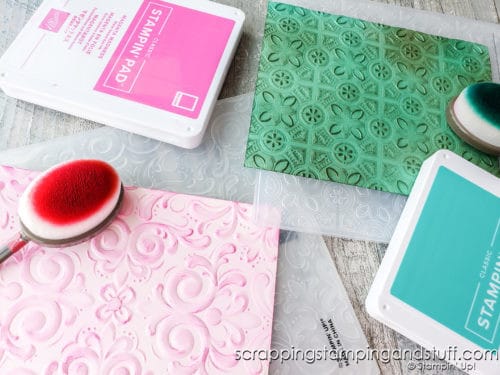
When using this technique, first decide the type of embossing folder you’d like to use. Begin by embossing the cardstock with your Cut & Emboss Machine or Mini Cut & Emboss Machine. Next, reach for your Blending Brushes and ink. Pick up ink onto the brushes with a gentle swirling motion as described in the video below, or in this blog post about blending brushes. With that same swirling motion, begin applying ink to the cardstock from the edges inward. As you do this, the raised portions of the paper will collect more ink, while the lower portions will receive less. This color variation in combination with the embossed texture is absolutely stunning!

Have you ever combined blending brushes and embossing on your card projects? This technique is simple to use, and makes for stunning projects.

Below are some helpful tips I’ve discovered while playing with this technique.

Blending Tips:

Dab Extra

Before applying ink with Blending Brush, first dab off the extra ink onto a scrap piece of paper. This keeps having a dark blob of ink on your beautiful project.

Use Varying Pressure

You can explore and experiment by applying more or less pressure. The amount of pressure can change the look of your project. Do some experimenting to see what you like best. I found that when using blending brushes with embossed paper, I actually prefer to apply very light pressure. This helped get more ink onto the raised portions while keeping the lower areas closer to the original color, for more overall color variation.

Layer Colors

Feel free to mix and match colors when applying with the Blending Brushes. You can evenly blend the colors across the project or apply certain colors only in specific areas. This will add depth, highlights and variation.

Video Tutorial

If you want to see exactly how to use Blending Brushes with embossing and get more of an explanation on today’s card projects, watch along with my video below.

Now let’s look at my card samples up close.

Blending Brushes And Embossing Sample Projects

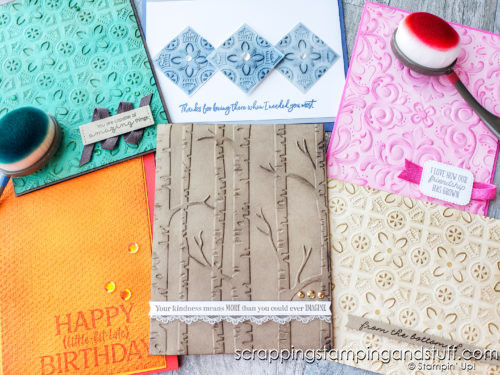
Below are samples of cards I created using this same blending brush and embossing technique. Have a look, and for more information on each including the colors of cardstock and ink used, make sure to watch along with the video above.

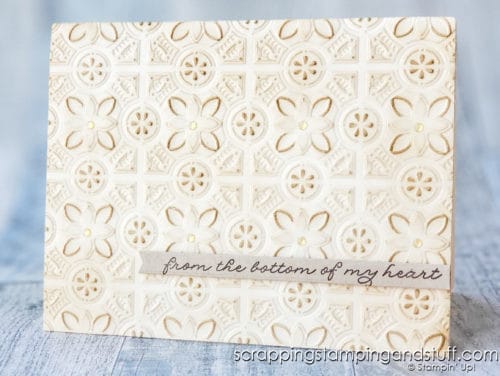
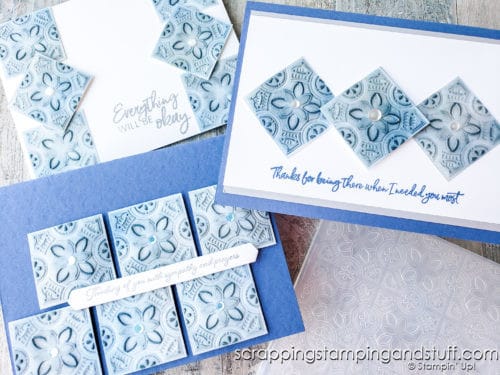
These first few samples use the Tin Tile embossing folder. These are just gorgeous in person!

Have you ever combined blending brushes and embossing on your card projects? This technique is simple to use, and makes for stunning projects.

Have you ever combined blending brushes and embossing on your card projects? This technique is simple to use, and makes for stunning projects.

Have you ever combined blending brushes and embossing on your card projects? This technique is simple to use, and makes for stunning projects.

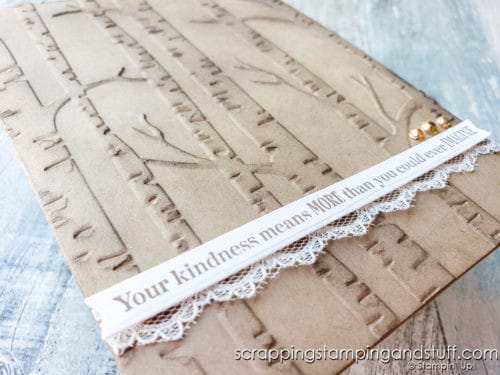
This next card uses the Woodland embossing folder. Depending on the colors used with this one, it can be great for winter, warmer months, fall, and Halloween too! Mine is a neutral sample that would be appropriate anytime of the year.

Have you ever combined blending brushes and embossing on your card projects? This technique is simple to use, and makes for stunning projects.

Here’s a collection of several of the cards I created using this technique. The pink card on the right uses the Parisian Flourish embossing folder, the one in the center is the Evergreen Forest Embossing folder, and the one at left uses the Tasteful Textile folder. Have you ever combined blending brushes and embossing on your card projects? This technique is simple to use, and makes for stunning projects.

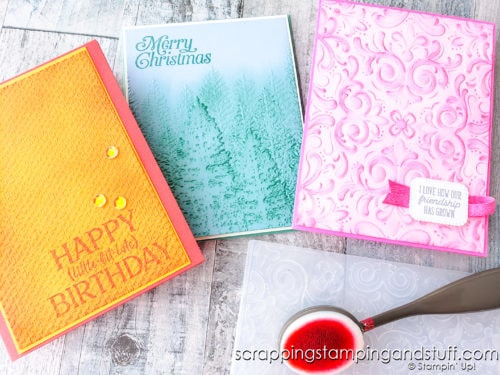
Aren’t these stunning?! As usual, you can’t appreciate the beauty of these cards unless you see them in person or make some yourself!

Have you ever combined blending brushes and embossing on your card projects? This technique is simple to use, and makes for stunning projects.
This is one of my favorite new techniques, and I can’t wait to play around with it more. I love the detail that comes alive when adding ink with the blending brushes. Try it yourself and experience the excitement!!

Don’t Miss Out!

Please make me your Stampin’ Up! demonstrator!  Earn rewards points towards free stamps PLUS a gift when you order. Use host code: Z23U72JU PLUS, with your first order, you’ll receive free catalogs in your thank you package!

Save hours of frustration in your craft room with this one little card making tool - the Stampin Pierce Mat!

Shopping during Sale–a–bration comes with many benefits!

  • For every $50 that you order, choose a free gift from the Sale–a–bration brochure. Order $100 and choose two items (or one of the special items only available with a $100 order)! Order $150 and choose three free items plus regular hostess benefits!
  • Host a party with over $300 in sales and you will get the exclusive Punch Party stamp set for free!
  • Sign up with Stampin’ Up! and choose $125 of products for just $99! In addition, you will receive free shipping, extra goodies from Stampin Up and FIVE full packs of 6″x6″ designer paper! What an amazing offer! I signed up during Sale–a–bration seven years ago. Best decision ever!

Order Products to make this Project Yourself:

Stampin' Cut & Emboss Machine

Stampin’ Cut & Emboss Machine
[149653]

Blending Brushes

Blending Brushes
[153611]

Scripty 3D Embossing Folder

Scripty 3D Embossing Folder
[149634]

Brick & Mortar 3D Embossing Folder

Brick & Mortar 3D Embossing Folder
[149643]

Woodland Embossing Folder

Woodland Embossing Folder
[139673]

Parisian Flourish 3D Embossing Folder

Parisian Flourish 3D Embossing Folder
[151474]

Tin Tile 3D Embossing Folder

Tin Tile 3D Embossing Folder
[151801]

Evergreen Forest 3D Embossing Folder

Evergreen Forest 3D Embossing Folder
[153576]

Tasteful Textile 3 D Embossing Folder

Tasteful Textile 3 D Embossing Folder
[152718]

Magenta Madness Classic Stampin' Pad

Magenta Madness Classic Stampin’ Pad
[153117]

Soft Suede Classic Stampin' Pad

Soft Suede Classic Stampin’ Pad
[147115]

Early Espresso Classic Stampin' Pad

Early Espresso Classic Stampin’ Pad
[147114]

Poppy Parade Classic Stampin' Pad

Poppy Parade Classic Stampin’ Pad
[147050]

Crumb Cake Classic Stampin' Pad

Crumb Cake Classic Stampin’ Pad
[147116]

Smoky Slate Classic Stampin' Pad

Smoky Slate Classic Stampin’ Pad
[147113]

Misty Moonlight Classic Stampin' Pad

Misty Moonlight Classic Stampin’ Pad
[153118] 

You Might Also Like:

An Ombre Stamping Technique With The Stamparatus

Baby Wipe Technique And A Fun Birthday Card

How To Make A Watercolor Wash Background


Sharing is caring!

Filed Under: Gallery, Learn to Stamp Tagged With: 2021 January-June Mini Catalog, Blending Brushes, embossing, parisian flourish embossing folder, tasteful textile embossing folder, technique, tin tile embossing folder, tutorial, woodland embossing folder

Previous Post: « Step Stamping Stamparatus Technique
Next Post: Quadrant Card Design Allows You To Use BOTH Sides of Your Pretty Papers! »

Reader Interactions

Comments

  1. Kathryn A Fleming says

    February 20, 2021 at 12:10 PM

    Anna- you looked absolutely beautiful in this video! I also love your new technique- and can’t wait to try it. Thanks for keeping us learning and loving card making.

    Reply

Trackbacks

  1. Stampin Up Basic Borders Dies & 6 Ways To Use Borders Dies says:
    May 1, 2021 at 5:01 AM

    […] instead of using the pieces themselves on the card? To create this effect, I reached for my blending brushes, some ink and a scrap piece of paper. I die cut the cloud border, then blended around it to create […]

    Reply

Leave a Reply Cancel reply

Your email address will not be published. Required fields are marked *

Recipe Rating


Primary Sidebar

Anna Helman

Independent Stampin' Up!® Demonstrator

  • Email
  • Facebook
  • Facebook Group
  • Instagram
  • Pinterest
  • RSS
  • Twitter
  • YouTube
Shop Stampin' Up!
Stampin' Up! catalogs
get updates
join Stampin' Up!
Stampin' Up! Rewards
Stampin' Up! special offers
Stampin' Up! clearance
Stampin' Up! 2025-2026 Annual Catalog
May 6, 2025 - May 4, 2026
View Online | Shop Online

Blog Archive

Categories

Footer

Important Links

  • Home
  • Shop Now
  • Get Updates
  • Join My Team
  • Rewards
  • Specials
  • Catalogs
  • Clearance

Anna Helman, Independent Stampin' Up!® Demonstrator

  • Email
  • Facebook
  • Facebook Group
  • Instagram
  • Pinterest
  • RSS
  • Twitter
  • YouTube

Get Ideas, Inspiration, and Special Offers!

Sign up to receive updates in your inbox

Thank you!

Please check your email for a special offer! 

.
All content on this blog is the property of Anna Helman, Stampin' Up!® Independent Demonstrator. Classes, services and projects offered here are not endorsed by Stampin' Up!® Projects, videos, photos, ideas and articles are shared for personal use only and may not be removed, duplicated or copied without permission. All artwork © Stampin' Up!®

Copyright © 2025 Anna Helman, handmake with love · Site Design by Catherine Carroll