• Nav Social Menu

    • Facebook
    • Facebook Group
    • Instagram
    • Pinterest
    • RSS
    • Twitter
    • YouTube

Handmake with Love

Anna Helman | formerly Scrapping, Stamping and Stuff

  • Blog
  • Start Here
    • About Me
    • Learn to Make Cards
    • Why Shop With Me?
    • Testimonials
    • Connect On Social
    • Get Email Updates
    • Stampin’ Up! Giveaway Winners
  • Products
    • Shop Now
    • Catalogs
    • Clearance
    • Why Choose Stampin Up?
    • Paper Pumpkin Kits
    • Product Shares
    • Rewards Program
    • Stamparatus
    • Cut And Emboss Machine
    • Mini Cut And Emboss Machine
    • Blends Alcohol Markers
    • Blending Brushes
  • Ideas
    • Video Tutorials
    • Project Gallery
    • Card Ideas
    • 3D Projects
    • Scrapbooking
    • Tips & Techniques
    • Kits
    • Learn to Make Cards
    • Printable Catalog Tabs
    • Social Media
  • Join
    • Join My Team
    • Stampin Up Demonstrator Resources
  • Classes
    • Classes in the Mail
    • In Person Events
  • Contact
    • Contact
    • Connect On Social

Watercolor Wings Thank You

14 Jul

Who doesn’t love butterflies? They’re just so full of color and beauty. If you’re a butterfly lover like me, you should love today’s card and the Watercolor Wings stamp set I used to make it.

Our new Watercolor Wings stamp set is pretty fantastic. If you haven’t seen it, it’s my stamp set of the month this month. Check it out here.

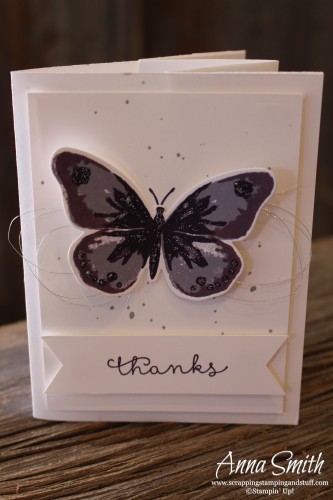
Here is the front of the card. Purple is my favorite and this makes me happy 🙂

Watercolor Wings Thank You

Here is the inside of the card. This is called a tunnel card and it’s really very simple to make.

Watercolor Wings Thank You

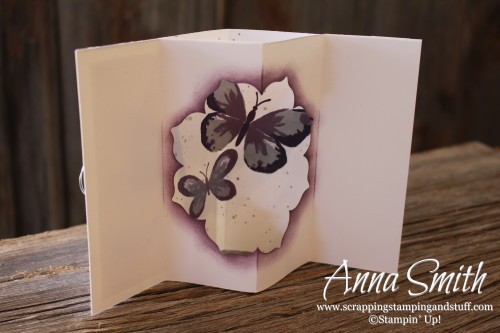
Here’s how to make a tunnel card. You need two pieces of cardstock that measure 5 1/2 x 8 1/2″. Die cut a shape out of the center of the first piece. Then score it at 2 1/8, 4 1/4, and 6 3/8″. In the center of the other piece of cardstock, stamp the images that will show through the die cut area. Then score it at 4 1/4″. Attach the two pieces together, using adhesive only on the left flap and right flap,  not the two center sections. When you fold the card, encourage the center to fold outward.

That’s it for today’s watercolor wings thank you card. Try making a tunnel card yourself and let me know how it goes!

Built for Free Using: My Stampin Blog

Sharing is caring!

Filed Under: Cards Tagged With: banner punch, bold butterfly thinlits, cottage greetings, fancy fold, watercolor wings

Previous Post: « Tin of Cards Thank You
Next Post: Party Time Scrapbook Page »

Reader Interactions

Leave a Reply Cancel reply

Your email address will not be published. Required fields are marked *

Recipe Rating


Primary Sidebar

Anna Helman

Independent Stampin' Up!® Demonstrator

  • Email
  • Facebook
  • Facebook Group
  • Instagram
  • Pinterest
  • RSS
  • Twitter
  • YouTube
Shop Stampin' Up!
Stampin' Up! catalogs
get updates
join Stampin' Up!
Stampin' Up! Rewards
Stampin' Up! special offers
Stampin' Up! clearance
Stampin' Up! 2025-2026 Annual Catalog
May 6, 2025 - May 4, 2026
View Online | Shop Online

Blog Archive

Categories

Footer

Important Links

  • Home
  • Shop Now
  • Get Updates
  • Join My Team
  • Rewards
  • Specials
  • Catalogs
  • Clearance

Anna Helman, Independent Stampin' Up!® Demonstrator

  • Email
  • Facebook
  • Facebook Group
  • Instagram
  • Pinterest
  • RSS
  • Twitter
  • YouTube

Get Ideas, Inspiration, and Special Offers!

Sign up to receive updates in your inbox

Thank you!

Please check your email for a special offer! 

.
All content on this blog is the property of Anna Helman, Stampin' Up!® Independent Demonstrator. Classes, services and projects offered here are not endorsed by Stampin' Up!® Projects, videos, photos, ideas and articles are shared for personal use only and may not be removed, duplicated or copied without permission. All artwork © Stampin' Up!®

Copyright © 2025 Anna Helman, handmake with love · Site Design by Catherine Carroll