• Nav Social Menu

    • Facebook
    • Facebook Group
    • Instagram
    • Pinterest
    • RSS
    • Twitter
    • YouTube

Handmake with Love

Anna Helman | formerly Scrapping, Stamping and Stuff

  • Blog
  • Start Here
    • About Me
    • Learn to Make Cards
    • Why Shop With Me?
    • Testimonials
    • Connect On Social
    • Get Email Updates
    • Stampin’ Up! Giveaway Winners
  • Products
    • Shop Now
    • Catalogs
    • Clearance
    • Why Choose Stampin Up?
    • Paper Pumpkin Kits
    • Product Shares
    • Rewards Program
    • Stamparatus
    • Cut And Emboss Machine
    • Mini Cut And Emboss Machine
    • Blends Alcohol Markers
    • Blending Brushes
  • Ideas
    • Video Tutorials
    • Project Gallery
    • Card Ideas
    • 3D Projects
    • Scrapbooking
    • Tips & Techniques
    • Kits
    • Learn to Make Cards
    • Printable Catalog Tabs
    • Social Media
  • Join
    • Join My Team
    • Stampin Up Demonstrator Resources
  • Classes
    • Classes in the Mail
    • In Person Events
  • Contact
    • Contact
    • Connect On Social

Tuesday Tip: 3 Best Tips for Masking

15 Nov

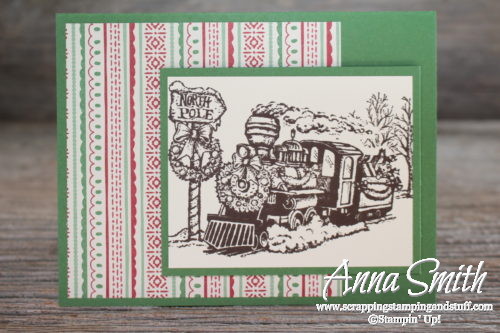
Hi all, it’s Tuesday! For today’s tip, I have an easy technique to share with you that can make for gorgeous cards. The technique is called masking – covering up part of your card while stamping, then removing the ‘mask’ to reveal amazing beauty! Keep reading to the bottom for my 3 best tips for masking. Here is the card I’ll be making for demonstration.

Tuesday Tip: Masking Technique and Tips with the Christmas Magic train stamp set

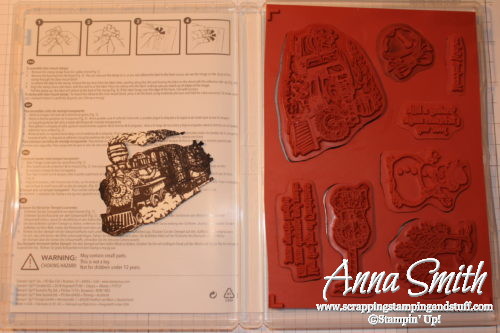
I’ll be using the Christmas Magic stamp set. This set comes with really neat stamps, including the train, North Pole post, trees, an old-timey snowman, large jingle bell, and a few greetings.

img_9711

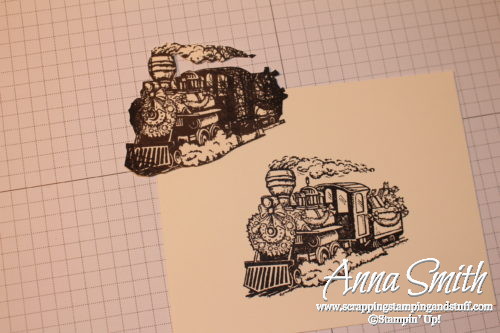
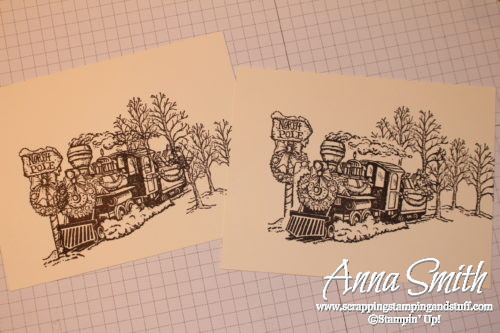
I wanted to stamp a scene using a few of the stamps. Below, you can see what I created.

Tuesday Tip stamping technique tutorial - tips and tricks for masking images. Sample card shown using the Christmas magic train stamp set.

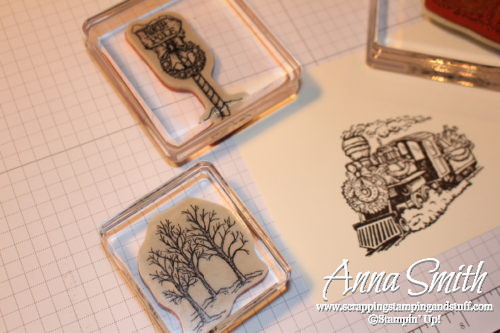
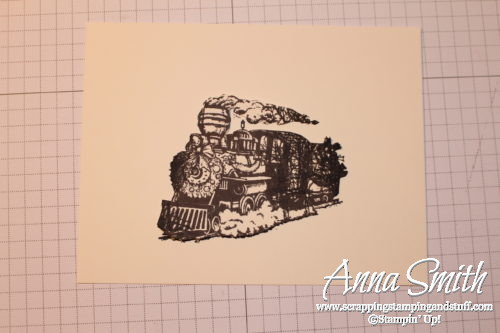
It just doesn’t look right, does it? The problem in the image above is when images overlap, you lose the sense of realism. There’s no depth, because all of the images show through each other instead of some being in front of others. Masking is an easy way to solve the problem. In this case, I’m making a mask to cover the train. As you can see in the photo, I stamped one train on the card front, and a second one on separate cardstock, which I then cut out.

Tuesday Tip stamping technique tutorial - tips and tricks for masking images. Sample card shown using the Christmas magic train stamp set.

Here, I have covered up the stamped train with the mask. Next, while holding it in place, I’ll stamp the other images around it.

Tuesday Tip stamping technique tutorial - tips and tricks for masking images. Sample card shown using the Christmas magic train stamp set.

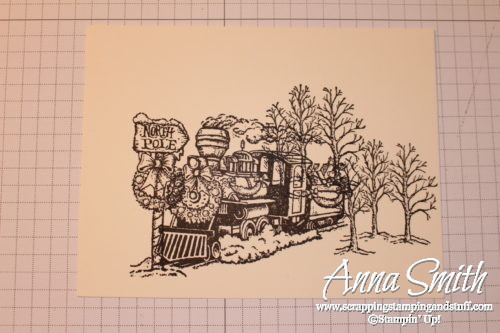
After stamping the North Pole sign and trees, I removed the mask and voila!

Tuesday Tip stamping technique tutorial - tips and tricks for masking images. Sample card shown using the Christmas magic train stamp set.

Here are the unmasked and masked scenes shown side by side. The one on the right clearly looks more realistic.

Tuesday Tip stamping technique tutorial - tips and tricks for masking images. Sample card shown using the Christmas magic train stamp set.

Now that you’ve waited long enough, here are my 3 best tips for masking.

  1. Create your mask on sticky notes, or place repositionable adhesive on the back of the mask. This will allow you to stick it temporarily to the paper so it doesn’t move while you stamp over them.
  2. Keep your mask in the appropriate stamp case, so that next time you want it it’s right there with the matching stamp.
  3. Don’t get too worked up about cutting absolutely perfectly around your mask. In my opinion, it’s better to cut slightly inside the edge of your stamped image than outside. If you cut outside the lines, you would end up with white space around the edges after you do your masked stamping.

Tuesday Tip stamping technique tutorial - tips and tricks for masking images. Sample card shown using the Christmas magic train stamp set.

Here’s the card I created using our beautiful This Christmas designer paper.

Tuesday Tip: Masking Technique and Tips with the Christmas Magic train stamp set

Isn’t this vintage train stamp fantastic?

Tuesday Tip: Masking Technique and Tips with the Christmas Magic train stamp set

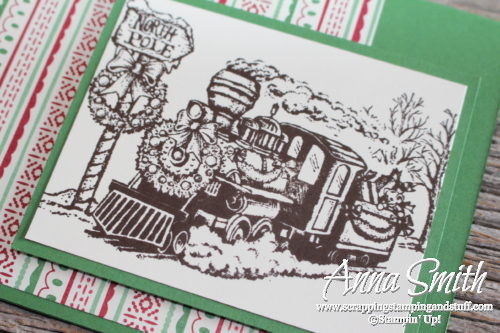
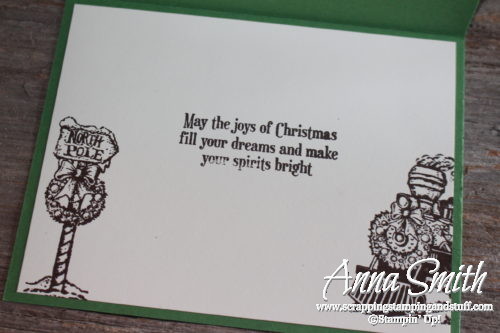
I stamped the train and North Pole sign on the inside of the card as well, along with the greeting.

Tuesday Tip: Masking Technique and Tips with the Christmas Magic train stamp set

Please shop with me and combine these offers to get great deals!

  • Use hostess code VPNDERW4 during the month of November and I will send you a free gift!
  • Keep track of your Stampin’ Rewards and earn free stamps from me!
  • Any purchase of $150 or more will earn you hostess credit through Stampin’ Up!
  • Join online stamp club and get free products and projects.

Order the products I used and make this card yourself!

Christmas Magic Wood-Mount Stamp Set

Christmas Magic Wood-Mount Stamp Set
[142116]

Christmas Magic Clear-Mount Stamp Set

Christmas Magic Clear-Mount Stamp Set
[142119]

This Christmas Designer Series Specialty Paper

This Christmas Designer Series Specialty Paper
[141628]

This Christmas 8-1/2" X 11" Cardstock

This Christmas 8-1/2″ X 11″ Cardstock
[141629]

Early Espresso Classic Stampin' Pad

Early Espresso Classic Stampin’ Pad
[126974]

Stampin' Trimmer

Stampin’ Trimmer
[126889]

SNAIL Permanent Adhesive

SNAIL Permanent Adhesive
[104332]

Stampin' Dimensionals

Stampin’ Dimensionals
[104430]

Sharing is caring!

Filed Under: Cards Tagged With: 2016 holiday catalog, annual catalog 2016-2017, Christmas, christmas magic, technique, this christmas dsp, tutorial

Previous Post: « Handmade Gift Boxes and Team Member Gifts
Next Post: Flower Patch Encouragement Cards for Cancer Patients »

Reader Interactions

Trackbacks

  1. Flower Patch Encouragement Cards for Cancer Patients - Scrapping Stamping and Stuff says:
    November 17, 2016 at 4:00 AM

    […] ← Tuesday Tip: 3 Best Tips for Masking […]

    Reply

Leave a Reply Cancel reply

Your email address will not be published. Required fields are marked *

Recipe Rating


Primary Sidebar

Anna Helman

Independent Stampin' Up!® Demonstrator

  • Email
  • Facebook
  • Facebook Group
  • Instagram
  • Pinterest
  • RSS
  • Twitter
  • YouTube
Shop Stampin' Up!
Stampin' Up! catalogs
get updates
join Stampin' Up!
Stampin' Up! Rewards
Stampin' Up! special offers
Stampin' Up! clearance
Stampin' Up! 2025-2026 Annual Catalog
May 6, 2025 - May 4, 2026
View Online | Shop Online

Blog Archive

Categories

Footer

Important Links

  • Home
  • Shop Now
  • Get Updates
  • Join My Team
  • Rewards
  • Specials
  • Catalogs
  • Clearance

Anna Helman, Independent Stampin' Up!® Demonstrator

  • Email
  • Facebook
  • Facebook Group
  • Instagram
  • Pinterest
  • RSS
  • Twitter
  • YouTube

Get Ideas, Inspiration, and Special Offers!

Sign up to receive updates in your inbox

Thank you!

Please check your email for a special offer! 

.
All content on this blog is the property of Anna Helman, Stampin' Up!® Independent Demonstrator. Classes, services and projects offered here are not endorsed by Stampin' Up!® Projects, videos, photos, ideas and articles are shared for personal use only and may not be removed, duplicated or copied without permission. All artwork © Stampin' Up!®

Copyright © 2025 Anna Helman, handmake with love · Site Design by Catherine Carroll