• Nav Social Menu

    • Facebook
    • Facebook Group
    • Instagram
    • Pinterest
    • RSS
    • Twitter
    • YouTube

Handmake with Love

Anna Helman | formerly Scrapping, Stamping and Stuff

  • Blog
  • Start Here
    • About Me
    • Learn to Make Cards
    • Why Shop With Me?
    • Testimonials
    • Connect On Social
    • Get Email Updates
    • Stampin’ Up! Giveaway Winners
  • Products
    • Shop Now
    • Catalogs
    • Clearance
    • Why Choose Stampin Up?
    • Paper Pumpkin Kits
    • Product Shares
    • Rewards Program
    • Stamparatus
    • Cut And Emboss Machine
    • Mini Cut And Emboss Machine
    • Blends Alcohol Markers
    • Blending Brushes
  • Ideas
    • Video Tutorials
    • Project Gallery
    • Card Ideas
    • 3D Projects
    • Scrapbooking
    • Tips & Techniques
    • Kits
    • Learn to Make Cards
    • Printable Catalog Tabs
    • Social Media
  • Join
    • Join My Team
    • Stampin Up Demonstrator Resources
  • Classes
    • Classes in the Mail
    • In Person Events
  • Contact
    • Contact
    • Connect On Social

How To Protect Punches

24 Dec

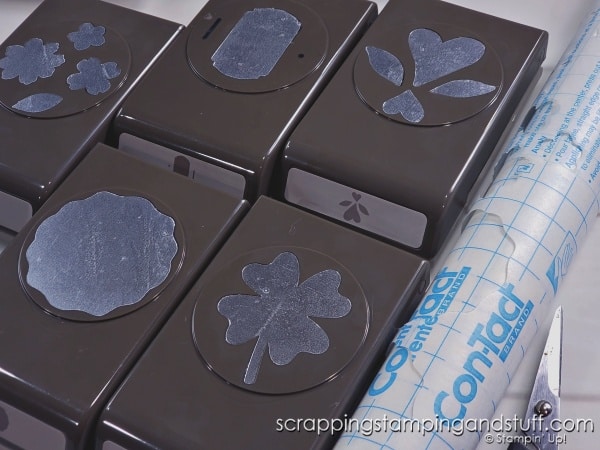
Does it bother you when the beautiful shiny silver on the top side of punches get scratched up and blemished? This drives me crazy! I’ve been working on a simple way to protect them, and today I want to share it with you.

Would you like to know how to protect punches from scratches and damage? Click to find a quick way to protect them and keep them looking like new!

Protect Punches With Contact Paper

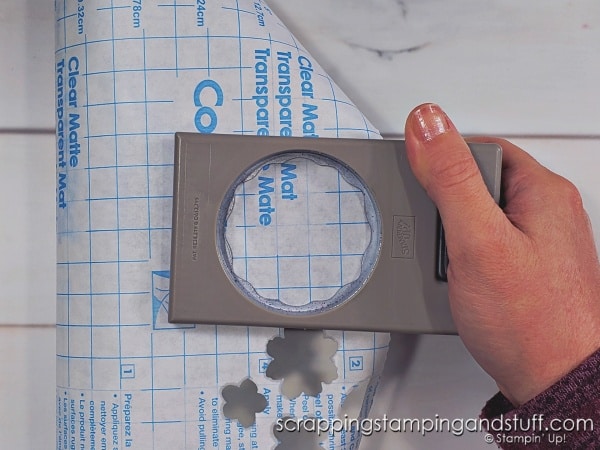
To protect your punches, simply punch through a piece of clear matte Contact Paper with your punch. Make sure the back side of the paper is visible through the punch, and if needed, you may need to layer it with some regular paper for it to punch properly.

Would you like to know how to protect punches from scratches and damage? Click to find a quick way to protect them and keep them looking like new!

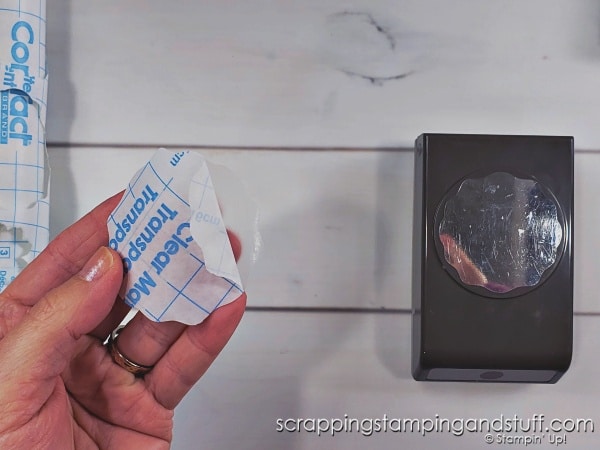
Peel back part of the backing, and fold it flat.

Would you like to know how to protect punches from scratches and damage? Click to find a quick way to protect them and keep them looking like new!

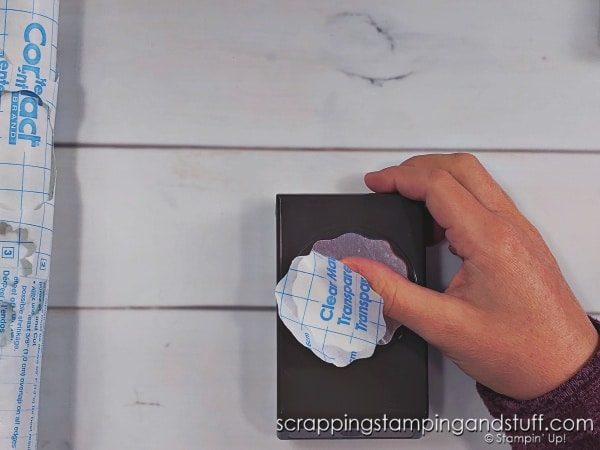
Line up the punch over top of the silver area and press the sticky portion down. Pull the paper backing while smoothing the sticky portion onto the punch.

Would you like to know how to protect punches from scratches and damage? Click to find a quick way to protect them and keep them looking like new!

Video Tutorial

For some tips and tricks for making this a breeze, watch along here.

One more thing – for all those punches in your collection that are already scratched up, no fear. This will make them look almost new! Do you want to get your punches working like new too? If so, take a look at this post!

Learn To Make Cards
Shop Supplies
Rewards Program
Join My Amazing Team

Now you know how to protect your punches and keep them looking like new!

Sharing is caring!

Filed Under: Gallery, Learn to Stamp Tagged With: cardmaking hacks, cardmaking tips and tricks, tips and tricks

Previous Post: « Get Letter Stamps STRAIGHT The Easy Way!
Next Post: December 2022 Paper Pumpkin Kit Alternatives! »

Reader Interactions

Comments

  1. Joan VanCourt says

    December 24, 2022 at 7:06 AM

    Wow, awesome tip!

    Reply
    • Anna Helman says

      December 24, 2022 at 12:42 PM

      Thanks Joan!

      Reply
  2. Paula Barclay says

    December 24, 2022 at 10:29 AM

    Another great idea. Thank you so much for not keeping all these wonderful ideas to yourself! Paula

    Reply
    • Anna Helman says

      December 24, 2022 at 12:42 PM

      You’re welcome!

      Reply
  3. Stephanie says

    December 24, 2022 at 11:30 AM

    GREAT IDEA.Thank you

    Reply
    • Anna Helman says

      December 24, 2022 at 12:41 PM

      You’re welcome Stephanie!

      Reply
  4. Pam Stephens says

    December 24, 2022 at 11:42 AM

    Great idea and I just bought a bunch of new punches. You share the best tips, thank you!

    Reply
    • Anna Helman says

      December 24, 2022 at 12:41 PM

      You’re welcome!

      Reply
  5. Ginny says

    December 24, 2022 at 11:49 AM

    Hi Anna, I really enjoy all your quick tips. Thank you.

    Reply
    • Anna Helman says

      December 24, 2022 at 12:41 PM

      Thanks Ginny!

      Reply

Leave a Reply Cancel reply

Your email address will not be published. Required fields are marked *

Recipe Rating


Primary Sidebar

Anna Helman

Independent Stampin' Up!® Demonstrator

  • Email
  • Facebook
  • Facebook Group
  • Instagram
  • Pinterest
  • RSS
  • Twitter
  • YouTube
Shop Stampin' Up!
Stampin' Up! catalogs
get updates
join Stampin' Up!
Stampin' Up! Rewards
Stampin' Up! special offers
Stampin' Up! clearance
Stampin' Up! 2025-2026 Annual Catalog
May 6, 2025 - May 4, 2026
View Online | Shop Online

Blog Archive

Categories

Footer

Important Links

  • Home
  • Shop Now
  • Get Updates
  • Join My Team
  • Rewards
  • Specials
  • Catalogs
  • Clearance

Anna Helman, Independent Stampin' Up!® Demonstrator

  • Email
  • Facebook
  • Facebook Group
  • Instagram
  • Pinterest
  • RSS
  • Twitter
  • YouTube

Get Ideas, Inspiration, and Special Offers!

Sign up to receive updates in your inbox

Thank you!

Please check your email for a special offer! 

.
All content on this blog is the property of Anna Helman, Stampin' Up!® Independent Demonstrator. Classes, services and projects offered here are not endorsed by Stampin' Up!® Projects, videos, photos, ideas and articles are shared for personal use only and may not be removed, duplicated or copied without permission. All artwork © Stampin' Up!®

Copyright © 2025 Anna Helman, handmake with love · Site Design by Catherine Carroll