• Nav Social Menu

    • Facebook
    • Facebook Group
    • Instagram
    • Pinterest
    • RSS
    • Twitter
    • YouTube

Handmake with Love

Anna Helman | formerly Scrapping, Stamping and Stuff

  • Blog
  • Start Here
    • About Me
    • Learn to Make Cards
    • Why Shop With Me?
    • Testimonials
    • Connect On Social
    • Get Email Updates
    • Stampin’ Up! Giveaway Winners
  • Products
    • Shop Now
    • Catalogs
    • Clearance
    • Why Choose Stampin Up?
    • Paper Pumpkin Kits
    • Product Shares
    • Rewards Program
    • Stamparatus
    • Cut And Emboss Machine
    • Mini Cut And Emboss Machine
    • Blends Alcohol Markers
    • Blending Brushes
  • Ideas
    • Video Tutorials
    • Project Gallery
    • Card Ideas
    • 3D Projects
    • Scrapbooking
    • Tips & Techniques
    • Kits
    • Learn to Make Cards
    • Printable Catalog Tabs
    • Social Media
  • Join
    • Join My Team
    • Stampin Up Demonstrator Resources
  • Classes
    • Classes in the Mail
    • In Person Events
  • Contact
    • Contact
    • Connect On Social

Don’t Throw Away That Trash!

29 May

There are a lot of reasons I wanted to start this blog, but one of the main reasons was to help people. I love being able to share useful tips and techniques I’ve learned along the way as I continue to travel through my crafting and stamping journey. One of those tips was a game changer in the way I store my rubber stamps, and I want to share it with you today. I also have a bonus tip to share related to how I label my rubber stamps. Let’s get started!

When assembling your new stamp sets, don't throw away that trash! Click for a quick tip, and you'll never throw away that trash again!

Rubber Stamp Storage Tip

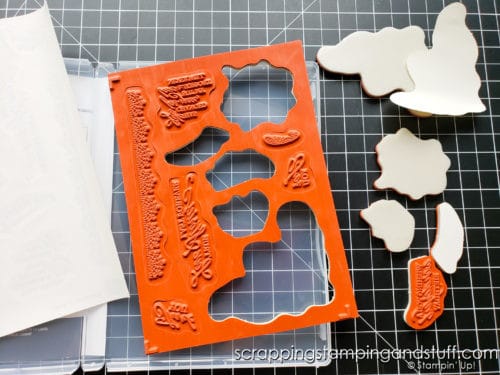
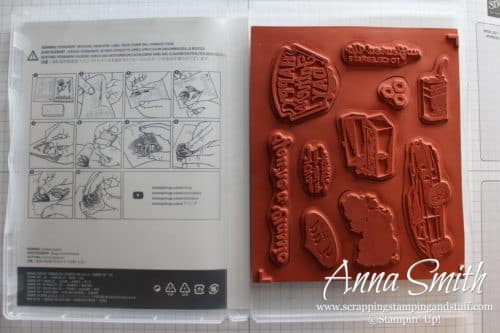
Before using this storage tip, I used to pop out my brand new stamps, label them, throw away the extra rubber rectangle ‘negative’ piece, and put them back into the case. Sounds normal right? But where I was going wrong was throwing away the ‘extra stuff.’ Don’t throw it away, KEEP IT!!!

Here’s Why:

When you keep the large rubber pad that your stamps come in, it creates the perfect template. It’s a great visual check for quickly knowing where each stamp should go. Why is this important? It gives you an easy way to check to make sure all stamps are back in the case before storing it away until the next time you use it. No guess work needed!

Your rubber stamps will never fall off your clear blocks again! Photo instructions for how to use Stampin' Up! Cling Stamps.

Prepping Your Rubber Stamps

Here’s the routine I like to follow each time I get new rubber stamps.

The first thing I do after opening the case is to peel off the paper backing from the stamps. After that, I pop out each individual stamp. I place the rubber rectangle, foam side down, on the inside of the case. Next, I apply labels to the stamps. I have a great tip for easily and perfectly labeling your stamps, that I’ll share in the next section.

 How to Perfectly Label Rubber Stamps

This labeling trick is so helpful when it comes to preparing new stamps. For more details and a quick video, check out this post for how to label your stamps perfectly every time.

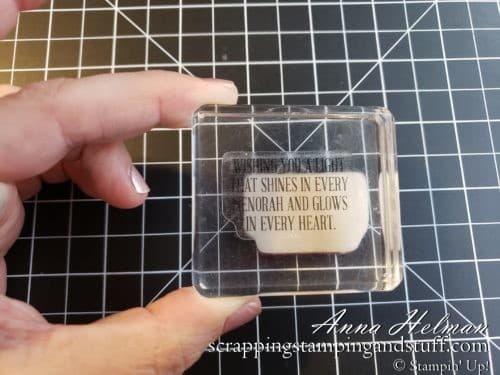
First reach for your label sheet. Peel off one label, along with the paper backing still attached. Find the corresponding stamp. Next, grab an acrylic block and very gently stick the label onto it. Remove the paper backing. I like to use my Take Your Pick tool to do this.

Use this quick card making tip and you will be able to place labels on rubber stamps perfectly every time!

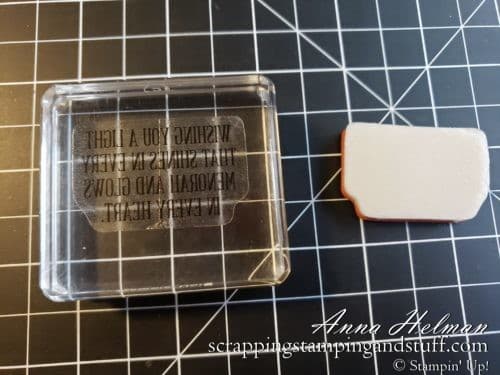
Once the paper backing is removed, pick up the block and flip it over. Now you can look through the clear block to line up the label perfectly. Gently lower it onto the stamp and give it a good press. Next, pull on the stamp from one corner to remove it from the block. Viola! A perfectly labeled stamp.

Use this quick card making tip and you will be able to place labels on rubber stamps perfectly every time!

Tip For Storing Your Rubber Stamps Video

If you’d like to watch along as I explain today’s tip for storing your stamps, check out my video below!

Did you enjoy this tip? Leave me a comment with other tips you love, or challenges you have that you would love to solve!

Don’t Miss Out!

Please make me your Stampin’ Up! demonstrator!  Earn rewards points towards free stamps PLUS a gift when you order using host code: DB6NBYAV PLUS, with your first order, you’ll receive free catalogs in your thank you package!

You Might Also Like:

The Stampin Up Take Your Pick Tool Is A Must-Have In Your Craft Collection

Thanks for joining me today. I hope you’ve enjoyed this post on tips for storing and labeling your rubber stamps.

Sharing is caring!

Filed Under: Gallery, Learn to Stamp Tagged With: cardmaking tips and tricks, tips and tricks

Previous Post: « Best Soft Pastels – Using Stampin Up Dry Pastels To Add Color To Projects
Next Post: Meme Monday! »

Reader Interactions

Comments

  1. Nancy says

    May 29, 2021 at 11:29 AM

    I’ve stored my stamps in the “template” of them every since I started using Stampin’ Up products but the hint on putting the label on the acrylic block is priceless. TFS

    Reply
  2. Karen Gilbert says

    June 3, 2021 at 12:57 PM

    Great tips Anna. I really like the one about the labels. I do save the rubber and lay it in the case to see if any stamps are missing. thanks

    Reply

Leave a Reply Cancel reply

Your email address will not be published. Required fields are marked *

Recipe Rating


Primary Sidebar

Anna Helman

Independent Stampin' Up!® Demonstrator

  • Email
  • Facebook
  • Facebook Group
  • Instagram
  • Pinterest
  • RSS
  • Twitter
  • YouTube
Shop Stampin' Up!
Stampin' Up! catalogs
get updates
join Stampin' Up!
Stampin' Up! Rewards
Stampin' Up! special offers
Stampin' Up! clearance
Stampin' Up! 2025-2026 Annual Catalog
May 6, 2025 - May 4, 2026
View Online | Shop Online

Blog Archive

Categories

Footer

Important Links

  • Home
  • Shop Now
  • Get Updates
  • Join My Team
  • Rewards
  • Specials
  • Catalogs
  • Clearance

Anna Helman, Independent Stampin' Up!® Demonstrator

  • Email
  • Facebook
  • Facebook Group
  • Instagram
  • Pinterest
  • RSS
  • Twitter
  • YouTube

Get Ideas, Inspiration, and Special Offers!

Sign up to receive updates in your inbox

Thank you!

Please check your email for a special offer! 

.
All content on this blog is the property of Anna Helman, Stampin' Up!® Independent Demonstrator. Classes, services and projects offered here are not endorsed by Stampin' Up!® Projects, videos, photos, ideas and articles are shared for personal use only and may not be removed, duplicated or copied without permission. All artwork © Stampin' Up!®

Copyright © 2025 Anna Helman, handmake with love · Site Design by Catherine Carroll