• Nav Social Menu

    • Facebook
    • Facebook Group
    • Instagram
    • Pinterest
    • RSS
    • Twitter
    • YouTube

Handmake with Love

Anna Helman | formerly Scrapping, Stamping and Stuff

  • Blog
  • Start Here
    • About Me
    • Learn to Make Cards
    • Why Shop With Me?
    • Testimonials
    • Connect On Social
    • Get Email Updates
    • Stampin’ Up! Giveaway Winners
  • Products
    • Shop Now
    • Catalogs
    • Clearance
    • Why Choose Stampin Up?
    • Paper Pumpkin Kits
    • Product Shares
    • Rewards Program
    • Stamparatus
    • Cut And Emboss Machine
    • Mini Cut And Emboss Machine
    • Blends Alcohol Markers
    • Blending Brushes
  • Ideas
    • Video Tutorials
    • Project Gallery
    • Card Ideas
    • 3D Projects
    • Scrapbooking
    • Tips & Techniques
    • Kits
    • Learn to Make Cards
    • Printable Catalog Tabs
    • Social Media
  • Join
    • Join My Team
    • Stampin Up Demonstrator Resources
  • Classes
    • Classes in the Mail
    • In Person Events
  • Contact
    • Contact
    • Connect On Social

Cardmaking 101 Lesson 1: Learn to Make Pretty Handmade Cards

19 Jul

There’s something remarkable about a handmade card. It might be the feeling you get when you’ve created something beautiful. It might be the way you’re refreshed after a little creative escape from a busy day. Or maybe it’s the amazing way you make someone else feel after you’ve shared your handmade creation with them. Regardless of why it’s remarkable, it is. Whether you’re the naturally crafty type, the moderately crafty “I can copy it if I see it” type, or the “I can’t craft even with a kit” type, you can do this. You can do this. Beginning with this tutorial, I will be walking you through the steps to go from simple stamper to professional. Stick with me and soon, you’ll be that person sharing gorgeous cards (also known as love in an envelope) with all of your friends and family. Ready? Ok, let’s learn to make pretty handmade cards!

Cardmaking 101 Lesson 1: Learn to Make Pretty Handmade Cards With These Picture Tutorials

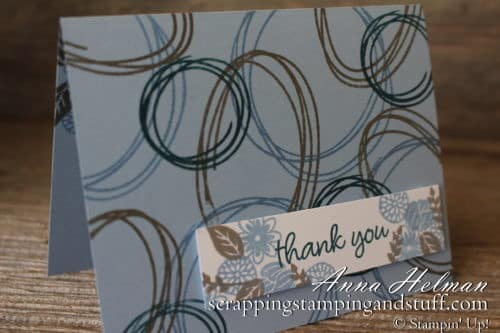
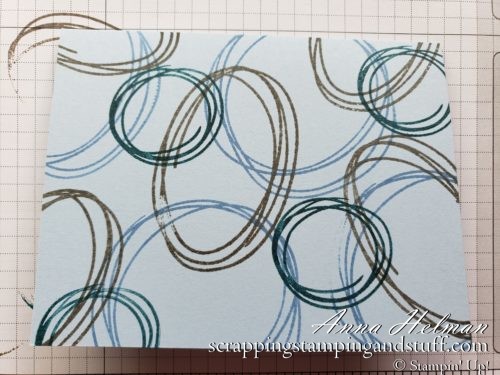
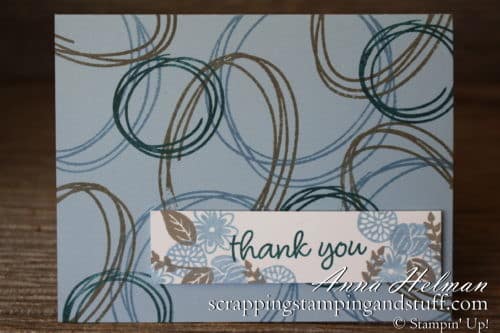
Here is the sample I’ll show you how to create today. Just a few supplies and a few minutes, and I have a lovely card to share with someone. Want to see other simple card ideas? Click here.

Cardmaking 101 Lesson 1: Learn to Make Pretty Handmade Cards With These Picture Tutorials

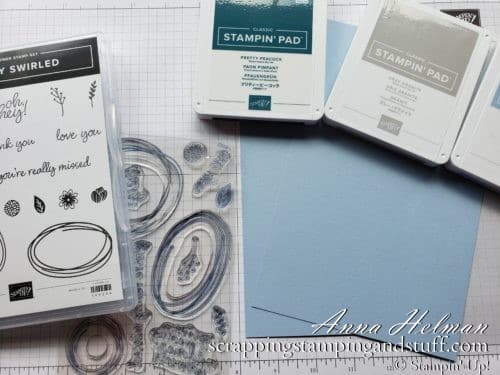
Here’s what I used for today’s card – the Sweetly Swirled stamp set, Balmy Blue cardstock, and three colors of Stampin’ Pads – Pretty Peacock, Gray Granite, and Balmy Blue. I also used a few adhesives. Links are at the bottom if you would like to order these products! Keep in mind, I will dedicate the next few Cardmaking 101 lessons to talking more about stamps, ink, paper, and adhesives. Make sure to check them out!

Cardmaking 101 Lesson 1: Learn to Make Pretty Handmade Cards With These Picture Tutorials

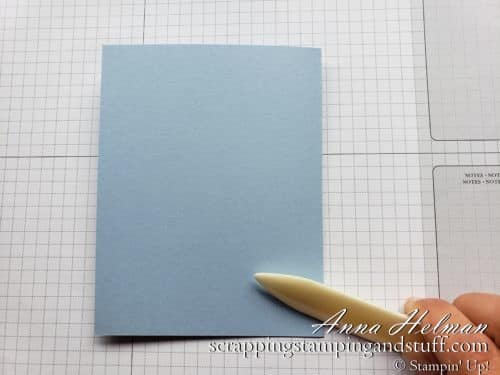
First I prepared the card base. It measured 5 1/2″ x 8 1/2″ (which is half of an 8 1/2″ x 11″ piece of cardstock), then I folded it in half and ran a bone folder along the crease to make it lay flat.

Cardmaking 101 Lesson 1: Learn to Make Pretty Handmade Cards With These Picture Tutorials and the Stampin' Up! Scripty Swirled stamp set

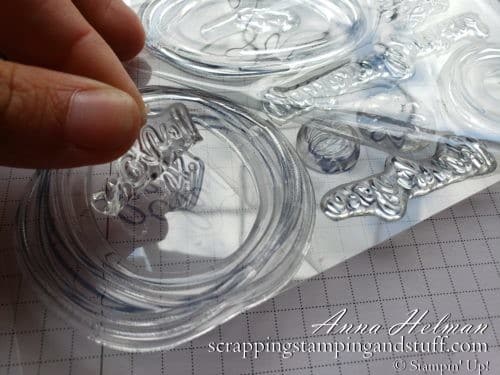
Next I prepared my stamps. As you can see below, the stamps can be peeled from the clear plastic protectors they come in. For this card, I’ll first use the small circle swirl stamp.

Cardmaking 101 Lesson 1: Learn to Make Pretty Handmade Cards With These Picture Tutorials

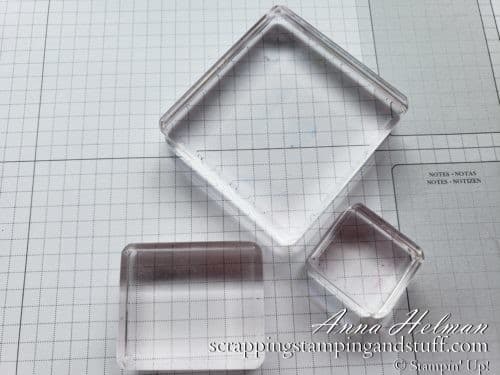
Stamps need to be attached to an acrylic block of an appropriate size. Below you can see a few of my collection.

Cardmaking 101 Lesson 1: Learn to Make Pretty Handmade Cards With These Picture Tutorials and the Stampin' Up! Scripty Swirled stamp set

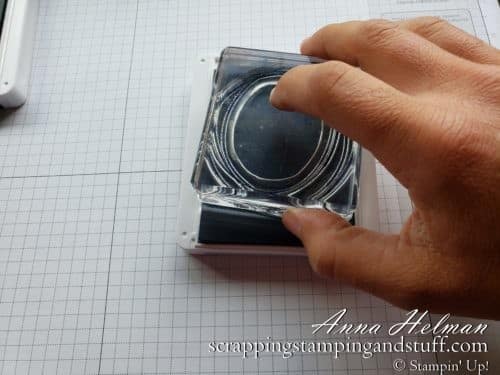
I attached the small circle stamp to an acrylic block, and then gently tapped it on the Pretty Peacock ink pad several times to ink it up. (For some reason, the large circle stamp is shown in this picture, but what you’ll see in the next photo is from the smaller circle stamp.)

Cardmaking 101 Lesson 1: Learn to Make Pretty Handmade Cards With These Picture Tutorials

Next I stamped firmly on the paper. You don’t want to press hard, but firmly. I re-inked each time I stamped.

Cardmaking 101 Lesson 1: Learn to Make Pretty Handmade Cards With These Picture Tutorials

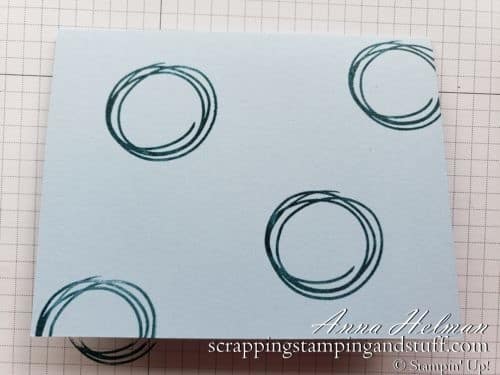
Using the oval and large circle swirl stamps, I added more swirls. I stamped the large circles with Balmy Blue ink and the ovals with Gray Granite.

Cardmaking 101 Lesson 1: Learn to Make Pretty Handmade Cards With These Picture Tutorials

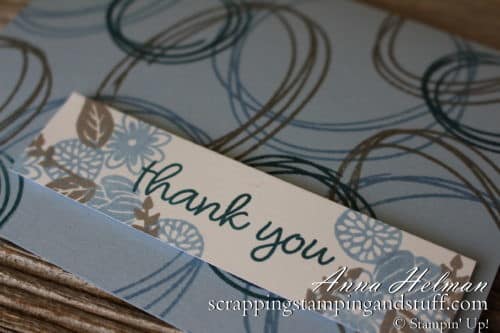
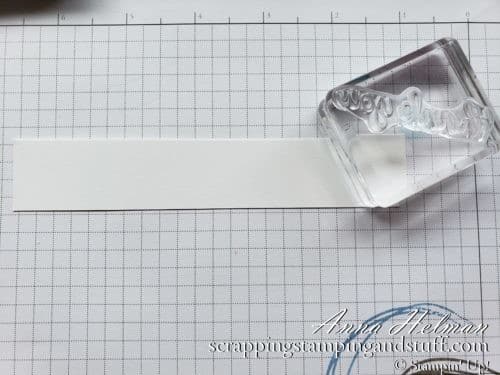
Ok, the background is finished! Let’s make a greeting! I cut a 1″ x 4″ piece of white cardstock and attached the ‘thank you’ stamp to an acrylic block.

Cardmaking 101 Lesson 1: Learn to Make Pretty Handmade Cards With These Picture Tutorials and the Stampin' Up! Scripty Swirled stamp set

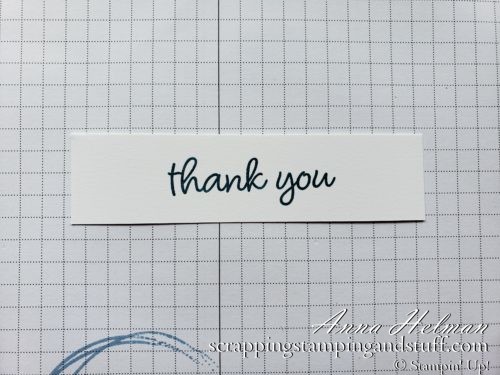
Then I inked the stamp with Pretty Peacock ink and stamped it on the paper strip.

Cardmaking 101 Lesson 1: Learn to Make Pretty Handmade Cards With These Picture Tutorials

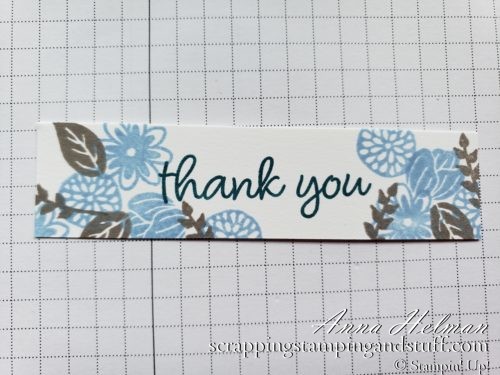
It needed some more decoration, so I added some Balmy Blue flowers and Gray Granite leaves, also included in the Sweetly Swirled stamp set.

Cardmaking 101: Learn to Make Pretty Handmade Cards With These Picture Tutorials

To attach the greeting to the card, I wanted it to pop up a little bit. For that reason, I attached a few Stampin’ Dimensionals to the back, then removed the paper backing…

Cardmaking 101 Lesson 1: Learn to Make Pretty Handmade Cards With These Picture Tutorials and the Stampin' Up! Scripty Swirled stamp set

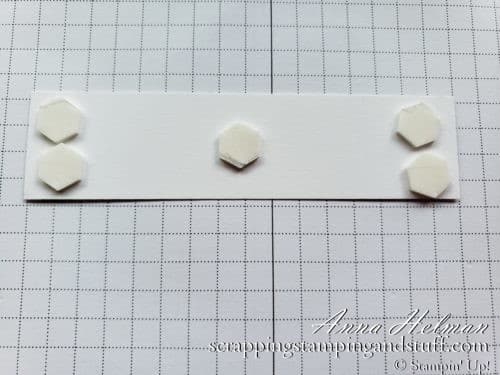
…and attached it to the card front.

Cardmaking 101: Learn to Make Pretty Handmade Cards With These Picture Tutorials

Here you can see the dimension it adds by using the Dimensionals on the back.

Cardmaking 101 Lesson 1: Learn to Make Pretty Handmade Cards With These Picture Tutorials

A card isn’t complete without an inside! I repeated some of the floral stamps inside the card, and added a nice greeting. Now it’s done!

Cardmaking 101: Learn to Make Pretty Handmade Cards With These Picture Tutorials

Again, with a few supplies and a few minutes, I made a lovely card that I will use to brighten someone’s day. You can do it too!

Cardmaking 101 Lesson 1: Learn to Make Pretty Handmade Cards With These Picture Tutorials

Subscribe to my blog to make sure you don’t miss out on future Cardmaking 101 posts!

Please make me your Stampin’ Up! demonstrator!

  • With your first order, you’ll receive a FREE annual catalog from me! Seasonal catalogs are also mailed to regular customers.
  • Please use hostess code GZS46UCA when you order.
  • Keep track of your Stampin’ Rewards and earn free stamps from me!
  • When you order $150 or more, you’ll earn hostess credit through Stampin’ Up!
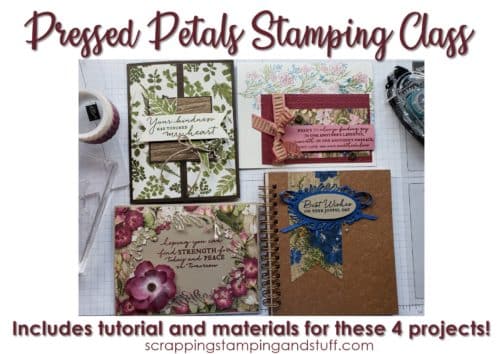
  • Check out my current Project in the Mail, Pressed Petals (shown below)!

Online stamping class in the mail! Receive the materials to make these beautiful handmade card ideas. Class uses the Stampin Up Pressed Petals product suite, Path of Petals stamp set, Petal Labels dies, and Pressed Petals designer paper.

Want to make this project for yourself? Use the links below to order!

Sweetly Swirled Photopolymer Stamp Set

Sweetly Swirled Photopolymer Stamp Set
[149254]

Whisper White 8-1/2" X 11" Cardstock

Whisper White 8-1/2″ X 11″ Cardstock
[100730]

Balmy Blue 8-1/2" X 11" Cardstock

Balmy Blue 8-1/2″ X 11″ Cardstock
[146982]

Bone Folder

Bone Folder
[102300]

Clear Block A

Clear Block A
[118487]

Clear Block D

Clear Block D
[118485]

Clear Block E

Clear Block E
[118484]

Gray Granite Classic Stampin' Pad

Gray Granite Classic Stampin’ Pad
[147118]

Balmy Blue Classic Stampin' Pad

Balmy Blue Classic Stampin’ Pad
[147105]

Pretty Peacock Classic Stampin’ Pad

Pretty Peacock Classic Stampin’ Pad
[150083]

Stampin' Dimensionals

Stampin’ Dimensionals
[104430]
Sharing is caring!

Filed Under: Learn to Stamp Tagged With: #simplestamping, blue, flowers, learn to stamp, scripty swirls, thank you

Previous Post: « Off to Great Places with Stampin Up Above The Clouds
Next Post: Cute As a Bug with Stampin Up Wiggle Worm »

Reader Interactions

Trackbacks

  1. Cardmaking 101 Lesson 2: Types of Stamps and How to Use Them - Scrapping Stamping and Stuff says:
    August 3, 2019 at 7:00 AM

    […] you’ll need to know right here to get started stamping. Want to start at the beginning? Start here. Today’s lesson is on types of stamps, and how to mount, ink, and clean them. Let’s get […]

    Reply
  2. Cardmaking 101 Lesson 3: Paper and How to Prepare a Card Base - Scrapping Stamping and Stuff says:
    August 15, 2019 at 7:01 AM

    […] 101 Lesson 3! Today, we will be talking all about paper! We’ve already talked about the basics of cardmaking and learned more about stamps. Now we’ll move on to paper! The paper you choose for your […]

    Reply
  3. Cardmaking 101 Lesson 5: Best Adhesives for Card Making and Scrapbooking | Scrapping Stamping and Stuff says:
    September 16, 2019 at 5:01 AM

    […] to start at the beginning with Cardmaking 101 and follow through the lessons in order? Click here! or stop back in to see my next lesson on papercrafting […]

    Reply
  4. Great Grandma's Old Fashioned Molasses Cookies | Scrapping Stamping and Stuff says:
    October 15, 2019 at 4:13 PM

    […] in seeing some of my more regular projects? Here is a basic beginner’s handmade card and here is a great place to start if you would like to learn how to […]

    Reply
  5. Cardmaking 101 Lesson 7: Using Punches For Cardmaking and Scrapbooking | Scrapping Stamping and Stuff says:
    October 16, 2019 at 5:01 AM

    […] more! If you are new here and want to start at the beginning with Cardmaking 101 Lesson 1, click here. Otherwise, let’s learn about […]

    Reply
  6. Cardmaking 101 Lesson 9: Stamping Blocks For Cardmaking | Scrapping Stamping and Stuff says:
    October 28, 2019 at 5:01 AM

    […] and other paper projects, or you have some experience but want to go back to the basics, then these Cardmaking 101 lessons should be of help! Today we will talk about using acrylic blocks for stamping as well as the […]

    Reply
  7. Cardmaking 101 Lesson 10: Stamping Off Technique | Scrapping Stamping and Stuff says:
    November 5, 2019 at 5:02 AM

    […] to Lesson 10 of my Cardmaking 101 series! I’m so glad you are here, and I hope these lessons will help you learn to love cardmaking […]

    Reply
  8. Cardmaking Lesson #11: Things To Look For In A Paper Trimmer | Scrapping Stamping and Stuff says:
    November 11, 2019 at 5:02 AM

    […] then you’re in the right place! If you would like to begin with Lesson 1, you can do that here. Keep reading and we’ll talk all about […]

    Reply
  9. Cute Turkey Craft Idea For Kids | Scrapping Stamping and Stuff says:
    November 14, 2019 at 5:01 AM

    […] I love seeing how proud of herself she is when she makes something amazing. It’s kind of how I feel when I make a beautiful card for someone! Want to learn more about stamping, cardmaking, and Stampin’ Up? Start here! […]

    Reply
  10. Adorable DIY Thanksgiving Place Cards | Scrapping Stamping and Stuff says:
    November 16, 2019 at 5:00 AM

    […] Want to learn what this stamping thing is all about? Start here.  […]

    Reply

Leave a Reply Cancel reply

Your email address will not be published. Required fields are marked *

Recipe Rating


Primary Sidebar

Anna Helman

Independent Stampin' Up!® Demonstrator

  • Email
  • Facebook
  • Facebook Group
  • Instagram
  • Pinterest
  • RSS
  • Twitter
  • YouTube
Shop Stampin' Up!
Stampin' Up! catalogs
get updates
join Stampin' Up!
Stampin' Up! Rewards
Stampin' Up! special offers
Stampin' Up! clearance
Stampin' Up! 2025-2026 Annual Catalog
May 6, 2025 - May 4, 2026
View Online | Shop Online

Blog Archive

Categories

Footer

Important Links

  • Home
  • Shop Now
  • Get Updates
  • Join My Team
  • Rewards
  • Specials
  • Catalogs
  • Clearance

Anna Helman, Independent Stampin' Up!® Demonstrator

  • Email
  • Facebook
  • Facebook Group
  • Instagram
  • Pinterest
  • RSS
  • Twitter
  • YouTube

Get Ideas, Inspiration, and Special Offers!

Sign up to receive updates in your inbox

Thank you!

Please check your email for a special offer! 

.
All content on this blog is the property of Anna Helman, Stampin' Up!® Independent Demonstrator. Classes, services and projects offered here are not endorsed by Stampin' Up!® Projects, videos, photos, ideas and articles are shared for personal use only and may not be removed, duplicated or copied without permission. All artwork © Stampin' Up!®

Copyright © 2025 Anna Helman, handmake with love · Site Design by Catherine Carroll