• Nav Social Menu

    • Facebook
    • Facebook Group
    • Instagram
    • Pinterest
    • RSS
    • Twitter
    • YouTube

Handmake with Love

Anna Helman | formerly Scrapping, Stamping and Stuff

  • Blog
  • Start Here
    • About Me
    • Learn to Make Cards
    • Why Shop With Me?
    • Testimonials
    • Connect On Social
    • Get Email Updates
    • Stampin’ Up! Giveaway Winners
  • Products
    • Shop Now
    • Catalogs
    • Clearance
    • Why Choose Stampin Up?
    • Paper Pumpkin Kits
    • Product Shares
    • Rewards Program
    • Stamparatus
    • Cut And Emboss Machine
    • Mini Cut And Emboss Machine
    • Blends Alcohol Markers
    • Blending Brushes
  • Ideas
    • Video Tutorials
    • Project Gallery
    • Card Ideas
    • 3D Projects
    • Scrapbooking
    • Tips & Techniques
    • Kits
    • Learn to Make Cards
    • Printable Catalog Tabs
    • Social Media
  • Join
    • Join My Team
    • Stampin Up Demonstrator Resources
  • Classes
    • Classes in the Mail
    • In Person Events
  • Contact
    • Contact
    • Connect On Social

Cracked Glass Technique Hummingbird Card

2 Jan

Countdown to the start of Sale-a-bration…3 days! I’ll have all the details posted soon, but basically what it means is that anyone who places a $50 order, hosts a $250 party, or signs up as a demonstrator will get fantastic free gifts – and you get to choose what they are! It’s the most wonderful time of the Stampin’ Up! year! Recently I have been highlighting many of the products in our upcoming Occasions Catalog as well as some of the free Sale-a-bration gift options, and today is another new product highlight. I made this neat cracked glass technique hummingbird card using the new Picture Perfect stamp set. Do you like it?

Cracked Glass Technique Hummingbird Card made with Stampin' Up! Picture Perfect stamp set

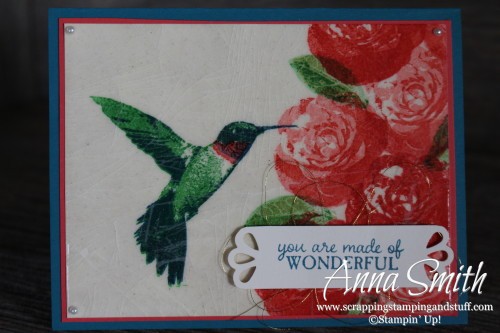
First let’s talk about the cracked glass technique. After I stamped the hummingbird and flowers, I covered the entire piece of cardstock with Versamark ink. I did this by placing the ink pad directly on top on the cardstock repeatedly until it was all covered. I sprinkled clear embossing powder over it, shook off the excess and heated it until the entire piece was glossy. I repeated that process 3 more times, for a total of 4 layers of clear embossing. Then I put it in the freezer for a few minutes. When I pulled it out, I bent the cardstock to cause the embossing to crack. After a few seconds it warmed up too much to crack, so I put it back in the freezer two more times to be able to get the cracked effect that I liked.

Cracked Glass Technique Hummingbird Card made with Stampin' Up! Picture Perfect stamp set

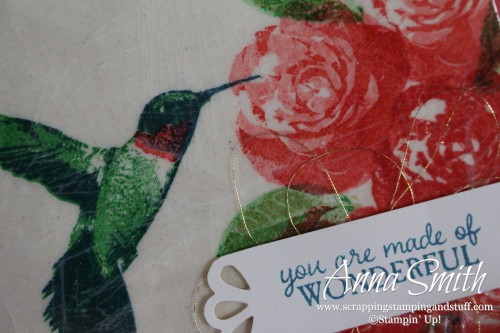
Now let’s talk about the colors I used to stamp the roses, leaves and hummingbird. The Picture Perfect set has 3- and 4- step stamps, meaning that there are 4 stamps to make the hummingbird and 3 stamps for the rose. The stamps are labeled with numbers to tell you which one to use first, second, third and fourth. Here are the colors I used with each stamp:

Flowers:

  • 1 – Watermelon Wonder (on some of them I stamped off once on scrap paper before stamping onto the card to get a lighter color)
  • 2 – Watermelon Wonder
  • 3 – Melon Mambo

Hummingbird:

  • 1 – Cucumber Crush
  • 2 – Watermelon Wonder
  • 3 – Island Indigo
  • 4 – Island Indigo

Leaves:

  • 1 – Cucumber Crush stamped off
  • 2 – Old Olive stamped off
  • 3 – Cucumber Crush

Cracked Glass Technique Hummingbird Card made with Stampin' Up! Picture Perfect stamp set

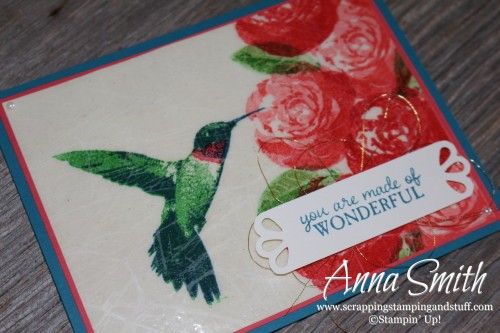
The picture below shows the cracked glass effect a little bit better.

Cracked Glass Technique Hummingbird Card made with Stampin' Up! Picture Perfect stamp set

Use the links below to see and shop for the products I used. Use hostess code Y4HGVHEJ when you order and I will send you a free gift! Even better, sign up for stamp club and you will get free projects and free stamps!

Built for Free Using: My Stampin Blog

Sharing is caring!

Filed Under: Cards Tagged With: animals, flowers, picture perfect, thank you

Previous Post: « Happy New Year Card
Next Post: Balloon Builders Minion Card »

Reader Interactions

Comments

  1. Dorothy Adams says

    January 3, 2016 at 2:55 PM

    I really like this card, the technique is awesome. I need to try it. Dorothy

    Reply
    • Anna Smith says

      January 3, 2016 at 9:13 PM

      Thanks Dorothy! I thought it was pretty neat. I would try it at a class, but it would take forever. Maybe we can do it at stamp club sometime if people bring their heat guns.

      Reply
  2. Paula Caron says

    January 3, 2016 at 5:15 PM

    Hi Anna– I have been following you for a couple of months but this is the first time I have “shown” myself. I love the card. How did you not turn your Versa Mark pad the colors of the card? The last time I tried to do this technique, I turned my pad watermelon wonder and am still trying to get the color off.

    Reply
    • Anna Smith says

      January 3, 2016 at 9:20 PM

      Thanks for making yourself known! Good question, but I’m not sure I have a great answer. I have tried this technique and another similar one and I haven’t had a lot of problem with the Versamark pad getting discolored. It discolors slightly, but not much. Did you let the watermelon wonder ink dry completely before using the Versamark?

      Reply
  3. Debbie says

    January 23, 2016 at 9:59 PM

    Hi Anna! This is a beautiful card. Just wanting to make sure that I understand…you stamped and colored your card first and then applied Versamark and clear embossing powder? Thanks for sharing.

    Reply
    • Anna Smith says

      January 23, 2016 at 10:13 PM

      Yes, that’s correct. Good luck if you try it yourself!

      Reply
  4. Josee Smuck says

    February 17, 2016 at 4:55 PM

    I love what you did with this card! I would love to share this on my blog for ‘My Crafty Friends Monday’ (a round up of amazing cards from amazing stampers!)! Please let me know if you would prefer that I didn’t share it (of course I give you credit and link back to your blog!).
    Inky Hugs!

    Reply

Trackbacks

  1. Picture Perfect Beach Scene Card - Scrapping Stamping and Stuff says:
    January 24, 2016 at 9:57 AM

    […] Perfect stamp set, of course. A few weeks ago I got out this same stamp set and tried out the rose and hummingbird stamps, but I’ve been wanting to make something with that great starfish. Today is the day! Here it […]

    Reply

Leave a Reply Cancel reply

Your email address will not be published. Required fields are marked *

Recipe Rating


Primary Sidebar

Anna Helman

Independent Stampin' Up!® Demonstrator

  • Email
  • Facebook
  • Facebook Group
  • Instagram
  • Pinterest
  • RSS
  • Twitter
  • YouTube
Shop Stampin' Up!
Stampin' Up! catalogs
get updates
join Stampin' Up!
Stampin' Up! Rewards
Stampin' Up! special offers
Stampin' Up! clearance
Stampin' Up! 2025-2026 Annual Catalog
May 6, 2025 - May 4, 2026
View Online | Shop Online

Blog Archive

Categories

Footer

Important Links

  • Home
  • Shop Now
  • Get Updates
  • Join My Team
  • Rewards
  • Specials
  • Catalogs
  • Clearance

Anna Helman, Independent Stampin' Up!® Demonstrator

  • Email
  • Facebook
  • Facebook Group
  • Instagram
  • Pinterest
  • RSS
  • Twitter
  • YouTube

Get Ideas, Inspiration, and Special Offers!

Sign up to receive updates in your inbox

Thank you!

Please check your email for a special offer! 

.
All content on this blog is the property of Anna Helman, Stampin' Up!® Independent Demonstrator. Classes, services and projects offered here are not endorsed by Stampin' Up!® Projects, videos, photos, ideas and articles are shared for personal use only and may not be removed, duplicated or copied without permission. All artwork © Stampin' Up!®

Copyright © 2025 Anna Helman, handmake with love · Site Design by Catherine Carroll