• Nav Social Menu

    • Facebook
    • Facebook Group
    • Instagram
    • Pinterest
    • RSS
    • Twitter
    • YouTube

Handmake with Love

Anna Helman | formerly Scrapping, Stamping and Stuff

  • Blog
  • Start Here
    • About Me
    • Learn to Make Cards
    • Why Shop With Me?
    • Testimonials
    • Connect On Social
    • Get Email Updates
    • Stampin’ Up! Giveaway Winners
  • Products
    • Shop Now
    • Catalogs
    • Clearance
    • Why Choose Stampin Up?
    • Paper Pumpkin Kits
    • Product Shares
    • Rewards Program
    • Stamparatus
    • Cut And Emboss Machine
    • Mini Cut And Emboss Machine
    • Blends Alcohol Markers
    • Blending Brushes
  • Ideas
    • Video Tutorials
    • Project Gallery
    • Card Ideas
    • 3D Projects
    • Scrapbooking
    • Tips & Techniques
    • Kits
    • Learn to Make Cards
    • Printable Catalog Tabs
    • Social Media
  • Join
    • Join My Team
    • Stampin Up Demonstrator Resources
  • Classes
    • Classes in the Mail
    • In Person Events
  • Contact
    • Contact
    • Connect On Social

Stampin Up Conversation Bubbles & My Updated Sentiment Tag Box!

7 Feb

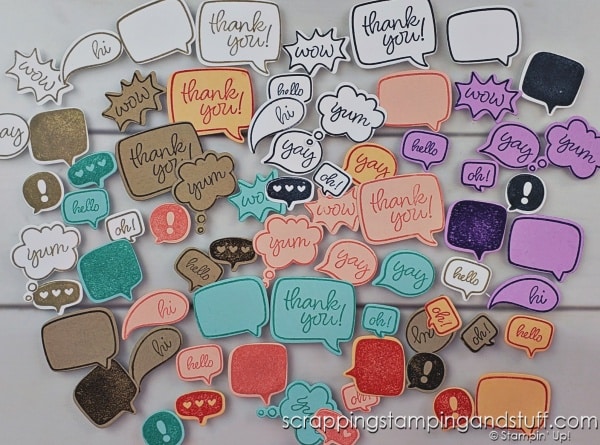
If you follow along regularly, you know my sentiment tag box is one of my favorite time savers in my craft area. I love craft room organization tips like this – just keep prepped sentiment tags in a tackle box and have them ready to finish your lovely card projects! I’ve been playing around with another way to prep a lot of tags and add them to my sentiment box and I want to share it with you today. I used the Stampin Up Conversation Bubbles bundle to create these adorable tags. Keep reading to see how I made a lot of these tags in a short amount of time!

Take a look at my best kept secret in my craft room - my sentiment tag box - and see how I updated it with the new Stampin Up Conversation Bubbles bundle!

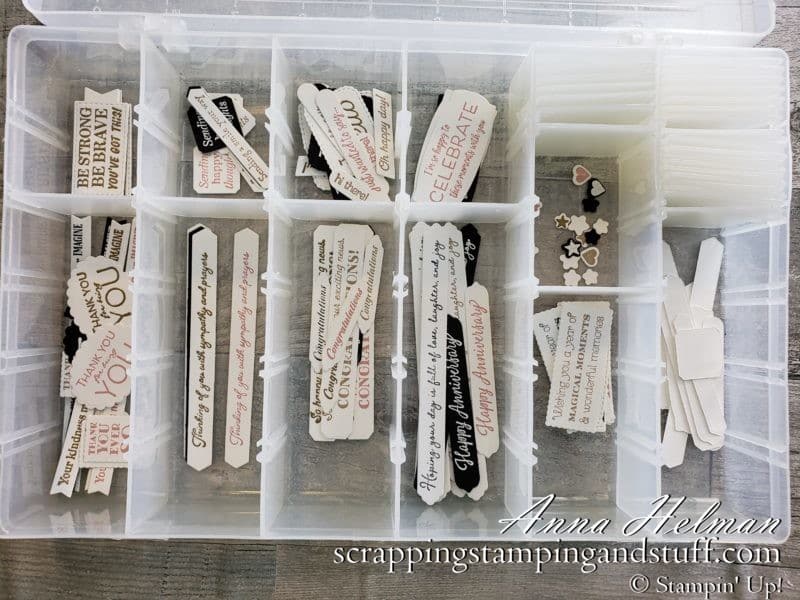
My Sentiment Tag Box

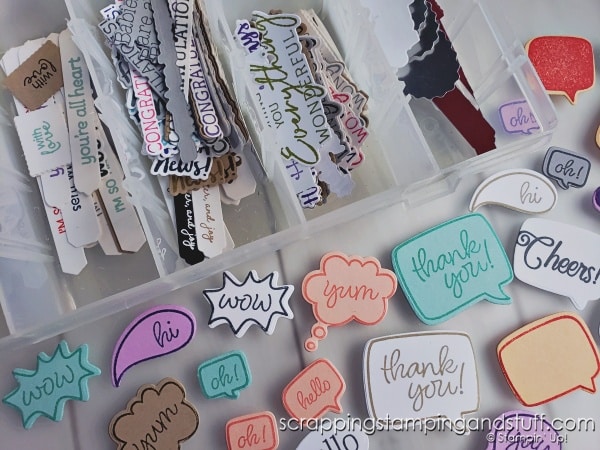
I created this box several years ago to organize prepared sentiment tags by category – birthday, thanks, thinking of you, congrats, etc. It’s such a time saver when I need to make a card in a hurry! I’ve used several methods to ‘stock’ the box with tags such as this one and this one. 

Make hundreds of sentiment tags for your card making projects in minutes with the Stampin Up Many Messages bundle.

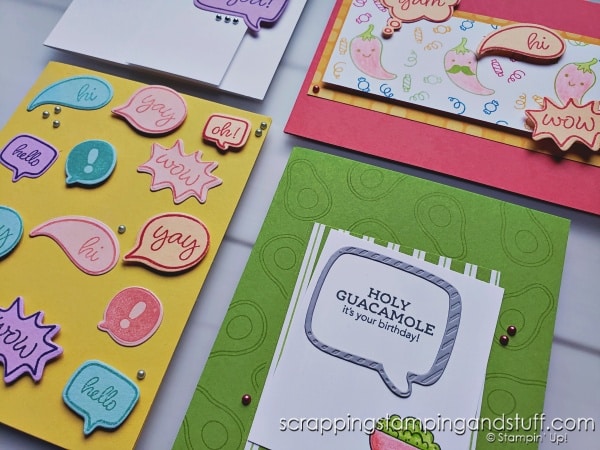
Now I’m excited to be adding a lot of fun, cutesy conversation bubble tags to my assortment. 

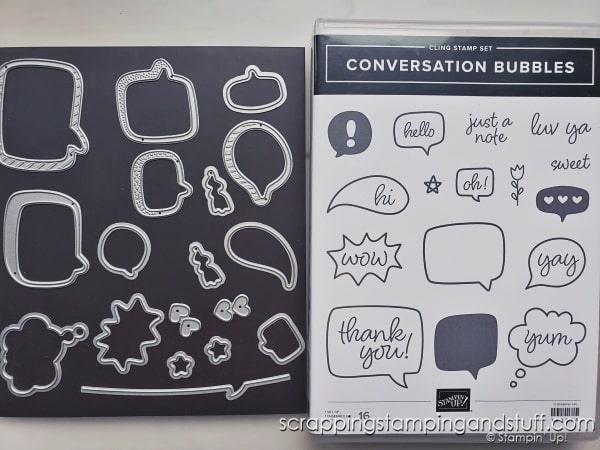
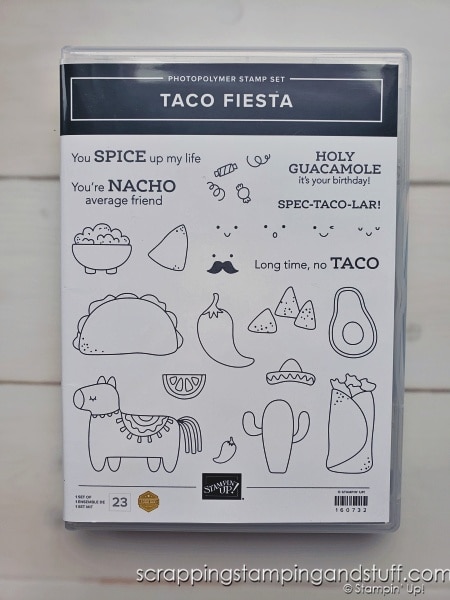
Stampin Up Conversation Bubbles Bundle

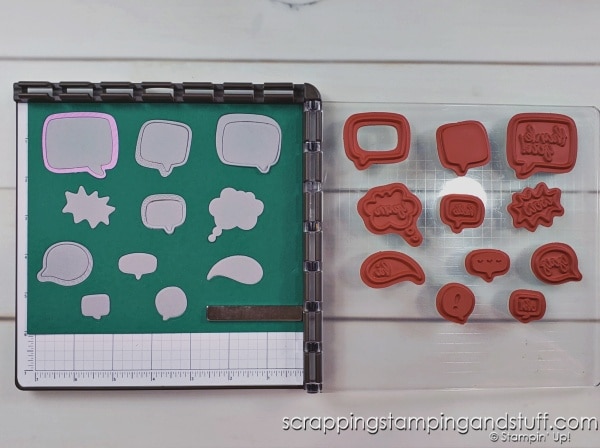
Here is the bundle I used to create my new assortment of tags. You can stamp and cut them out individually as with any die set, but I’ll share a shortcut to create a lot of tags quickly below.

Sample Cards

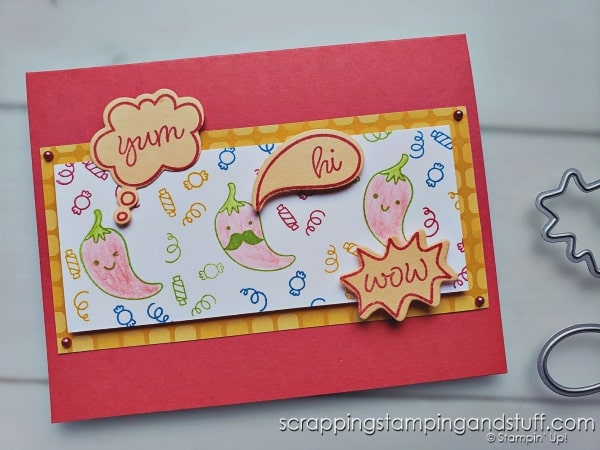
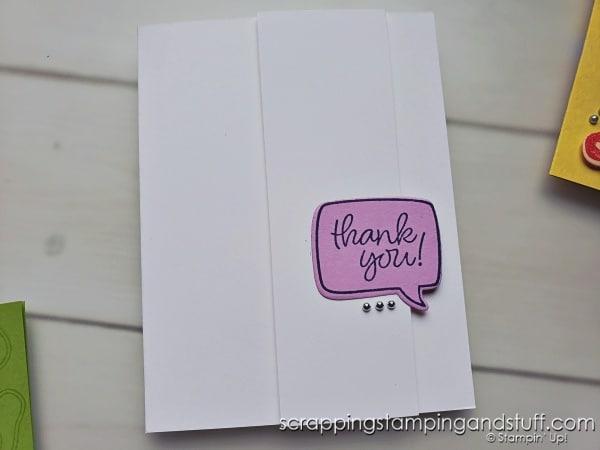
Here you can see a few simple cards I’ve created with the Conversation Bubbles die cuts and Taco Fiesta stamps. Aren’t they cute?

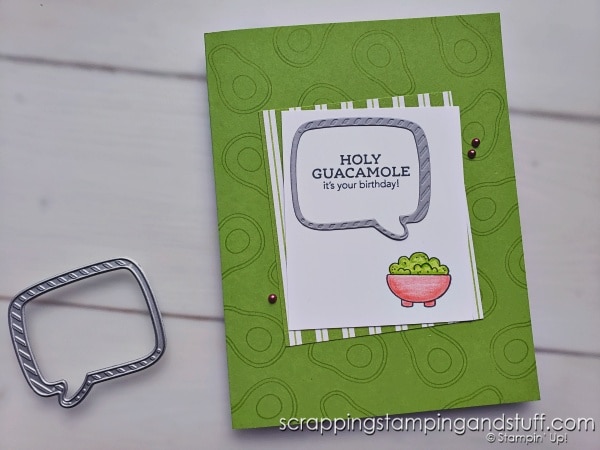
Here’s a really basic card! Quick and easy!

Creating Tags Fast

Here’s how to use this bundle to create tags fast:

1. Layer two pieces of cardstock measuring 5 1/2″ x 8 1/2″ onto your die cutting platform base. Put all dies on top, and crank through your machine. Remove die cuts and separate them into groups of each shape. Repeat as many times as desired with several colors of cardstock.

2. Cut dies from a piece of cardstock that fits the base of your Stamparatus. Lay this template and a piece of grid paper into the base of the Stamparatus.

3. Place stamps over top of the holes, lining them up as well as possible.

4. Lower the clear plate to pick up the stamps.

Take a look at my best kept secret in my craft room - my sentiment tag box - and see how I updated it with the new Stampin Up Conversation Bubbles bundle!

5. Ink stamps with a light color of ink and stamp onto grid paper.

Take a look at my best kept secret in my craft room - my sentiment tag box - and see how I updated it with the new Stampin Up Conversation Bubbles bundle!

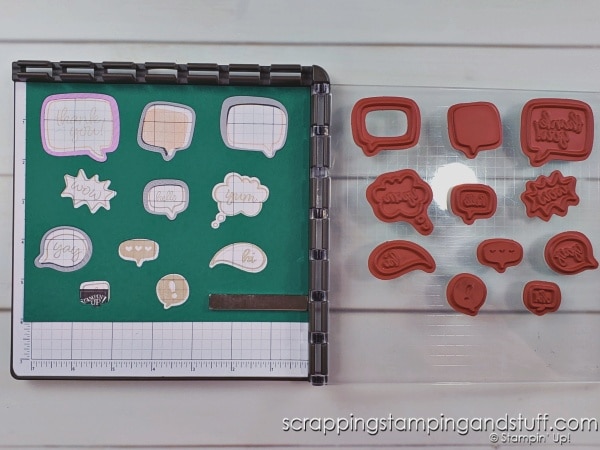
6. Check alignment of stamps with the die cuts. If any stamps are misaligned, remove those stamps, line them up again with the die cut holes, and try again.

Take a look at my best kept secret in my craft room - my sentiment tag box - and see how I updated it with the new Stampin Up Conversation Bubbles bundle!

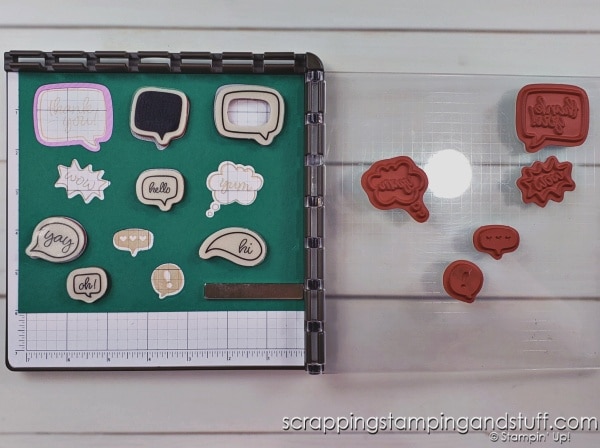
Test stamp with a different color of ink and check alignment.

Take a look at my best kept secret in my craft room - my sentiment tag box - and see how I updated it with the new Stampin Up Conversation Bubbles bundle!

**Want a more precise way of lining them up? See how I did it for the Charming Sentiments bundle here**

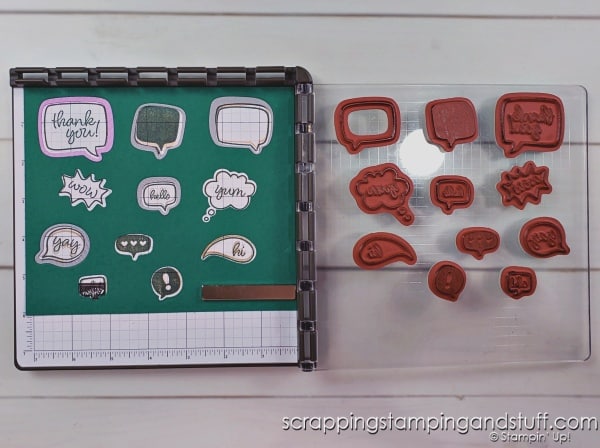
7. When stamps are aligned properly, begin putting the die cuts into the holes. Fill each hole, then ink the stamps and stamp. This is where it gets fun!

Take a look at my best kept secret in my craft room - my sentiment tag box - and see how I updated it with the new Stampin Up Conversation Bubbles bundle!

8. Remove stamped die cuts (I love to use my Take Your Pick tool), place new cuts in the holes and stamp again.

9. Repeat until all die cuts are stamped, or leave some blank and add other sentiments to them.

Switch Up The Sentiments

If you prefer to use different sentiment stamps, or just want a bigger variety, you can use other stamps with the die cuts. You can line them up on the Stamparatus as described above, or leave the cut pieces blank and just stamp one tag at a time as needed.

Stampin Up Conversation Bubbles Video

Watch along here to see the process described above for making tags quickly!

Do you keep sentiment tags prepped and ready in your craft area? If so, how do you organize them? Comment at the bottom and tell me!

Supply List

Product List
Conversation Bubbles Bundle (English)
[160637]
Conversation Bubbles Dies
[160636]
Conversation Bubbles Cling Stamp Set (English)
[160628]
Taco Fiesta Photopolymer Stamp Set (English)
[160732]
Dandy Designs 12" X 12" (30.5 X 30.5 Cm) Designer Series Paper
[160836]
Poppy Parade 8-1/2" X 11" Cardstock
[119793]
Granny Apple Green 8-1/2" X 11" Cardstock
[146990]
Daffodil Delight 8-1/2" X 11" Cardstock
[119683]
Basic White 8 1/2" X 11" Thick Cardstock
[159229]
Watercolor Pencils
Watercolor Pencils
[141709]
Watercolor Pencils Assortment 2
[149014]
Basic Gray Classic Stampin' Pad
[149165]
Granny Apple Green Stampin' Pad
[147095]
Pumpkin Pie Classic Stampin' Pad
[147086]
Pacific Point Classic Stampin' Pad
[147098]
Poppy Parade Classic Stampin' Pad
[147050]
Festive Pearls
Festive Pearls
[159963]
Stampin' Seal
Stampin' Seal
[152813]
Stampin' Dimensionals
[104430]
Stampin' Cut & Emboss Machine
[149653]
Paper Trimmer
Paper Trimmer
[152392]
Take Your Pick
Take Your Pick
[144107]
Add All to Cart

Learn To Make Cards
Shop Supplies
Rewards Program
Join My Amazing Team

Thanks for visiting to see the Stampin Up Conversation Bubbles bundle and my sentiment tag box!

Sharing is caring!

Filed Under: Craft Room Organization, Gallery Tagged With: cardmaking tips and tricks, craft room organization, stampin up conversation bubbles

Previous Post: « How To Make A Shaker Card In 4 Simple Steps!
Next Post: Repeat Stamping Fast! »

Reader Interactions

Leave a Reply Cancel reply

Your email address will not be published. Required fields are marked *

Recipe Rating


Primary Sidebar

Anna Helman

Independent Stampin' Up!® Demonstrator

  • Email
  • Facebook
  • Facebook Group
  • Instagram
  • Pinterest
  • RSS
  • Twitter
  • YouTube
Shop Stampin' Up!
Stampin' Up! catalogs
get updates
join Stampin' Up!
Stampin' Up! Rewards
Stampin' Up! special offers
Stampin' Up! clearance
Stampin' Up! 2025-2026 Annual Catalog
May 6, 2025 - May 4, 2026
View Online | Shop Online

Blog Archive

Categories

Footer

Important Links

  • Home
  • Shop Now
  • Get Updates
  • Join My Team
  • Rewards
  • Specials
  • Catalogs
  • Clearance

Anna Helman, Independent Stampin' Up!® Demonstrator

  • Email
  • Facebook
  • Facebook Group
  • Instagram
  • Pinterest
  • RSS
  • Twitter
  • YouTube

Get Ideas, Inspiration, and Special Offers!

Sign up to receive updates in your inbox

Thank you!

Please check your email for a special offer! 

.
All content on this blog is the property of Anna Helman, Stampin' Up!® Independent Demonstrator. Classes, services and projects offered here are not endorsed by Stampin' Up!® Projects, videos, photos, ideas and articles are shared for personal use only and may not be removed, duplicated or copied without permission. All artwork © Stampin' Up!®

Copyright © 2025 Anna Helman, handmake with love · Site Design by Catherine Carroll