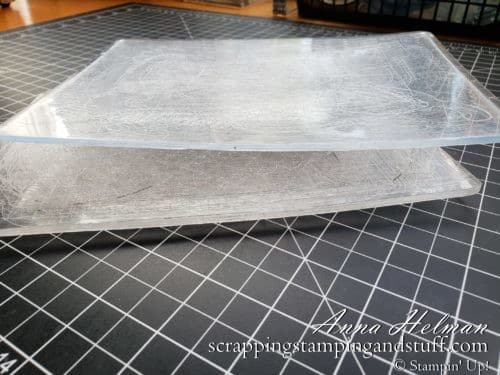
If you have a die cutting and embossing machine and you’ve used it more than, say, ten times, chances are you have been annoyed by the occurrence of warped cutting plates. When they arrive with your new purchase, they’re so smooth, pretty, and translucent. Then you start using them and bit by bit they get mucked up. They start to bend. And curve. And warp. Then, when you go to use them and lay down your metal dies, they often won’t lay flat or stay in place. This equals you being annoyed. Being annoyed during crafting is not ok. Today I will share a card making tip to solve this problem!
When I first heard about this tip, I wanted to try it for a while to make sure it would work. After that, my problem was solved and I forgot to share this amazing tip with you. I finally remembered, and today I’m sharing it so that your cutting plates will be, from this point forward, wonderfully flat the way they should be.
The Cause
The rollers in your die cutting and embossing machine exert a large amount of pressure on your plates each time they run through. Because of irregular thickness of the items you send through the machine, as well as this pressure, it begins to push, stretch, bend, and warp your previously-flat cutting plates.
Resulting Problems
This probably goes without saying, but once you have warped cutting plates, they won’t lay flat. When you’re preparing your ‘sandwich’ of materials to send through your machine and you’re trying to get a die to lay precisely around a stamped image, it’s important that it will stay where placed. Warped plates = die won’t stay in place. Die won’t stay in place = you annoyed.
This is not necessary! I have a simple solution for you, so let’s talk about it.
The Solution
Label Top And Bottom
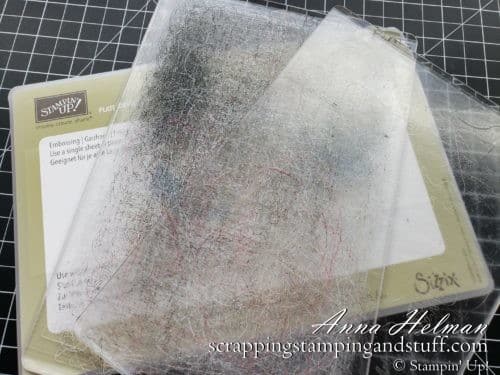
You’ll need to begin with a set of new plates. They are a minimal investment, and believe me, it’s worth it.
Label one plate as ‘top’ and one as ‘bottom.’ From now on, you will only use the ‘top’ plate on the top of your stack, and you will only use the ‘bottom’ plate on the bottom.
Use As Follows
Use the bottom plate on the bottom of your sandwich. Place paper on top, then your dies with the cutting edge downward. Place the top plate on top.
So…your top plate is always on top, the bottom plate is always on the bottom. Which side of the top plate is up or down, and which side of the bottom plate is up or down is not as important. If by chance you do start to notice a small bend in your bottom plate, the following tip may help.
Lay your bottom plate on your work suface and press down in the center of it. If it gives or moves downward at all (as the result of beginning to warp), flip the plate over and use it that way.
That’s it!

Video Tutorial
I’ll expain all of this in the video below. Enjoy!
I hope this solves all of your life problems when it comes to warped cutting plates. Please stop back soon!
Please make me your Stampin’ Up! demonstrator! Earn rewards points towards free stamps PLUS a gift when you order using August host code: P7URKZUU. PLUS, with your first order, you’ll receive free catalogs in your thank you package!

Sign Up For My Upcoming Virtual Card Classes!
Does the top plate always stay the same or does it also get flipped when bending.
I’ve never noticed a need to flip mine, but if yours would start to warp I would suggest flipping it.
I actually tape my bottom plate to the base. Keeps me from using it for anything else.
Great idea! Thanks for sharing!
I do this except my no cut plate is on top. So i can see thru it and make sure tape dosnt make it slip and if i dont need tape i can still see if its straight. I just flip my bottome plate afrer every 5 or so cuts
Yes that’s the same that I do!
I have been doing this as well and I don’t have warped plates.
Great!! Thanks for stopping by 🙂
I’m so excited about this video and can’t wait to try your method. I gets so frustrated with the warped plates and having to replace them. Thanks for the video and cutting tips.
You’re welcome! If you would like an ordering link to get some new plates just let me know.
Thank you Anna; for sure will follow your tip !
This is a great tip!! I know this is an old video (2021) LOL but I was actually searching your site because you have SO MANY GREAT tips and I was having this very issue happening with my mini machine and it was only after a few uses….Very frustrating!! Now that I saw this video tip I am going to use it. Thanks for sharing Anna!
Loved these tips hoping my plate hasn’t gone too far I am new to cutting with a die
Will keep in touch,
My big shot plus plates were well past sell by date and marking my card badly so have ordered some and a metal plate for the plus machine will order some more when using them next week so don’t get stuck without any but ended up very ill in hospital so couldn’t have used them anyway My friends visiting me soon and she has another tip to do to the plates so the cuts in the plates aren’t as bad with some plastic wrapped around the plate I can’t see how it would work for both plates going through the machine so let you know when she’s showed me Jane