Hi everyone! How are you liking my 12 Days of Handmade Gift Ideas so far? Send me a message or comment on this post and let me know! Today is my fourth day of gift ideas, and today’s project is a simple pen and post-it holder set. Check it out!

This would be a great gift for someone you don’t need to give a large gift to, but you want to do something small. It would be a good little add-on to another gift too. It would also be a perfect gift for a little girl in your life! I’m envisioning my little girl keeping this in her purse and thinking she is big stuff to have a pretty notebook of her own to carry around!

Above you can see the post-it holder close up, and below you can see it when it’s opened. Keep reading for the tutorial on how to make it!

Instructions:
Begin with a piece of Rose Glimmer Paper measuring 3 1/4″ x 9 1/2″. Place it glitter side down on your Stampin’ Trimmer or scoring board, and score it at 3″, 3 1/2″, 4″, 7 1/2″, and 8″ as shown in the following photos.


Next, turn the paper vertically and line it up with the left side of the paper at the 2 1/4″ mark.

Before lowering the cutting arm and blade, move the blade to the 3″ mark. Then lower the arm and blade. Cut only from 3″ to 4″ as shown in the next two photos.


Raise the arm and shift the paper right until the left edge is at the 1″ mark. Lower the arm with the blade at the 3″ mark. Repeat cutting only from 3″ to 4″.

Your paper should now look like this.

Bend the score lines back and forth to loosen them up.

Make sure your paper is oriented the same direction as in the photo above, and then place Tear and Tape adhesive on the areas circled below.

Fold the left side over towards the right on the scored line shown on the right in the photo above (where you put adhesive is actually flipping over and coming back down). You will see the other two scored lines on top after making the fold. Press firmly to help the adhesive adhere.

Then fold it back up to look like this.

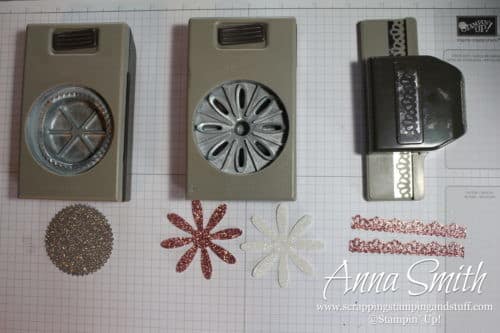
Next, prepare the decorations. Punch the following:
- Starburst Punch – 1 from silver glimmer paper
- Daisy Punch – 1 from rose glimmer and 1 from sparkle glimmer
- Decorative Ribbon Border Punch – 2 strips each measuring 3 1/4″ in length from rose glimmer paper

Attach the border strips to both the inside and outside edges using Fine-Tip Glue Pen.

Attach the other punches on top and add a button and bow. Next you’ll want to place your post-it pad inside, and use a Velcro dot to hold it shut.

Add a nice pen and your pen and post-it holder set is complete!

Thanks for stopping in! Subscribe to my blog to make sure you don’t miss the next 8 days of handmade gift ideas!
Please make me your Stampin’ Up! demonstrator!
-
- Please use hostess code 2794VXDR when you order.
- Check out my current Project in the Mail, Christmas Traditions!
- Keep track of your Stampin’ Rewards and earn free stamps from me!
- When you order $150 or more, you’ll earn hostess credit through Stampin’ Up!
Order the products I used and make this project yourself!


Leave a Reply