• Nav Social Menu

    • Facebook
    • Facebook Group
    • Instagram
    • Pinterest
    • RSS
    • Twitter
    • YouTube

Handmake with Love

Anna Helman | formerly Scrapping, Stamping and Stuff

  • Blog
  • Start Here
    • About Me
    • Learn to Make Cards
    • Why Shop With Me?
    • Testimonials
    • Connect On Social
    • Get Email Updates
    • Stampin’ Up! Giveaway Winners
  • Products
    • Shop Now
    • Catalogs
    • Clearance
    • Why Choose Stampin Up?
    • Paper Pumpkin Kits
    • Product Shares
    • Rewards Program
    • Stamparatus
    • Cut And Emboss Machine
    • Mini Cut And Emboss Machine
    • Blends Alcohol Markers
    • Blending Brushes
  • Ideas
    • Video Tutorials
    • Project Gallery
    • Card Ideas
    • 3D Projects
    • Scrapbooking
    • Tips & Techniques
    • Kits
    • Learn to Make Cards
    • Printable Catalog Tabs
    • Social Media
  • Join
    • Join My Team
    • Stampin Up Demonstrator Resources
  • Classes
    • Classes in the Mail
    • In Person Events
  • Contact
    • Contact
    • Connect On Social

WASTE Paper When You’re Die Cutting – Here’s Why!

21 Jul

Hi friends, and thanks so much for visiting today. I have a quick tip to share and it’s something that just hit me last week. I feel like I’ve been die cutting the wrong way for my entire stamping career. Are you die cutting wrong too? Stick with me, let’s find out.

Today's card making tip - WASTE paper when you're die cutting. Click to find out why!

WASTE Paper When You’re Die Cutting Video

Watch along here or keep reading!

Waste Paper To Save Paper, Time And Effort!

As a resourceful human, when I’m die cutting I have always tried to place my die as close to the edge of the paper as possible. This minimizes waste and maximizes the size of the paper left after I’m done, which I can save and use for another project. Makes sense, right? Is this what you do too?

Today's card making tip - WASTE paper when you're die cutting. Click to find out why!

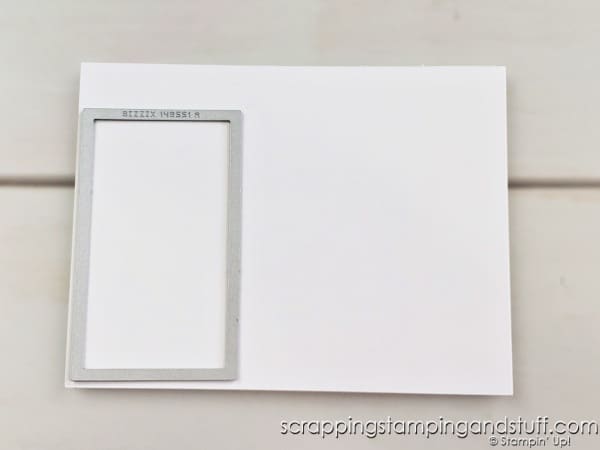
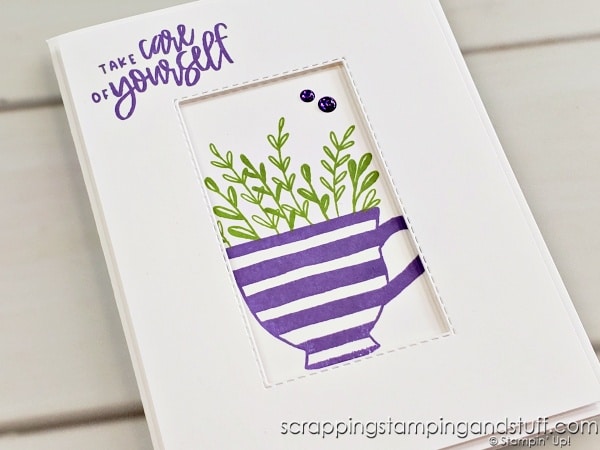
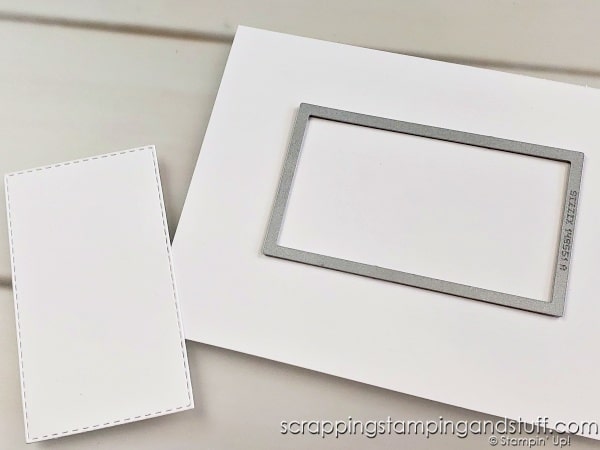
Just the other day I realized I was doing it all wrong! I was cutting a label shape, and I realized if I would cut in the center of the paper, I would end up with two usable pieces – the shape I’m cutting and a lovely frame with the shape cut out of the center.

So today’s tip pretty simple. Whether you’re using a piece of paper the size of a card front or a smaller piece, if you center your shape, you’ll end up with two usable pieces. Use them both now, or save the second one to use on a future project. Actually, you don’t even have to center the die. It could be closer to a particular corner or placed at an angle, but regardless just place the die where it  leaves a nice frame around it which can be used on another project.

Today's card making tip - WASTE paper when you're die cutting. Click to find out why!

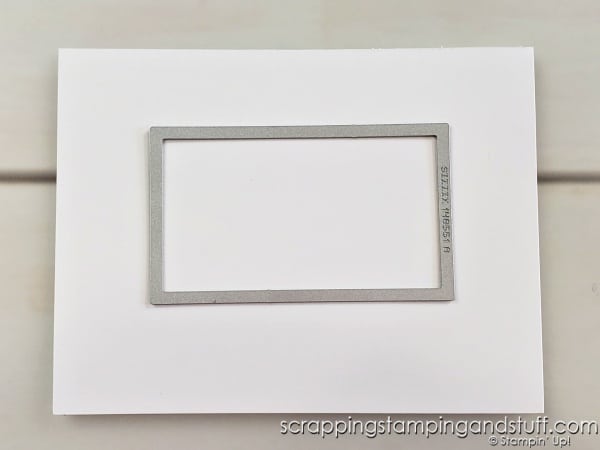
Now I have two usable pieces with no extra effort AND zero wasted paper. It’s a win!

Today's card making tip - WASTE paper when you're die cutting. Click to find out why!

Love My Die Cutting Machine

Are you in the market for a die cutting machine? Or just getting frustrated with yours? I absolutely love my Cut & Emboss machine, and you can learn about it here, or take a look at it using the link below.

Product List
Stitched Rectangles Dies
[151820]
Stampin' Cut & Emboss Machine
[149653]
Mini Stampin' Cut & Emboss Machine
[150673]
Cup Of Tea Photopolymer Stamp Set (English)
[158661]
Pear Pizzazz Classic Stampin' Pad
[147104]
Highland Heather Classic Stampin' Pad
[147103]

More Card Making Tips & Tricks

If you enjoy card making tips and tricks, take a list at tons more here!

Learn To Make Cards
Shop Supplies
Rewards Program
Join My Amazing Team

I hope today’s tip helps you waste…I mean save paper and effort!

Sharing is caring!

Filed Under: Gallery, Learn to Stamp Tagged With: cardmaking hacks, cardmaking tips and tricks, die cutting, learn to stamp

Previous Post: « How To Clean Ink Off Of Hands – Problem Solved!
Next Post: July 2022 Paper Pumpkin – Sending Good Thoughts »

Reader Interactions

Comments

  1. Deb says

    July 21, 2022 at 8:21 AM

    Brilliant tip Anna!! I will definitely keep this in mind and use it from time to time. I really like the framed looked adds a nice touch to the card!

    Reply
    • Anna Helman says

      July 21, 2022 at 9:08 AM

      Great, thank you Deb!

      Reply
  2. Teresa Leggo says

    July 23, 2022 at 10:37 PM

    Awesome tip!!!

    I’ve just discovered this too and like you always used to try to get as close to the edges to get more out of a piece of cardstock. It’s great for layers on a card and especially if you are using specialty dsp’s.

    Reply
    • Anna Helman says

      July 24, 2022 at 10:23 AM

      Hi Teresa, yes you’re right it’s perfect for layers too!

      Reply
  3. Diana says

    August 10, 2022 at 12:32 AM

    Brilliant, thank you!

    Reply
    • Anna Helman says

      August 10, 2022 at 7:23 AM

      Thanks Diana!

      Reply

Leave a Reply Cancel reply

Your email address will not be published. Required fields are marked *

Recipe Rating


Primary Sidebar

Anna Helman

Independent Stampin' Up!® Demonstrator

  • Email
  • Facebook
  • Facebook Group
  • Instagram
  • Pinterest
  • RSS
  • Twitter
  • YouTube
Shop Stampin' Up!
Stampin' Up! catalogs
get updates
join Stampin' Up!
Stampin' Up! Rewards
Stampin' Up! special offers
Stampin' Up! clearance
Stampin' Up! 2025-2026 Annual Catalog
May 6, 2025 - May 4, 2026
View Online | Shop Online

Blog Archive

Categories

Footer

Important Links

  • Home
  • Shop Now
  • Get Updates
  • Join My Team
  • Rewards
  • Specials
  • Catalogs
  • Clearance

Anna Helman, Independent Stampin' Up!® Demonstrator

  • Email
  • Facebook
  • Facebook Group
  • Instagram
  • Pinterest
  • RSS
  • Twitter
  • YouTube

Get Ideas, Inspiration, and Special Offers!

Sign up to receive updates in your inbox

Thank you!

Please check your email for a special offer! 

.
All content on this blog is the property of Anna Helman, Stampin' Up!® Independent Demonstrator. Classes, services and projects offered here are not endorsed by Stampin' Up!® Projects, videos, photos, ideas and articles are shared for personal use only and may not be removed, duplicated or copied without permission. All artwork © Stampin' Up!®

Copyright © 2025 Anna Helman, handmake with love · Site Design by Catherine Carroll