Today is the first time I’m sharing Tuesday Tips… handy tips on Tuesdays. It’s always nice to pick up little tips and tricks to make your crafting quicker, easier, inexpensivier (!), or just to learn something new! Sometimes I will share ideas I’ve come up with myself, and other times they will be tips I’ve picked up from other people. Today’s tip is about adhesive. Let’s be honest – not all adhesives are created equal. My go to, all purpose adhesive is the Snail. I love the Snail. I’ve probably used miles of it by now. However, sometimes, Snail just won’t cut it. Sometimes I need something as tough as nails, in adhesive form. Meet Fast Fuse.

Fast Fuse is super strong, yet as easy to apply as Snail. Tough and convenient. I use it for thick paper, like foil sheets and watercolor paper. I use it anytime my paper is bowed for some reason, such as if I did embossing or watercoloring on it. I use it for certain embellishments like ribbons and buttons. I even use it behind vellum, because in many cases (depending on the colors underneath the vellum), it doesn’t show through.
How many of you out there have used Fast Fuse? Comment and let me know what your experience was. Did you love it? Hate it? Was it a love-hate relationship? I’ll be honest, I’ve had hate moments with Fast Fuse, but overall, I LOVE it! If you haven’t tried it, you need to!
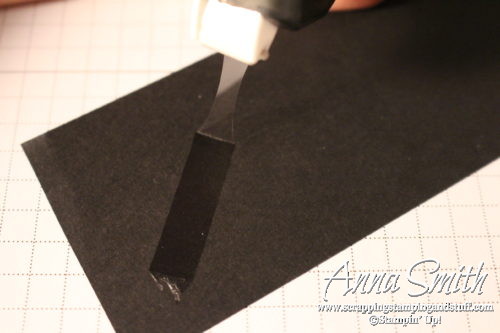
In order to love Fast Fuse, it is essential that you know how to use it properly. The average user will roll out the amount of adhesive they want as shown in the photo below, then raise up to detach the adhesive. However, if you look closely, you can see the adhesive has stretched out but not detached. Fast Fuse could do this for days. Raise it, lower it, raise it, lower it, raise it…it’s still attached. Then it finally breaks and flings gummy super-strong adhesive onto the side of the dispenser. It ends up inside the dispenser too, wreaking havoc on the function of the unit. Let me tell you, it’s quite a dilemma.
Here’s where the tip part of Tip Tuesday comes in. Here’s how to properly use Fast Fuse adhesive.
1. Lower it to the paper and pull back to dispense the amount of adhesive you want.
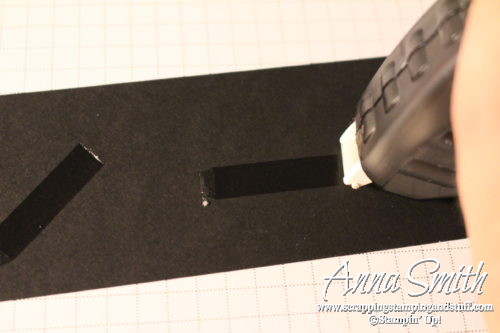
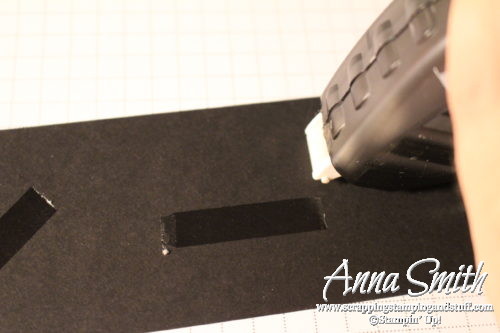
2. Before you raise up, slide to the side. Move it directly to the side, and it will detach itself. Then you can raise up no problem!
A couple of extra hints:
- Alternate sliding left and right to detach the tape. According to a helpful member of Stampin’ Up’s product development team, this will help keep the tape centered, reducing some of the problems I will describe below.
- If the adhesive doesn’t want to start dispensing when you place it on the paper, use your finger to advance the roll just slightly until the adhesive is at the very tip, then try again.
- If you get an extra piece of plastic tape coming out the tip of the dispenser, open the dispenser and remove the cartridge. Lift one of the ‘gear’ pieces so they are no longer interlocking, and then rotate the right roller clockwise until the excess plastic tape is pulled tight. Put it back together and it should work again.
- Keep the inside of the dispenser clean of gummy adhesive. You can use rubbing alcohol to clean it up if needed.
I had no idea I could write a mini novel about Fast Fuse. This might be the longest post I’ve written in weeks! I hope you find it helpful, and do me (and yourself) a favor…add Fast Fuse and a refill cartridge to your next order. It’s worth it!
Products Used:


Thanks so much -this was my first attempt with fast fuse – the left right tip really works. Was almost ready to throw in the trash until I could get the wheels aligned properly as per your instructions.
Wow I just saw your comment. I’m so glad you didn’t throw it away! Are you aware that Fast Fuse retired and that refills are on clearance right now??? It’s time to stock up!!