• Nav Social Menu

    • Facebook
    • Facebook Group
    • Instagram
    • Pinterest
    • RSS
    • Twitter
    • YouTube

Handmake with Love

Anna Helman | formerly Scrapping, Stamping and Stuff

  • Blog
  • Start Here
    • About Me
    • Learn to Make Cards
    • Why Shop With Me?
    • Testimonials
    • Connect On Social
    • Get Email Updates
    • Stampin’ Up! Giveaway Winners
  • Products
    • Shop Now
    • Catalogs
    • Clearance
    • Why Choose Stampin Up?
    • Paper Pumpkin Kits
    • Product Shares
    • Rewards Program
    • Stamparatus
    • Cut And Emboss Machine
    • Mini Cut And Emboss Machine
    • Blends Alcohol Markers
    • Blending Brushes
  • Ideas
    • Video Tutorials
    • Project Gallery
    • Card Ideas
    • 3D Projects
    • Scrapbooking
    • Tips & Techniques
    • Kits
    • Learn to Make Cards
    • Printable Catalog Tabs
    • Social Media
  • Join
    • Join My Team
    • Stampin Up Demonstrator Resources
  • Classes
    • Classes in the Mail
    • In Person Events
  • Contact
    • Contact
    • Connect On Social

Stampin Up Flowering Tulips Fun Fold Flap Card

10 Feb

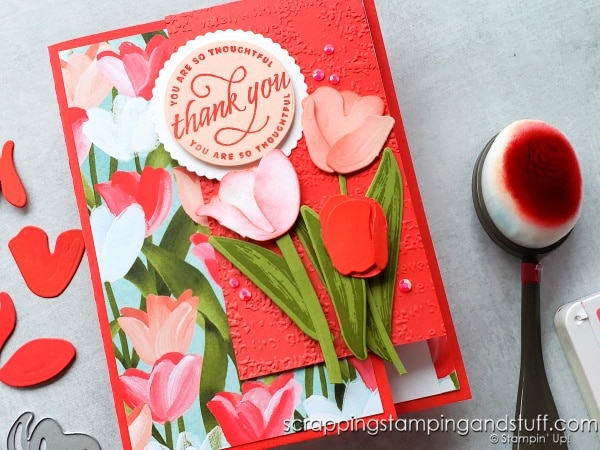
Last week while we were snowed in, I spent a day preparing for this week’s craft projects, and the one I’m sharing today is my favorite! I love creating fun fold cards, and I also love flowers. This card made with the Stampin Up Flowering Tulips bundle is just so pretty. Let’s take a look at it!

See a gorgeous fun fold card made with the Stampin Up Flowering Tulips bundle and also learn how to assemble the Stampin Up Tulips dies!

Stampin Up Flowering Tulips Fun Fold Video Tutorial

Get all the details on today’s card, and see how to create it here, or keep reading for more information!

Stampin Up Flowering Tulips Bundle

This is such a prettty bundle, but I’ll be honest, when I first looked at it I wasn’t sure how to use it. It took me a little time to figure out how to use both the stamps and dies, so I want to share that with you today!

Stampin Up Flowering Tulips Bundle

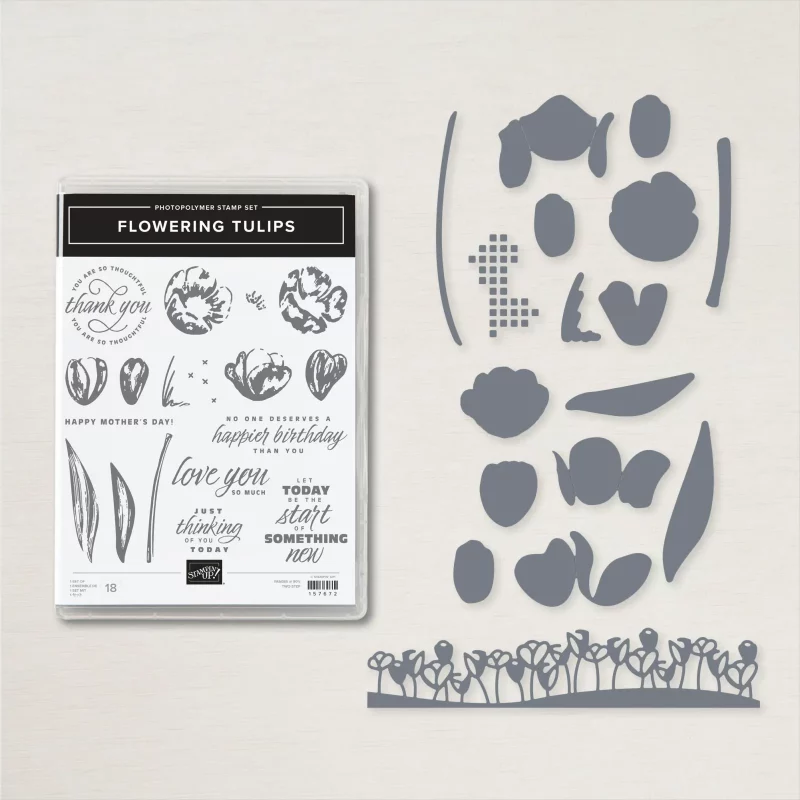
Each tulip stamp has a coordinating one to layer with it. If you look at the front of the stamp set, you’ll see them shown in pairs. For each set of tulip stamps, the one on the left should be stamped with darker ink, and the one on the right should be layered with lighter ink. This creates a really beautiful result, with realistic shading.

See a gorgeous fun fold card made with the Stampin Up Flowering Tulips bundle and also learn how to assemble the Stampin Up Tulips dies!

How To Assemble The Stampin Up Tulips Dies

Next I’ll share a bit about assembling the tulips die cuts. There are probably a lot of ways to use these dies, but the simple way is to fold and layer them as they’re designed. It’s not necessarily common sense when you first see them, so I want to share how it works.
For each of the flowers on my card, I used two of the die cuts. You can see them shown below in pairs.

See a gorgeous fun fold card made with the Stampin Up Flowering Tulips bundle and also learn how to assemble the Stampin Up Tulips dies!

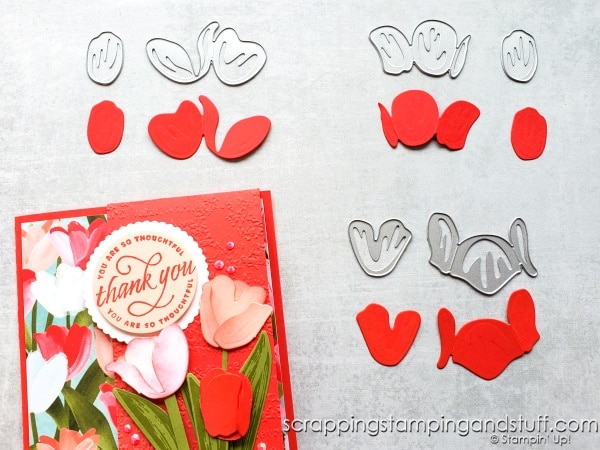
The larger die cuts are designed to be folded in half or thirds. See the score lines on the left and right sides of the die cut below? That’s where it is meant to be folded.

See a gorgeous fun fold card made with the Stampin Up Flowering Tulips bundle and also learn how to assemble the Stampin Up Tulips dies!

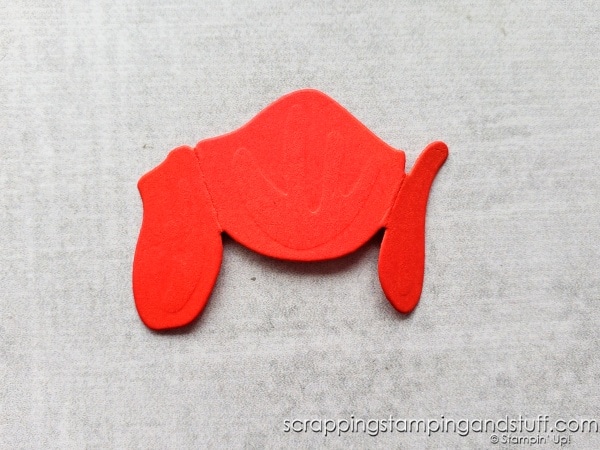
Once the large piece is folded, it needs flipped over.

See a gorgeous fun fold card made with the Stampin Up Flowering Tulips bundle and also learn how to assemble the Stampin Up Tulips dies!

*Note – See the funny lines on the middle portion of the flower above? The back side of my die cuts looked that way because my die cutting plates have been extremely well used. Since both sides of these die cuts will show, you may want to use a newer set of plates when cutting with them, but as you can see here, once the flowers are layered, you don’t notice the lines too much.

After the large part of the flower is folded, the smaller die cut can be inserted inside. Use some glue dots or other quick-holding adhesive to hold them together, and you’re ready to finish your project!

See a gorgeous fun fold card made with the Stampin Up Flowering Tulips bundle and also learn how to assemble the Stampin Up Tulips dies!

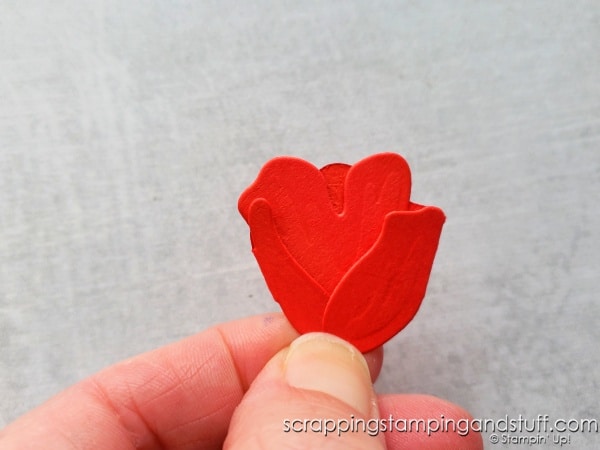
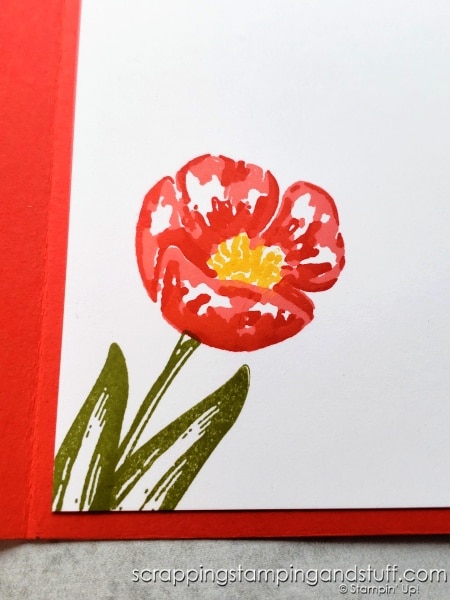
You can use these dies with cardstock or designer paper. For some realistic shading, I decided to add ink around the edges using my blending brushes. You can see this in the video.

This is pretty easy, right? And they’re just beautiful!

Card Materials

To make this card, you’ll need the following:

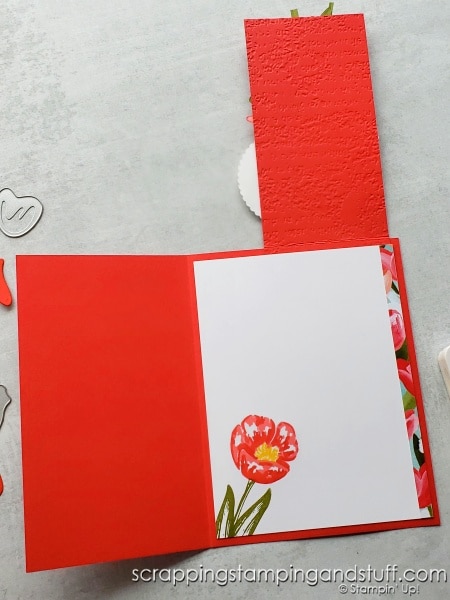
  • 5 1/2″ x 7 1/2″ card base, scored at 4 1/4″ on the long edge
  • 2 1/2″ x 5 1/4″ flap, scored at 1/2″ on the long edge
  • 1/4″ x 5 1/4″ designer paper
  • 3″ x 5 1/4″ designer paper
  • 4″ x 5 1/4″ white
  • Die cuts and sentiment
See a gorgeous fun fold card made with the Stampin Up Flowering Tulips bundle and also learn how to assemble the Stampin Up Tulips dies!

Supplies List

Here are the supplies I used to make this card…

Product List
Flowering Tulips Bundle (English)
[157678]
Flowering Tulips Photopolymer Stamp Set (English)
[157672]
Tulips Dies
Tulips Dies
[157677]
Flowering Fields 12” X 12” (30.5 X 30.5 Cm) Designer Series Paper
[157670]
Timeworn Type 3 D Embossing Folder
[156505]
Poppy Parade 8-1/2" X 11" Cardstock
[119793]
Basic White 8 1/2" X 11" Thick Cardstock
[159229]
Petal Pink 8-1/2" X 11" Cardstock
[146985]
Old Olive 8-1/2" X 11" Cardstock
[100702]
Poppy Parade Classic Stampin' Pad
[147050]
Old Olive Classic Stampin' Pad
[147090]
Flirty Flamingo Classic Stampin' Pad
[147052]
Blending Brushes
Blending Brushes
[153611]
Layering Circles Dies
[151770]
Stampin' Cut & Emboss Machine
[149653]
Paper Trimmer
Paper Trimmer
[152392]
Simply Scored
Simply Scored
[122334]
Bone Folder
Bone Folder
[102300]
2021–2023 In Color Jewels
[155571]
Tear & Tape Adhesive
[138995]
Stampin' Seal+
Stampin' Seal+
[149699]
Multipurpose Liquid Glue
[110755]
Stampin' Dimensionals
[104430]
Add All to Cart

Learn To Make Cards
Shop Supplies
Rewards Program
Join My Amazing Team

See a gorgeous fun fold card made with the Stampin Up Flowering Tulips bundle and also learn how to assemble the Stampin Up Tulips dies!

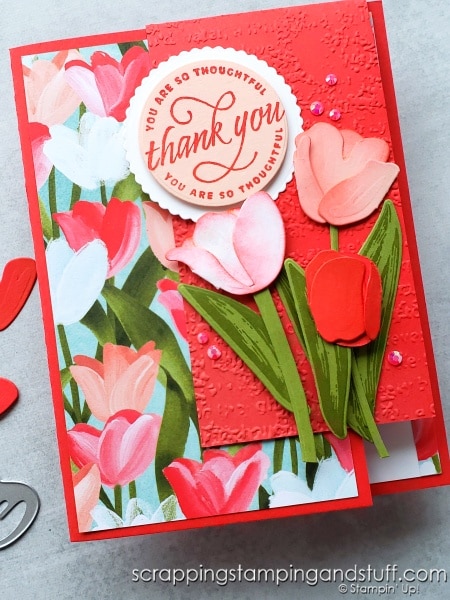
Thank you for following along with today’s fun fold featuring the Stampin Up Flowering Tulips bundle!

Sharing is caring!

Filed Under: Gallery, Tutorials Tagged With: 2022 Stampin Up January-June Mini Catalog, flowering fields designer paper, flowers, fun fold, layering circles dies, stampin up flowering tulips, stampin up tulip dies, thank you, timeworn type embossing folder

Previous Post: « Stampin Up All Together – Blends Marker Techniques & 6 Card Samples
Next Post: Did You Know THIS About Your Tombow Glue? »

Reader Interactions

Comments

  1. Kylie Bertucci says

    April 19, 2022 at 11:05 AM

    Stunning card Anna! Love the layout and how you did the shading on your tulips.
    The stamped tulip inside is gorgeous too!

    Reply
    • Anna Helman says

      April 19, 2022 at 12:42 PM

      Thanks so much Kylie!

      Reply

Trackbacks

  1. Gorgeous Fun Folds - Try Them Today!  says:
    April 14, 2022 at 5:00 AM

    […] is another fun fold tulip card I created using these same […]

    Reply

Leave a Reply Cancel reply

Your email address will not be published. Required fields are marked *

Recipe Rating


Primary Sidebar

Anna Helman

Independent Stampin' Up!® Demonstrator

  • Email
  • Facebook
  • Facebook Group
  • Instagram
  • Pinterest
  • RSS
  • Twitter
  • YouTube
Shop Stampin' Up!
Stampin' Up! catalogs
get updates
join Stampin' Up!
Stampin' Up! Rewards
Stampin' Up! special offers
Stampin' Up! clearance
Stampin' Up! 2025-2026 Annual Catalog
May 6, 2025 - May 4, 2026
View Online | Shop Online

Blog Archive

Categories

Footer

Important Links

  • Home
  • Shop Now
  • Get Updates
  • Join My Team
  • Rewards
  • Specials
  • Catalogs
  • Clearance

Anna Helman, Independent Stampin' Up!® Demonstrator

  • Email
  • Facebook
  • Facebook Group
  • Instagram
  • Pinterest
  • RSS
  • Twitter
  • YouTube

Get Ideas, Inspiration, and Special Offers!

Sign up to receive updates in your inbox

Thank you!

Please check your email for a special offer! 

.
All content on this blog is the property of Anna Helman, Stampin' Up!® Independent Demonstrator. Classes, services and projects offered here are not endorsed by Stampin' Up!® Projects, videos, photos, ideas and articles are shared for personal use only and may not be removed, duplicated or copied without permission. All artwork © Stampin' Up!®

Copyright © 2025 Anna Helman, handmake with love · Site Design by Catherine Carroll