• Nav Social Menu

    • Facebook
    • Facebook Group
    • Instagram
    • Pinterest
    • RSS
    • Twitter
    • YouTube

Handmake with Love

Anna Helman | formerly Scrapping, Stamping and Stuff

  • Blog
  • Start Here
    • About Me
    • Learn to Make Cards
    • Why Shop With Me?
    • Testimonials
    • Connect On Social
    • Get Email Updates
    • Stampin’ Up! Giveaway Winners
  • Products
    • Shop Now
    • Catalogs
    • Clearance
    • Why Choose Stampin Up?
    • Paper Pumpkin Kits
    • Product Shares
    • Rewards Program
    • Stamparatus
    • Cut And Emboss Machine
    • Mini Cut And Emboss Machine
    • Blends Alcohol Markers
    • Blending Brushes
  • Ideas
    • Video Tutorials
    • Project Gallery
    • Card Ideas
    • 3D Projects
    • Scrapbooking
    • Tips & Techniques
    • Kits
    • Learn to Make Cards
    • Printable Catalog Tabs
    • Social Media
  • Join
    • Join My Team
    • Stampin Up Demonstrator Resources
  • Classes
    • Classes in the Mail
    • In Person Events
  • Contact
    • Contact
    • Connect On Social

OSAT Blog Hop – Bring On the Birthdays and a Tiny Treat Box Tutorial

14 Mar

Welcome to this month’s OSAT Blog Hop…Bring on the Birthdays! Everyone loves a good birthday, we all have them, and it’s fun to celebrate, right?! So here’s to celebrating birthdays. Check out the card I made along with a tiny treat box tutorial below!

Stampin' Up! Piece of Cake Birthday Card Idea and Tiny Treat Box Tutorial with Pillow Mints

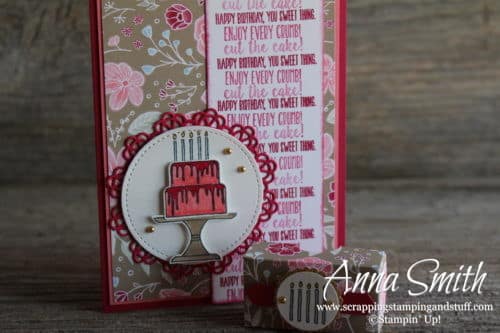
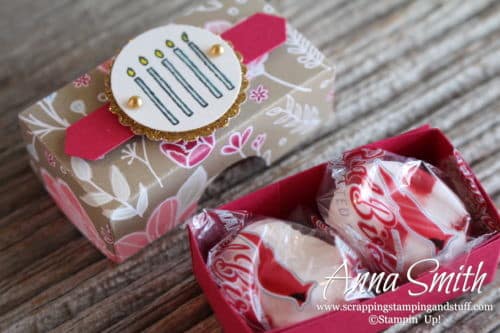
I made these using the Piece of Cake stamp set and coordinating Cake Builder punch. The little box accompanying the card is a tiny treat box to hold small candies. I made it the perfect size to fit two pillow mints, but it would also work for hard candies or mini candy bars. I thought this would be a nice little gift for someone you wouldn’t give an actual gift to, but you still want to do a little something nice to brighten their day, like someone you work with, a church friend, or a neighbor.

Stampin' Up! Piece of Cake Birthday Card Idea and Tiny Treat Box Tutorial with Pillow Mints

So truth be told, I would have come up with another 3D project to go along with my card, but there has been so much happening in my life that I couldn’t possibly use my brain to come up with one more idea!! I made a bunch of these little boxes last week, because I just turned my former house into a craft retreat, and my first group came over the weekend. I wanted to leave them some special treats!

Stampin' Up! Piece of Cake Birthday Card Idea and Tiny Treat Box with Pillow Mints

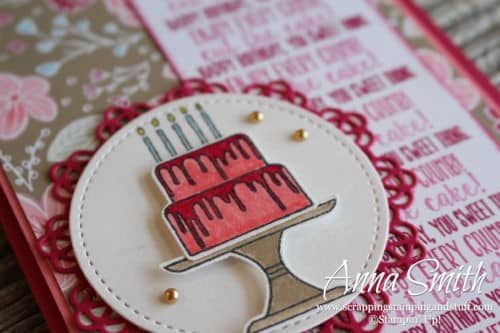
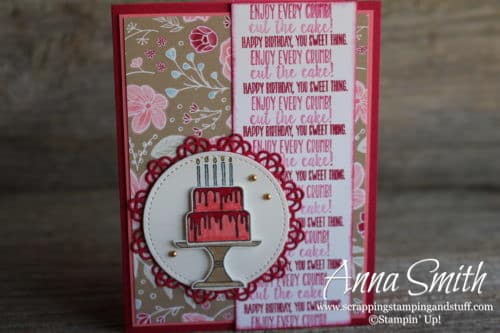
First let’s take a look at the card. I used paper from the All My Love designer paper pack. The greetings down the right side are stamps included in the Piece of Cake stamp set. I Lovely Lipstick ink and stamped off to create the faded effect.

Stampin' Up! Piece of Cake Birthday Card Idea and Tiny Treat Box Tutorial with Pillow Mints

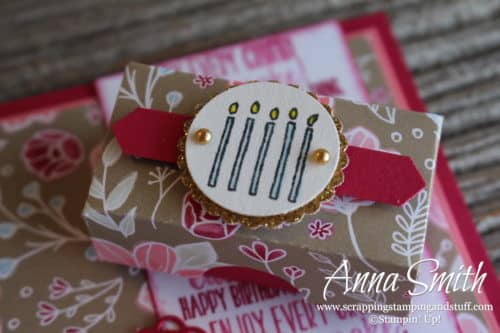
Here is a close up of the tiny treat box. Wouldn’t it brighten your day to find one of these on your pillow next time you stay overnight somewhere?! Or if someone dropped you one on your birthday? If you would like to make some of these yourself, I’ve included a tutorial below.

Stampin' Up! Piece of Cake Birthday Card Idea and Tiny Treat Box Tutorial with Pillow Mints

Thanks for visiting! Make sure to continue along on the blog hop using the links below, and keep reading for the treat box tutorial!


Tiny Treat Box Tutorial

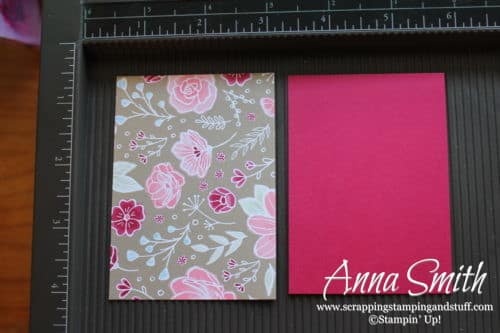
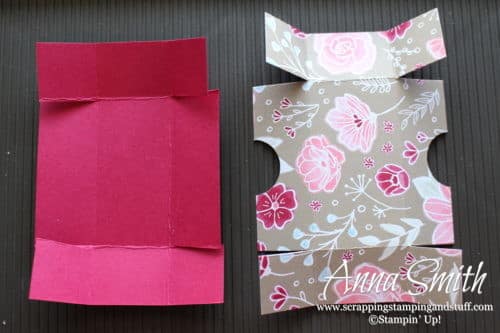
Begin with a 2 ½” x 3 ½” piece of Lovely Lipstick cardstock and 2 5/8” x 3 5/8” piece of designer paper.

Stampin' Up! Piece of Cake Birthday Card Idea and Tiny Treat Box Tutorial with Pillow Mints

Place the cardstock onto your scoring board. Score it ¾” from the left side.

Stampin' Up! Piece of Cake Birthday Card Idea and Tiny Treat Box Tutorial with Pillow Mints

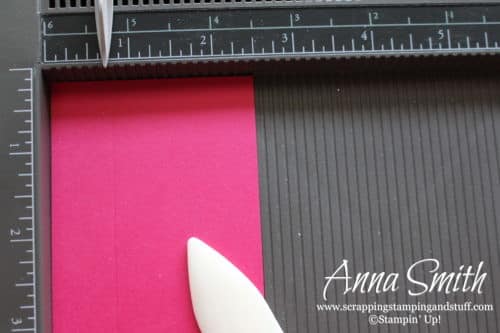
Rotate the cardstock 90 degrees and score again ¾” from the left side.

Stampin' Up! Piece of Cake Birthday Card Idea and Tiny Treat Box Tutorial with Pillow Mints

Repeat the previous step until each side is scored. Do the same with the designer paper.

Stampin' Up! Piece of Cake Birthday Card Idea and Tiny Treat Box Tutorial with Pillow Mints

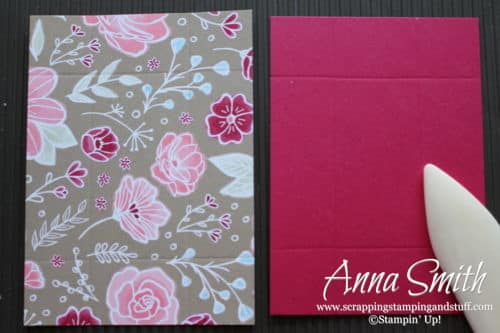
Fold on the score lines to loosen up the folds.

Stampin' Up! Piece of Cake Birthday Card Idea and Tiny Treat Box Tutorial with Pillow Mints

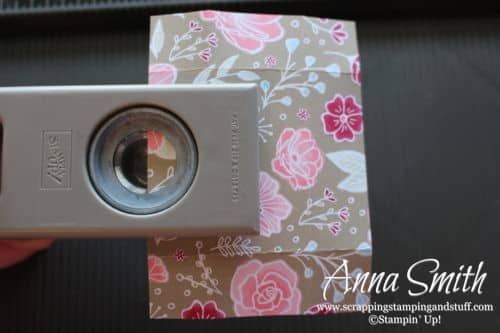
Use a ¾” circle punch to punch semi-circles out of the two long sides of the designer paper. I eyeballed the placement, halfway between the score lines and so that half of the circle will be punched out.

Stampin' Up! Piece of Cake Birthday Card Idea and Tiny Treat Box Tutorial with Pillow Mints

Stampin' Up! Piece of Cake Birthday Card Idea and Tiny Treat Box Tutorial with Pillow Mints

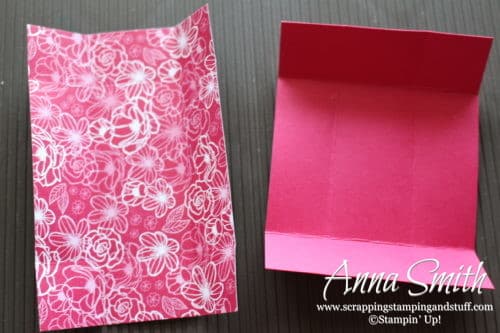
Cut on the score lines to create flaps on each of the four corners. Cut from the outer edge to the first score line.

Stampin' Up! Piece of Cake Birthday Card Idea and Tiny Treat Box Tutorial with Pillow Mints

Lay the papers so that the side that will become the outside edge is face up. Place strong adhesive on each of the four corner flaps. I used our retired Fast Fuse adhesive on these because I ran out of Glue Dots. I would strongly recommend using Glue Dots.

Stampin' Up! Piece of Cake Birthday Card Idea and Tiny Treat Box Tutorial with Pillow Mints

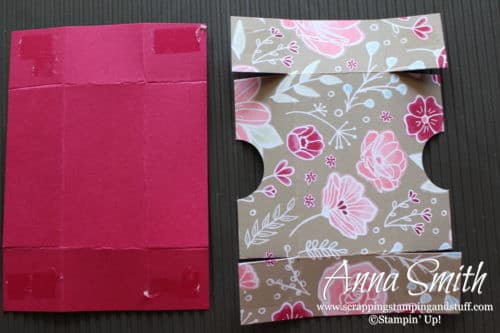
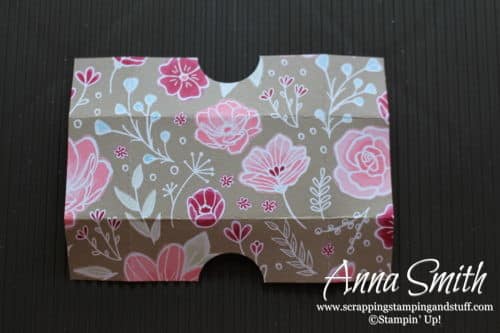
Fold into boxes and apply pressure to the adhesive to secure it in place.

Stampin' Up! Piece of Cake Birthday Card Idea and Tiny Treat Box Tutorial with Pillow Mints

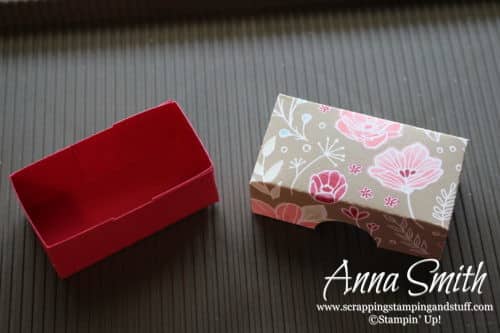
Decorate and fill with treats!

Stampin' Up! Piece of Cake Birthday Card Idea and Tiny Treat Box with Pillow Mints

Please make me your Stampin’ Up! demonstrator!

  • Please use hostess code WKM7TJFA when you order. With an order of $50+, you’ll receive Sale-a-bration benefits PLUS a link to access dozens of free stamping tutorials!
  • Earn these items free during Sale-a-bration!
  • Keep track of your Stampin’ Rewards and earn free stamps from me!
  • When you order $150 or more, you’ll earn hostess credit through Stampin’ Up!

Use the links below to order and make this project yourself! 

Piece Of Cake Photopolymer Bundle

Piece Of Cake Photopolymer Bundle
[150579]

Doily Builder Thinlits Dies

Doily Builder Thinlits Dies
[148553]

Stitched Shapes Framelits Dies

Stitched Shapes Framelits Dies
[145372]

Big Shot

Big Shot
[143263]

1" Circle Punch

1″ Circle Punch
[119868]

3/4" Circle Punch

3/4″ Circle Punch
[119873]

Classic Label Punch

Classic Label Punch
[141491]

Stampin' Trimmer

Stampin’ Trimmer
[126889]

Simply Scored

Simply Scored
[122334]

Bone Folder

Bone Folder
[102300]

Paper Snips Scissors

Paper Snips Scissors
[103579]

All My Love 12" X 12" (30.5 X 30.5 Cm) Designer Series Paper

All My Love 12″ X 12″ (30.5 X 30.5 Cm) Designer Series Paper
[148576]

All My Love 8-1/2" X 11" Cardstock Pack

All My Love 8-1/2″ X 11″ Cardstock Pack
[148578]

Whisper White 8-1/2" X 11" Card Stock

Whisper White 8-1/2″ X 11″ Card Stock
[100730]

Lovely Lipstick Classic Stampin' Pad

Lovely Lipstick Classic Stampin’ Pad
[147140]

Tuxedo Black Memento Ink Pad

Tuxedo Black Memento Ink Pad
[132708]

Many Marvelous Markers

Many Marvelous Markers
[147154]

In Color 2018–2020 Stampin' Write Markers

In Color 2018–2020 Stampin’ Write Markers
[147159]

Metallic Pearls

Metallic Pearls
[146282]

SNAIL Permanent Adhesive

SNAIL Permanent Adhesive
[104332]

Glue Dots

Glue Dots
[103683]

Stampin' Dimensionals

Stampin’ Dimensionals
[104430]
Sharing is caring!

Filed Under: Cards, Tutorials Tagged With: all my love dsp, birthday, cake builder punch, circle punch, classic label punch, doily builder thinlits, gold, piece of cake, pink, scallop circle punch, stitched shapes, treat holder

Previous Post: « Windmill Lane Farm Craft Retreat – Now Available for Bookings!
Next Post: The 2019-2020 Stampin’ Up! Annual Catalog Is Live! »

Reader Interactions

Comments

  1. Candy Ford says

    March 14, 2019 at 11:45 PM

    Adorable! Love the tiny pillow gift. How awesome about your new craft retreat! Sounds super fun!

    Reply
  2. Emma Goddard says

    March 15, 2019 at 1:16 PM

    What a sweet box! and coordinating card.

    Reply
  3. Jo Anne Hewins says

    March 15, 2019 at 10:17 PM

    Love that doily behind your cake! Thanks for the box directions!

    Reply
  4. Martin Stone says

    March 16, 2019 at 1:40 PM

    Who wouldn’t want to receive something as cute as this!

    Reply
  5. Sheila Bacon says

    March 18, 2019 at 10:08 AM

    Wow! What colorful and eye-catching card and box! Thank you for the directions and pix so that the box can be recreated!

    Reply

Trackbacks

  1. Designer Paper Sale and Some Cute Mint Boxes | Scrapping Stamping and Stuff says:
    September 5, 2019 at 5:01 AM

    […] I make these mint boxes to be carefully placed on the pillows at Windmill Lane Farm, the craft retreat I started this past year. If you would like the tutorial for how to make the boxes, you can find it here. […]

    Reply

Leave a Reply Cancel reply

Your email address will not be published. Required fields are marked *

Recipe Rating


Primary Sidebar

Anna Helman

Independent Stampin' Up!® Demonstrator

  • Email
  • Facebook
  • Facebook Group
  • Instagram
  • Pinterest
  • RSS
  • Twitter
  • YouTube
Shop Stampin' Up!
Stampin' Up! catalogs
get updates
join Stampin' Up!
Stampin' Up! Rewards
Stampin' Up! special offers
Stampin' Up! clearance
Stampin' Up! 2025-2026 Annual Catalog
May 6, 2025 - May 4, 2026
View Online | Shop Online

Blog Archive

Categories

Footer

Important Links

  • Home
  • Shop Now
  • Get Updates
  • Join My Team
  • Rewards
  • Specials
  • Catalogs
  • Clearance

Anna Helman, Independent Stampin' Up!® Demonstrator

  • Email
  • Facebook
  • Facebook Group
  • Instagram
  • Pinterest
  • RSS
  • Twitter
  • YouTube

Get Ideas, Inspiration, and Special Offers!

Sign up to receive updates in your inbox

Thank you!

Please check your email for a special offer! 

.
All content on this blog is the property of Anna Helman, Stampin' Up!® Independent Demonstrator. Classes, services and projects offered here are not endorsed by Stampin' Up!® Projects, videos, photos, ideas and articles are shared for personal use only and may not be removed, duplicated or copied without permission. All artwork © Stampin' Up!®

Copyright © 2025 Anna Helman, handmake with love · Site Design by Catherine Carroll