• Nav Social Menu

    • Facebook
    • Facebook Group
    • Instagram
    • Pinterest
    • RSS
    • Twitter
    • YouTube

Handmake with Love

Anna Helman | formerly Scrapping, Stamping and Stuff

  • Blog
  • Start Here
    • About Me
    • Learn to Make Cards
    • Why Shop With Me?
    • Testimonials
    • Connect On Social
    • Get Email Updates
    • Stampin’ Up! Giveaway Winners
  • Products
    • Shop Now
    • Catalogs
    • Clearance
    • Why Choose Stampin Up?
    • Paper Pumpkin Kits
    • Product Shares
    • Rewards Program
    • Stamparatus
    • Cut And Emboss Machine
    • Mini Cut And Emboss Machine
    • Blends Alcohol Markers
    • Blending Brushes
  • Ideas
    • Video Tutorials
    • Project Gallery
    • Card Ideas
    • 3D Projects
    • Scrapbooking
    • Tips & Techniques
    • Kits
    • Learn to Make Cards
    • Printable Catalog Tabs
    • Social Media
  • Join
    • Join My Team
    • Stampin Up Demonstrator Resources
  • Classes
    • Classes in the Mail
    • In Person Events
  • Contact
    • Contact
    • Connect On Social

How To Line Up Punches Simply With This One Handy Trick

10 Mar

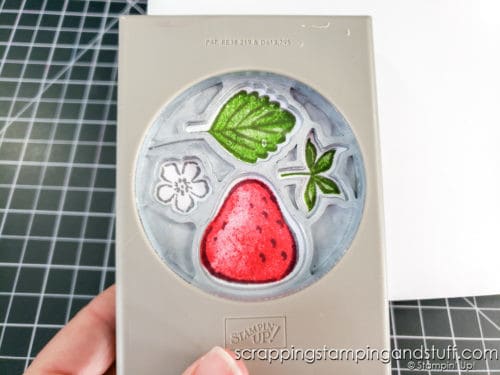
Hello and welcome! If you’ve been here before, you know I love to share tips and tricks to make cardmaking easier and more enjoyable. Today, I’m going to share how to easily line up builder punches and stamped images for cardmaking and other papercraft projects. There are so many coordinating punches and stamp sets that I love, it’s hard to pick a favorite, but if I had to, I would say Stampin Up’s Strawberry Builder Punch and Sweet Strawberry Stamp Set would be near the top of my list. The problem with this type of punch is they can be cumbersome to use with so many pieces. Never fear…I have a solution for you today that makes it easy as pie!

Learn how to line up punches, even those with multiple pieces, quickly and easily with this one handy cardmaking hack!

How to Line Up Punches Video

To follow along with today’s cardmaking tip, watch along with my video below!

How to Line Up Punches Perfectly

Once you get the hang of it, today’s tip is really quick and easy to use. Here’s a list of some things you’ll need to gather before you begin:

  • Scrap Paper
  • Builder Punch of Your Choice
  • Coordinating Stamp Set
  • Stamp pads

Making a Template

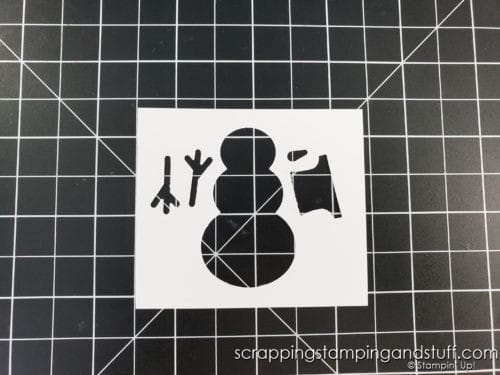
To begin, reach for the scrap paper you prepared and builder punch you selected. With your builder punch, punch out the image from the scrap paper.

This will be used as a template for lining up the coordinating stamps.
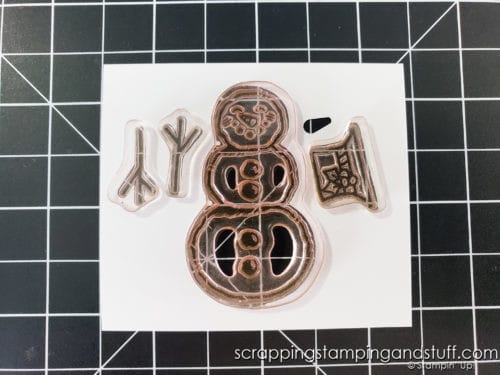
 Learn how to line up punches, even those with multiple pieces, quickly and easily with this one handy cardmaking hack!

Mounting the Stamps

Next, let’s line up the stamps.

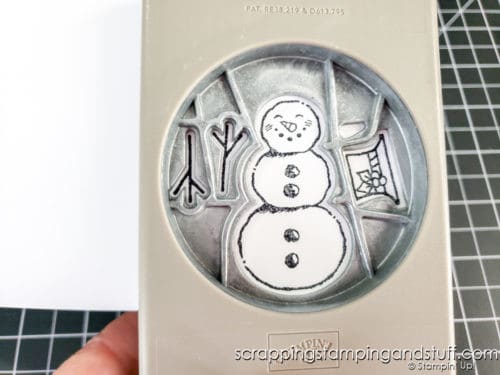
With the scrap piece in front of you, get the coordinating stamp set you selected. Begin by placing the coordinating stamps over top of the holes you just punched out. Sometimes it’s easier to use the pointed end of the Take Your Pick tool to line up and move around stamps if they’re sticking to your fingers and not cooperating.

 Learn how to line up punches, even those with multiple pieces, quickly and easily with this one handy cardmaking hack!

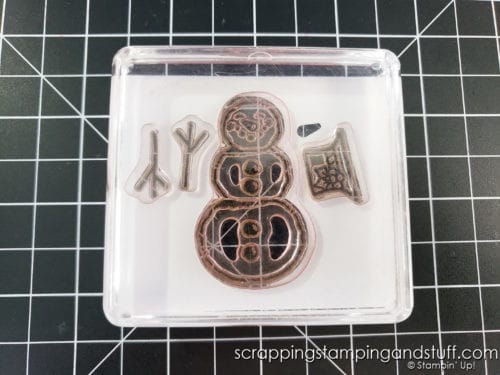
Once the stamps are in place, lay an acrylic block over top and press to adhere them to the block. Now you’re stamps are perfectly lined up to align with the punch.

 Learn how to line up punches, even those with multiple pieces, quickly and easily with this one handy cardmaking hack!

Stamping & Punching

Now it’s time to ink and stamp. Once the image is stamped with your choice of ink and cardstock, you can color in the images with pencils or markers, or add color with coordinating stamps if they’re included in the stamp set.

 Learn how to line up punches, even those with multiple pieces, quickly and easily with this one handy cardmaking hack!

Once the color is added, get your coordinating punch. Simply slide the punch over the cardstock, line it up, and give it a good punch!

 Learn how to line up punches, even those with multiple pieces, quickly and easily with this one handy cardmaking hack!

Viola! You have a perfectly stamped and punched image. I hope you’ve enjoyed today’s tip. Stop back soon for more great paper crafting ideas and info!

Don’t Miss Out!

Please make me your Stampin’ Up! demonstrator!  Earn rewards points towards free stamps PLUS a gift when you order. Use host code: EUPGXHR6 PLUS, with your first order, you’ll receive free catalogs in your thank you package!

Did you enjoy this tip? If so, you might also like:

How To Unclog The Stampin Up Fine Tip Glue Pen

3 Paper Saving Tips To Get More Use From Your Beautiful Papers!

Quick Tip To Apply And Remove Backing From Foam Dots

Thanks for visiting for today’s tip – how to line up punches!!

Sharing is caring!

Filed Under: Gallery, Learn to Stamp Tagged With: cardmaking tips and tricks, snowman builder punch, strawberry builder punch, tips and tricks

Previous Post: « A Fun New Card Design To Try Today!
Next Post: A Sweet Lamb With Stampin Up Springtime Joy »

Reader Interactions

Comments

  1. Kathryn A Fleming says

    March 10, 2021 at 9:35 AM

    HI Anna- thank you for sharing yet another brilliant set of tips! Now I can go from tired and tedious to fast and easy !!!

    Reply
  2. Kelli says

    April 17, 2021 at 5:07 PM

    BRILLIANT!

    Reply

Trackbacks

  1. Using A Candle To Loosen Up Stiff Ink Pads says:
    May 12, 2021 at 5:00 AM

    […] How To Line Up Punches Simply With This One Handy Trick […]

    Reply

Leave a Reply Cancel reply

Your email address will not be published. Required fields are marked *

Recipe Rating


Primary Sidebar

Anna Helman

Independent Stampin' Up!® Demonstrator

  • Email
  • Facebook
  • Facebook Group
  • Instagram
  • Pinterest
  • RSS
  • Twitter
  • YouTube
Shop Stampin' Up!
Stampin' Up! catalogs
get updates
join Stampin' Up!
Stampin' Up! Rewards
Stampin' Up! special offers
Stampin' Up! clearance
Stampin' Up! 2025-2026 Annual Catalog
May 6, 2025 - May 4, 2026
View Online | Shop Online

Blog Archive

Categories

Footer

Important Links

  • Home
  • Shop Now
  • Get Updates
  • Join My Team
  • Rewards
  • Specials
  • Catalogs
  • Clearance

Anna Helman, Independent Stampin' Up!® Demonstrator

  • Email
  • Facebook
  • Facebook Group
  • Instagram
  • Pinterest
  • RSS
  • Twitter
  • YouTube

Get Ideas, Inspiration, and Special Offers!

Sign up to receive updates in your inbox

Thank you!

Please check your email for a special offer! 

.
All content on this blog is the property of Anna Helman, Stampin' Up!® Independent Demonstrator. Classes, services and projects offered here are not endorsed by Stampin' Up!® Projects, videos, photos, ideas and articles are shared for personal use only and may not be removed, duplicated or copied without permission. All artwork © Stampin' Up!®

Copyright © 2025 Anna Helman, handmake with love · Site Design by Catherine Carroll