• Nav Social Menu

    • Facebook
    • Facebook Group
    • Instagram
    • Pinterest
    • RSS
    • Twitter
    • YouTube

Handmake with Love

Anna Helman | formerly Scrapping, Stamping and Stuff

  • Blog
  • Start Here
    • About Me
    • Learn to Make Cards
    • Why Shop With Me?
    • Testimonials
    • Connect On Social
    • Get Email Updates
    • Stampin’ Up! Giveaway Winners
  • Products
    • Shop Now
    • Catalogs
    • Clearance
    • Why Choose Stampin Up?
    • Paper Pumpkin Kits
    • Product Shares
    • Rewards Program
    • Stamparatus
    • Cut And Emboss Machine
    • Mini Cut And Emboss Machine
    • Blends Alcohol Markers
    • Blending Brushes
  • Ideas
    • Video Tutorials
    • Project Gallery
    • Card Ideas
    • 3D Projects
    • Scrapbooking
    • Tips & Techniques
    • Kits
    • Learn to Make Cards
    • Printable Catalog Tabs
    • Social Media
  • Join
    • Join My Team
    • Stampin Up Demonstrator Resources
  • Classes
    • Classes in the Mail
    • In Person Events
  • Contact
    • Contact
    • Connect On Social

Cut Stamps Apart To Make Them More Versatile!

17 Dec

Welcome friends! I have a quick tip to share today, which is how to cut stamps apart to make them more versatile for you. For the longest time, I never considered cutting stamps, but then I realized it would actually make them more usable in some situations. Let’s talk about why.

Click for this quick card making tip - cut stamps apart to make them more versatile!

Reasons To Consider Cutting Stamps

There are several reasons you may want to cut stamps including:

  • You only want to use part of a sentiment stamp
  • You want to stamp part of the stamp with one color and part with another color
  • You want to rearrange the words in the greeting
  • You want to remove a portion
  • You want to use part of the sentiment on the front of a card and part on the inside

Before you start cutting your stamps apart, please read the following!

Disclaimer

I know some readers are thinking ‘Well Anna you can do that same thing by doing this little technique…’ and I realize you can do many of the things above with different techniques. For example, if you only want to stamp part of a greeting, you can:

Use a marker to color only the portion of the stamp you want to use

OR

Use tape over the portion of a stamp you don’t want, then ink your stamp, then remove the tape

So I’m not saying to cut apart all of your stamps! I’m just sharing this as one more idea for getting the most out of the stamps in your collection!

Example

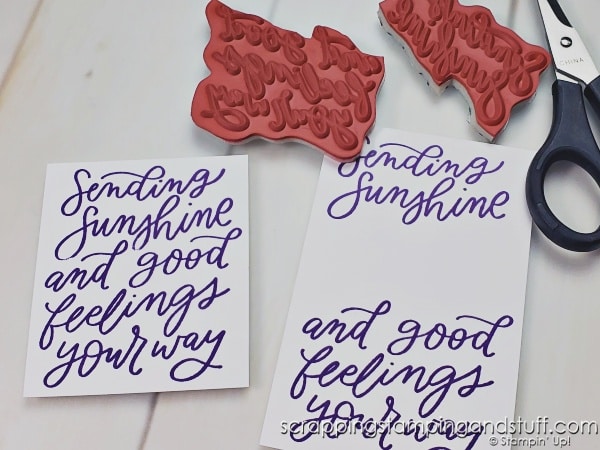
Here you can see that I took one large stamp and cut it into two portions, one to use on card fronts and the other for the insides. I can easily nest them back together and use as one stamp, or when desired I can use them separately. This is just one example of the many situations where you might want your stamps in separate pieces.

Click for this quick card making tip - cut stamps apart to make them more versatile!

Cut Stamps Apart To Make Them More Versatile Video

Watch along here as I share a few tips for how to best cut stamps.

Products Used

Take a look at the stamps I used here.

Product List
Good Feelings Cling Stamp Set (English)
[158737]
Paper Snips
Paper Snips
[103579]
Add All to Cart

Learn To Make Cards
Shop Supplies
Rewards Program
Join My Amazing Team

Will you cut stamps in your collection or leave them all as is?

Sharing is caring!

Filed Under: Gallery, Learn to Stamp Tagged With: 2022-2023 Stampin Up Annual Catalog, cardmaking hacks, cardmaking tips and tricks, learn to stamp, tips and tricks

Previous Post: « Stampin Up Desert Details & 8 Stamparatus Techniques
Next Post: 7 Vintage Card Techniques To Try Today! »

Reader Interactions

Comments

  1. Trish says

    December 17, 2022 at 12:09 PM

    I forget about this sometimes. I don’t have wonderful scissors for the cutting so I have a trick that helps. I start with an Xacto knife and make a shallow cut first. I DON’T cut all the way through to begin with. I may even continue with several passes with the Xacto knife on the rubber side and finish with scissors when I get to the label. Merry Christmas from one Hoosier to another

    Reply
    • Anna Helman says

      December 17, 2022 at 12:28 PM

      Sounds like that works perfectly! Thanks Trish, Merry Christmas!

      Reply

Leave a Reply Cancel reply

Your email address will not be published. Required fields are marked *

Recipe Rating


Primary Sidebar

Anna Helman

Independent Stampin' Up!® Demonstrator

  • Email
  • Facebook
  • Facebook Group
  • Instagram
  • Pinterest
  • RSS
  • Twitter
  • YouTube
Shop Stampin' Up!
Stampin' Up! catalogs
get updates
join Stampin' Up!
Stampin' Up! Rewards
Stampin' Up! special offers
Stampin' Up! clearance
Stampin' Up! 2025-2026 Annual Catalog
May 6, 2025 - May 4, 2026
View Online | Shop Online

Blog Archive

Categories

Footer

Important Links

  • Home
  • Shop Now
  • Get Updates
  • Join My Team
  • Rewards
  • Specials
  • Catalogs
  • Clearance

Anna Helman, Independent Stampin' Up!® Demonstrator

  • Email
  • Facebook
  • Facebook Group
  • Instagram
  • Pinterest
  • RSS
  • Twitter
  • YouTube

Get Ideas, Inspiration, and Special Offers!

Sign up to receive updates in your inbox

Thank you!

Please check your email for a special offer! 

.
All content on this blog is the property of Anna Helman, Stampin' Up!® Independent Demonstrator. Classes, services and projects offered here are not endorsed by Stampin' Up!® Projects, videos, photos, ideas and articles are shared for personal use only and may not be removed, duplicated or copied without permission. All artwork © Stampin' Up!®

Copyright © 2025 Anna Helman, handmake with love · Site Design by Catherine Carroll