• Nav Social Menu

    • Facebook
    • Facebook Group
    • Instagram
    • Pinterest
    • RSS
    • Twitter
    • YouTube

Handmake with Love

Anna Helman | formerly Scrapping, Stamping and Stuff

  • Blog
  • Start Here
    • About Me
    • Learn to Make Cards
    • Why Shop With Me?
    • Testimonials
    • Connect On Social
    • Get Email Updates
    • Stampin’ Up! Giveaway Winners
  • Products
    • Shop Now
    • Catalogs
    • Clearance
    • Why Choose Stampin Up?
    • Paper Pumpkin Kits
    • Product Shares
    • Rewards Program
    • Stamparatus
    • Cut And Emboss Machine
    • Mini Cut And Emboss Machine
    • Blends Alcohol Markers
    • Blending Brushes
  • Ideas
    • Video Tutorials
    • Project Gallery
    • Card Ideas
    • 3D Projects
    • Scrapbooking
    • Tips & Techniques
    • Kits
    • Learn to Make Cards
    • Printable Catalog Tabs
    • Social Media
  • Join
    • Join My Team
    • Stampin Up Demonstrator Resources
  • Classes
    • Classes in the Mail
    • In Person Events
  • Contact
    • Contact
    • Connect On Social

Cut ALL The Shapes At Once For Unique Cards!

31 Jan

A while back I shared a tip about cutting several dies at once, in order to end up with an assortment of die cuts with just one crank through your machine. I have another tip to share today that is similar, but with a different end result. Let’s take a look!

Cut ALL the nesting shapes at once for unique card projects! Use them to highlight a stamp, frame printed paper, or create unique backgrounds!

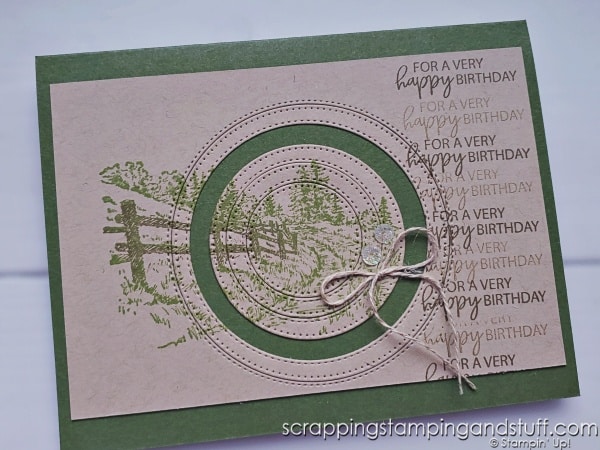
As a side note, right now during Sale-a-bration, you can get all of the stamps and papers shown on the cards below for free! With any $50 order, you can choose a free item. Take a look here to learn more.

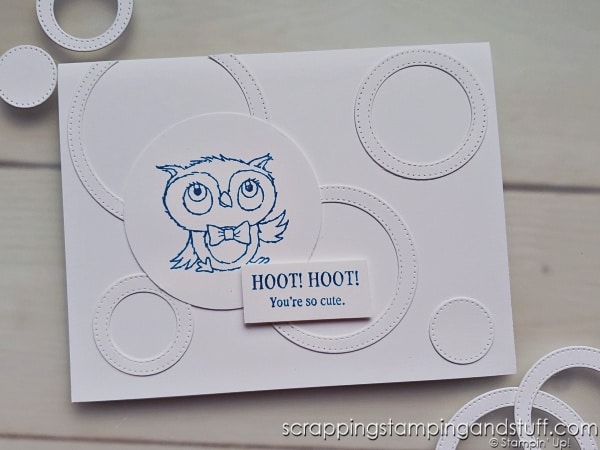
Next time you’re doing some die cutting, try the following. Grab a set of nesting shape dies, like circles, squares or rectangles. Lay a piece of cardstock on your base plate, and place all the dies on top so they are nested together and with even spacing. If you need to hold them in place, use a post-it note or some washi tape.

Cut ALL the nesting shapes at once for unique card projects! Use them to highlight a stamp, frame printed paper, or create unique backgrounds!

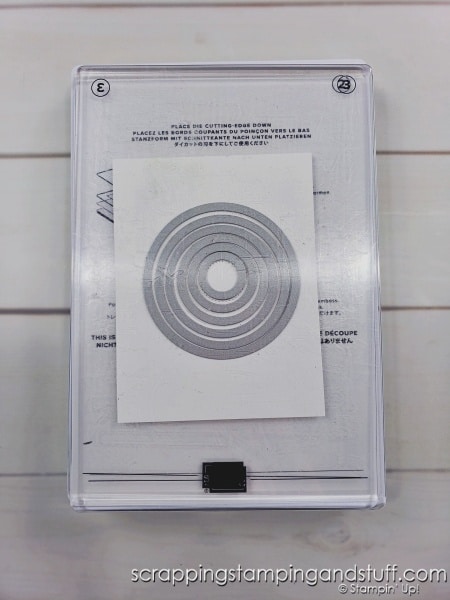
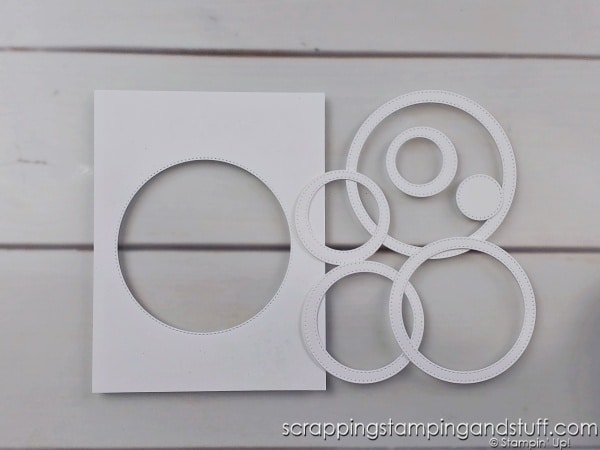
Run this through your die cutting machine and you’ll get something that looks like this.

Cut ALL the nesting shapes at once for unique card projects! Use them to highlight a stamp, frame printed paper, or create unique backgrounds!

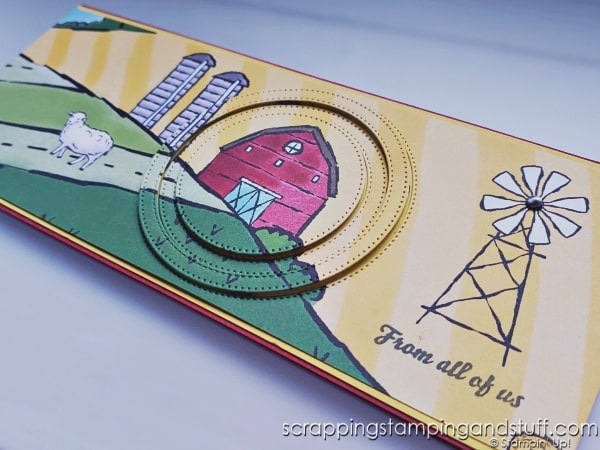
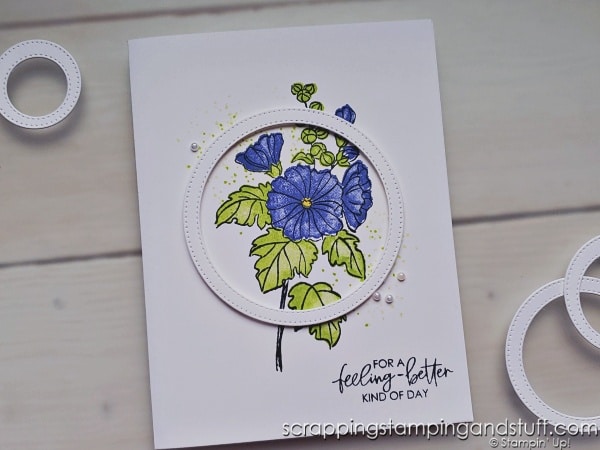
You can cut plain cardstock as shown above, or you can stamp something first and then do your cutting. Another option is to use a piece of printed paper.

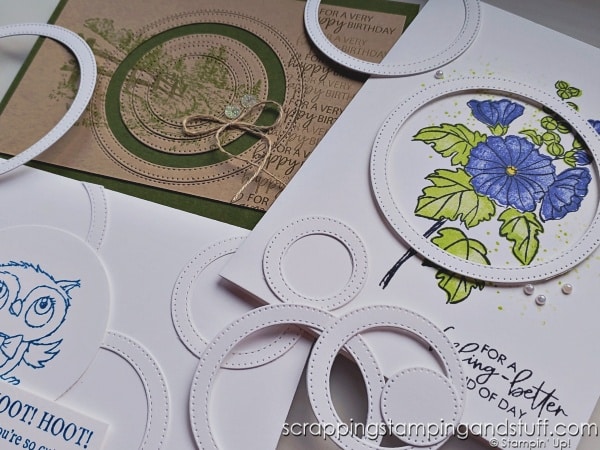
What can you do with these shapes? Here are a few ideas.

Cut ALL the nesting shapes at once for unique card projects! Use them to highlight a stamp, frame printed paper, or create unique backgrounds!

Highlight A Stamped Image

Cut ALL the nesting shapes at once for unique card projects! Use them to highlight a stamp, frame printed paper, or create unique backgrounds!

Create A Focal Point For Printed Paper

Cut ALL the nesting shapes at once for unique card projects! Use them to highlight a stamp, frame printed paper, or create unique backgrounds!

Frame An Object

Cut ALL the nesting shapes at once for unique card projects! Use them to highlight a stamp, frame printed paper, or create unique backgrounds!

Unique Backgrounds

Cut ALL the nesting shapes at once for unique card projects! Use them to highlight a stamp, frame printed paper, or create unique backgrounds!

Video Tutorial

Watch along here as I explain more!!

Bonus tip – If you want to get even more shapes with one crank through your machine, lay several sets of nested shapes on your base plate at one time!

See more card making tips and tricks here!

Supply List

Product List
In The Country Cling Stamp Set
[160828]
Adorable Owls Cling Stamp Set (English)
[160269]
Beautifully Happy Photopolymer Stamp Set (English)
[160804]
Stylish Shapes Dies
Stylish Shapes Dies
[159183]
Stampin' Cut & Emboss Machine
[149653]
Day At The Farm 12" X 12" (30.5 X 30.5 Cm) Designer Series Paper
[160835]
On The Farm Bundle (English)
[160661]
On The Farm Cling Stamp Set (English)
[160652]
Parakeet Party Classic Stampin' Pad
[159208]
Orchid Oasis Classic Stampin' Pad
[159214]
Orchid Oasis Classic Stampin' Pad
[159214]
Tuxedo Black Memento Ink Pad
[132708]
Old Olive Classic Stampin' Pad
[147090]
Old Olive Classic Stampin' Pad
[147090]
Soft Suede Classic Stampin' Pad
[147115]
Pacific Point Classic Stampin' Pad
[147098]
Basic White 8 1/2" X 11" Thick Cardstock
[159229]
Mossy Meadow 8-1/2" X 11" Cardstock
[133676]
Cherry Cobbler 8-1/2" X 11" Cardstock
[119685]
Daffodil Delight 8-1/2" X 11" Cardstock
[119683]
Iridescent Rhinestones Basic Jewels
[158130]
Linen Thread
Linen Thread
[104199]
Adhesive Backed Studs
[160767]
Paper Trimmer
Paper Trimmer
[152392]
Stampin' Seal
Stampin' Seal
[152813]
Stampin' Dimensionals
[104430]
Add All to Cart

Learn To Make Cards
Shop Supplies
Rewards Program
Join My Amazing Team

Sharing is caring!

Filed Under: Gallery, Learn to Stamp Tagged With: cardmaking tips and tricks, sale-a-bration 2023, technique

Previous Post: « Fix That Messed Up Greeting In Seconds!
Next Post: Game Changer – How I Prep My Clear Stamps! »

Reader Interactions

Comments

  1. Barb says

    January 31, 2023 at 9:04 AM

    You are the best. This is a GREAT idea, and my next card is going to use this technique!

    Reply
  2. Judy Harmon says

    January 31, 2023 at 10:56 AM

    This idea is great, Anna, and one I’m going to try. Since I ‘m fairly new using dies, I love having tips for something different or unique. Thank you for sharing… I’ve learned a LOT from watching you on YouTube ❤️X

    Reply
    • Anna Helman says

      January 31, 2023 at 2:30 PM

      I’m so glad you can get some useful ideas here. Thanks for following along!

      Reply
  3. Laurie Hable says

    January 31, 2023 at 4:50 PM

    Great idea, Anna! Thank you for sharing!

    Reply
    • Anna Helman says

      January 31, 2023 at 5:01 PM

      Thanks Laurie!

      Reply

Trackbacks

  1. Stampin Up On The Farm & Beginner Level Cards To Make In Minutes says:
    February 11, 2023 at 5:01 AM

    […] Here are two more cards with some added interest. For this card, I used the Day At The Farm designer paper, which you can get free right now during Sale-a-bration, and I used my circle dies to focus on the barn. If you would like to see more about this technique of using several nested shape dies in one place, take a look here. […]

    Reply

Leave a Reply Cancel reply

Your email address will not be published. Required fields are marked *

Recipe Rating


Primary Sidebar

Anna Helman

Independent Stampin' Up!® Demonstrator

  • Email
  • Facebook
  • Facebook Group
  • Instagram
  • Pinterest
  • RSS
  • Twitter
  • YouTube
Shop Stampin' Up!
Stampin' Up! catalogs
get updates
join Stampin' Up!
Stampin' Up! Rewards
Stampin' Up! special offers
Stampin' Up! clearance
Stampin' Up! 2025-2026 Annual Catalog
May 6, 2025 - May 4, 2026
View Online | Shop Online

Blog Archive

Categories

Footer

Important Links

  • Home
  • Shop Now
  • Get Updates
  • Join My Team
  • Rewards
  • Specials
  • Catalogs
  • Clearance

Anna Helman, Independent Stampin' Up!® Demonstrator

  • Email
  • Facebook
  • Facebook Group
  • Instagram
  • Pinterest
  • RSS
  • Twitter
  • YouTube

Get Ideas, Inspiration, and Special Offers!

Sign up to receive updates in your inbox

Thank you!

Please check your email for a special offer! 

.
All content on this blog is the property of Anna Helman, Stampin' Up!® Independent Demonstrator. Classes, services and projects offered here are not endorsed by Stampin' Up!® Projects, videos, photos, ideas and articles are shared for personal use only and may not be removed, duplicated or copied without permission. All artwork © Stampin' Up!®

Copyright © 2025 Anna Helman, handmake with love · Site Design by Catherine Carroll