• Nav Social Menu

    • Facebook
    • Facebook Group
    • Instagram
    • Pinterest
    • RSS
    • Twitter
    • YouTube

Handmake with Love

Anna Helman | formerly Scrapping, Stamping and Stuff

  • Blog
  • Start Here
    • About Me
    • Learn to Make Cards
    • Why Shop With Me?
    • Testimonials
    • Connect On Social
    • Get Email Updates
    • Stampin’ Up! Giveaway Winners
  • Products
    • Shop Now
    • Catalogs
    • Clearance
    • Why Choose Stampin Up?
    • Paper Pumpkin Kits
    • Product Shares
    • Rewards Program
    • Stamparatus
    • Cut And Emboss Machine
    • Mini Cut And Emboss Machine
    • Blends Alcohol Markers
    • Blending Brushes
  • Ideas
    • Video Tutorials
    • Project Gallery
    • Card Ideas
    • 3D Projects
    • Scrapbooking
    • Tips & Techniques
    • Kits
    • Learn to Make Cards
    • Printable Catalog Tabs
    • Social Media
  • Join
    • Join My Team
    • Stampin Up Demonstrator Resources
  • Classes
    • Classes in the Mail
    • In Person Events
  • Contact
    • Contact
    • Connect On Social

Snow Globe Treat Holder – DIY Halloween Treats Week Day 5

9 Oct

Welcome back! Have you been following along this week with all of the DIY Halloween treats that I’ve been sharing? If not, make sure to use the links at the bottom to look back a few days. I’ll have two more to share with you as well, so check back in the next few days! Today I have a neat snow globe treat holder to share with you that I made with the new Stampin Up Snow Globe Scenes dies. Here it is!

Stampin Up Snow Globe Treat Holder! Adorable Halloween card and candy corn treat holder using the Stampin Up Snow Globes Scenes Dies and clear plastic domes! Cute DIY Halloween Treats

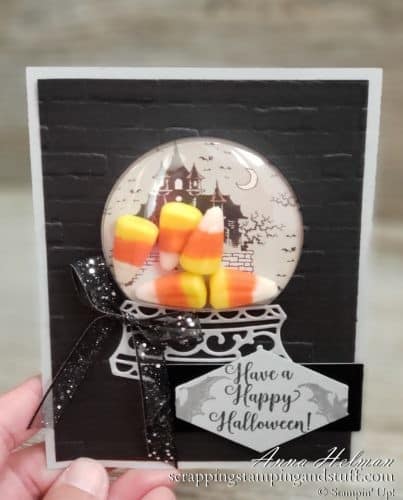
You can do sooooo many things with these snow globe dies and clear plastic domes. One day it occured to me that you could even put treats inside them, so I tried it out on these Halloween cards!

Stampin Up Snow Globe Treat Holder! Adorable Halloween card and candy corn treat holder using the Stampin Up Snow Globes Scenes Dies and clear plastic domes! Cute DIY Halloween Treats

Putting these together takes a few steps and some thought. I did the thought, so I wanted to share here so that you just have to do the steps! You will need the following (product links are at the bottom if you need them):

  • 4 1/4″ x 5 1/2″ Smoky Slate cardstock to make a flat card (or if you want this to be a folding card you need it to be 8 1/2″ x 4 1/4″ folded in half)
  • 4″ x 5 1/4″ Basic Black cardstock, with the snow globe die cut out, then embossed with the Bricks and Mortar embossing folder
  • A piece of Monster Bash designer paper cut slightly larger than the snow globe dome. Keep in mind you want the haunted house placed towards the top of the dome so that it will show.
  • A snow globe base die cut from Smoky Slate cardstock

Stampin Up Snow Globe Treat Holder! Adorable Halloween card and candy corn treat holder using the Stampin Up Snow Globes Scenes Dies and clear plastic domes! Cute DIY Halloween Treats

To assemble the card, first remove the adhesive strip from the top side of the clear plastic dome. Insert it through the back side of the black cardstock and press to adhere.

Stampin Up Snow Globe Treat Holder! Adorable Halloween card and candy corn treat holder using the Stampin Up Snow Globes Scenes Dies and clear plastic domes! Cute DIY Halloween Treats

Lay the designer paper on top of the Smoky Slate cardstock where you think it will be placed correctly for the snow globe dome. Do not use adhesive yet.

Stampin Up Snow Globe Treat Holder! Adorable Halloween card and candy corn treat holder using the Stampin Up Snow Globes Scenes Dies and clear plastic domes! Cute DIY Halloween Treats

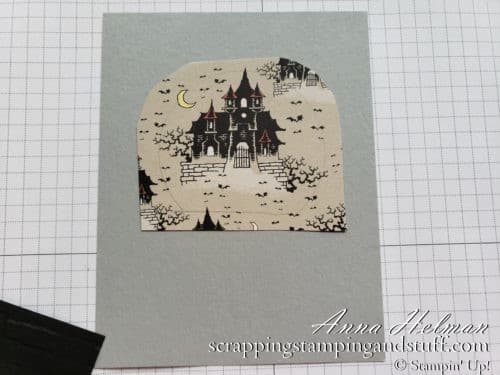
Lay the black cardstock on top to see if the designer paper is in the correct place. If not, adjust it until it is placed correctly.

Stampin Up Snow Globe Treat Holder! Adorable Halloween card and candy corn treat holder using the Stampin Up Snow Globes Scenes Dies and clear plastic domes! Cute DIY Halloween Treats

Lay the black cardstock aside. It’s time to adhere the designer paper in its current spot. I did this by pressing down on the left side to hold it in place, while lifting the right side. With the right side lifted, I rolled some Snail adhesive underneath, then pressed it back down. Next I lifted the left side to put Snail underneath it.

Stampin Up Snow Globe Treat Holder! Adorable Halloween card and candy corn treat holder using the Stampin Up Snow Globes Scenes Dies and clear plastic domes! Cute DIY Halloween Treats

Lay a few treats on top where the dome will be placed. Don’t put so many that you can’t see the haunted house!

Stampin Up Snow Globe Treat Holder! Adorable Halloween card and candy corn treat holder using the Stampin Up Snow Globes Scenes Dies and clear plastic domes! Cute DIY Halloween Treats

Place adhesive on the back side of the black cardstock. I used Tear & Tape adhesive. I removed the paper backing from both the tape and the back side of the snow globe dome, then carefully laid it over top of the gray cardstock in the correct place and pressed down to adhere.

Stampin Up Snow Globe Treat Holder! Adorable Halloween card and candy corn treat holder using the Stampin Up Snow Globes Scenes Dies and clear plastic domes! Cute DIY Halloween Treats

I added a few decorations and the snow globe treat holder is complete! So cute! Try these out and let me know how it goes!

Stampin Up Snow Globe Treat Holder! Adorable Halloween card and candy corn treat holder using the Stampin Up Snow Globes Scenes Dies and clear plastic domes! Cute DIY Halloween Treats

Please make me your Stampin’ Up! demonstrator and order from me using the product links below!

  • With your first order, you’ll receive a FREE annual catalog from me! Seasonal catalogs are also mailed to regular customers.
  • Please use hostess code GJNKWZVN when you order.
  • Keep track of your Stampin’ Rewards and earn free stamps from me!
  • When you order $150 or more, you’ll earn hostess credit through Stampin’ Up!
  • Sample all of the papers, ribbons, and embellishments that Stampin Up has to offer with Product Shares.

Stampin Up Product Shares! Embellishment Share 2019 Holiday Catalog - Beautiful Holiday Embellishment Assortment For One Low Price!

  • Check out my current Project in the Mail, Tags Tags Tags (shown below)!

Stampin Up Tags Tags Tags Bundle Class In the Mail includes tutorial and materials to make 3 adorable cards
Order the products I used and make this project yourself!

Snow Globe Scenes Dies

Snow Globe Scenes Dies
[150655]

Snow Globe Shaker Dome

Snow Globe Shaker Dome
[150442]

Monster Bash Designer Series Paper

Monster Bash Designer Series Paper
[150447]

Wonderfully Wicked Cling Stamp Set

Wonderfully Wicked Cling Stamp Set
[150547]

Basic Black 8-1/2" X 11" Cardstock

Basic Black 8-1/2″ X 11″ Cardstock
[121045]

Smoky Slate 8-1/2" X 11" Cardstock

Smoky Slate 8-1/2″ X 11″ Cardstock
[131202]

Black Foil Sheets

Black Foil Sheets
[147898]

Brick & Mortar 3D Embossing Folder

Brick & Mortar 3D Embossing Folder
[149643]

Tuxedo Black Memento Ink Pad

Tuxedo Black Memento Ink Pad
[132708]

Smoky Slate Classic Stampin' Pad

Smoky Slate Classic Stampin’ Pad
[147113]

Tailored Tag Punch

Tailored Tag Punch
[145667]

Banner Triple Punch

Banner Triple Punch
[138292]

Black 5/8" (1.6 Cm) Glittered Organdy Ribbon

Black 5/8″ (1.6 Cm) Glittered Organdy Ribbon
[147897]

Snail Adhesive

Snail Adhesive
[104332]

Tear & Tape Adhesive

Tear & Tape Adhesive
[138995]

Stampin' Dimensionals

Stampin’ Dimensionals
[104430]

Multipurpose Liquid Glue

Multipurpose Liquid Glue
[110755]
Sharing is caring!

Filed Under: Gift Ideas Tagged With: 2019 holiday catalog, brick and mortar embossing folder, halloween, monster bash dsp, snow globe scenes, tailored tag punch, treat holder, wonderfully wicked stamp set

Previous Post: « New Metallic Ink Pads and a Beautiful Friendship Card
Next Post: OSAT Blog Hop Spooktacular – A Halloween Paper Lantern »

Reader Interactions

Leave a Reply Cancel reply

Your email address will not be published. Required fields are marked *

Recipe Rating


Primary Sidebar

Anna Helman

Independent Stampin' Up!® Demonstrator

  • Email
  • Facebook
  • Facebook Group
  • Instagram
  • Pinterest
  • RSS
  • Twitter
  • YouTube
Shop Stampin' Up!
Stampin' Up! catalogs
get updates
join Stampin' Up!
Stampin' Up! Rewards
Stampin' Up! special offers
Stampin' Up! clearance
Stampin' Up! 2025-2026 Annual Catalog
May 6, 2025 - May 4, 2026
View Online | Shop Online

Blog Archive

Categories

Footer

Important Links

  • Home
  • Shop Now
  • Get Updates
  • Join My Team
  • Rewards
  • Specials
  • Catalogs
  • Clearance

Anna Helman, Independent Stampin' Up!® Demonstrator

  • Email
  • Facebook
  • Facebook Group
  • Instagram
  • Pinterest
  • RSS
  • Twitter
  • YouTube

Get Ideas, Inspiration, and Special Offers!

Sign up to receive updates in your inbox

Thank you!

Please check your email for a special offer! 

.
All content on this blog is the property of Anna Helman, Stampin' Up!® Independent Demonstrator. Classes, services and projects offered here are not endorsed by Stampin' Up!® Projects, videos, photos, ideas and articles are shared for personal use only and may not be removed, duplicated or copied without permission. All artwork © Stampin' Up!®

Copyright © 2025 Anna Helman, handmake with love · Site Design by Catherine Carroll