• Nav Social Menu

    • Facebook
    • Facebook Group
    • Instagram
    • Pinterest
    • RSS
    • Twitter
    • YouTube

Handmake with Love

Anna Helman | formerly Scrapping, Stamping and Stuff

  • Blog
  • Start Here
    • About Me
    • Learn to Make Cards
    • Why Shop With Me?
    • Testimonials
    • Connect On Social
    • Get Email Updates
    • Stampin’ Up! Giveaway Winners
  • Products
    • Shop Now
    • Catalogs
    • Clearance
    • Why Choose Stampin Up?
    • Paper Pumpkin Kits
    • Product Shares
    • Rewards Program
    • Stamparatus
    • Cut And Emboss Machine
    • Mini Cut And Emboss Machine
    • Blends Alcohol Markers
    • Blending Brushes
  • Ideas
    • Video Tutorials
    • Project Gallery
    • Card Ideas
    • 3D Projects
    • Scrapbooking
    • Tips & Techniques
    • Kits
    • Learn to Make Cards
    • Printable Catalog Tabs
    • Social Media
  • Join
    • Join My Team
    • Stampin Up Demonstrator Resources
  • Classes
    • Classes in the Mail
    • In Person Events
  • Contact
    • Contact
    • Connect On Social

OSAT Blog Hop Sale-a-brate Every Occasion With Stampin’ Up! Climbing Roses

10 Jan

Hi everyone and welcome to our first OSAT Blog Hop of 2019! It has been a few years since I have had the pleasure to join in with this hop, and I’m excited to be back! We are highlighting Sale-a-bration and the new Occasions Catalog during today’s hop. My project today features the gorgeous Stampin’ Up! Climbing Roses bundle. Read on!

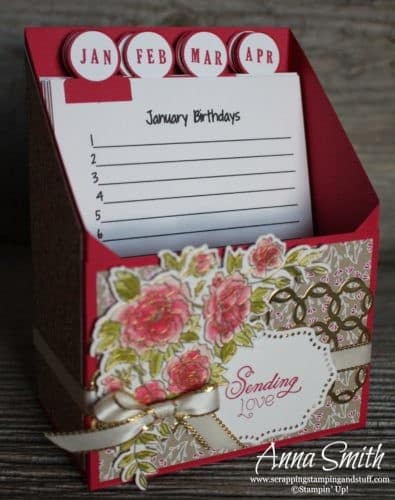
Here is what I put together for this month’s project. It is a matching birthday card organizer and card.

Beautiful Stampin' Up! Climbing Roses card and birthday card organizer set. Includes photo tutorial for the card organizer!

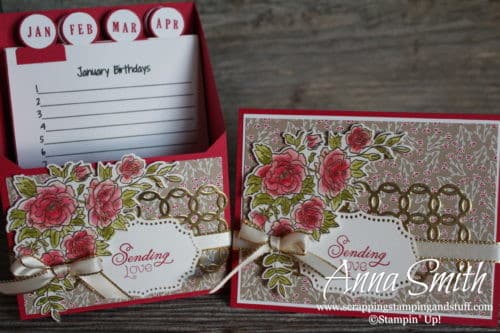
I made these card organizers at a class in November, and people have been asking how to make them. Today I’ll share the instructions with you, but first, let’s take a look at the card.

Beautiful Stampin' Up! Climbing Roses card and birthday card organizer set. Includes photo tutorial for the card organizer!

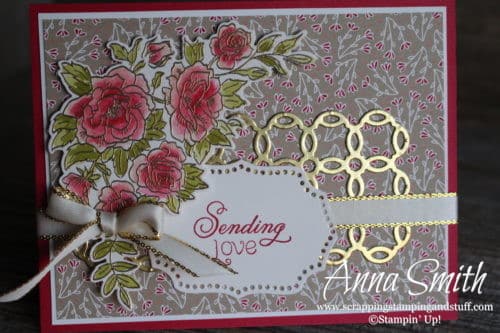
I LOVE how the gold turned out. It really makes them pop. When I started making this, I didn’t have Valentine’s Day in mind, but the colors would be perfect to use this as a Valentine’s gift for a friend. I guess you could use it for a V-Day gift for your spouse if they really love to make and organize cards?!?!

Here’s a quick rundown of how I made the card. I used the Stampin’ Up! Climbing Roses stamp set and Rose Trellis thinlits set, which are available together as a bundle for 10% off the regular price. I used the trellis die to cut the trellis out of gold foil paper. I stamped the roses onto white shimmer paper using Versamark ink, embossed them using gold embossing powder, then used an aqua painter with Old Olive, Lovely Lipstick, and Powder Pink inks to add color. For the ‘Sending Love’ sentiment, I stamped it onto white shimmer paper with Lovely Lipstick ink, then cut it out with that amazing die that is part of the Rose Trellis thinlits set.

Beautiful Stampin' Up! Climbing Roses card and birthday card organizer set. Includes photo tutorial for the card organizer!

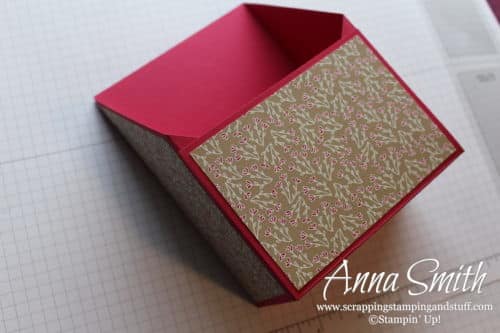
Here is a closer look at the card organizer. I saw a picture of one of these a while back and fell in love. I think these are just awesome! First, this organizer will give me a cute spot to write down birthdays and anniversaries too. Second, it is going to sit on my desk staring me in the face each time I sit down. I no longer have an excuse to forget birthdays! Third, when I make a card and think, “This would be a perfect card for (so and so),” I can just slide it into the organizer behind the right month for their birthday and it will be ready and waiting when the time comes!

Beautiful Stampin' Up! Climbing Roses card and birthday card organizer set. Includes photo tutorial for the card organizer!

Read on below for the tutorial to make this card organizer!

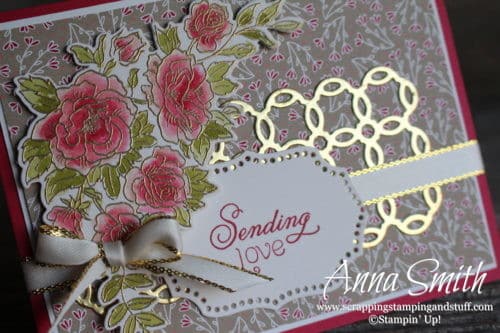
Here’s another close up of the artwork included in the Climbing Roses stamp set and Rose Trellis thinlits. Just gorgeous!

Beautiful Stampin' Up! Climbing Roses card and birthday card organizer set. Includes photo tutorial for the card organizer!

Thanks for visiting! Use the links below to continue on through the blog hop or look below for the card organizer tutorial! 

Card Organizer Tutorial

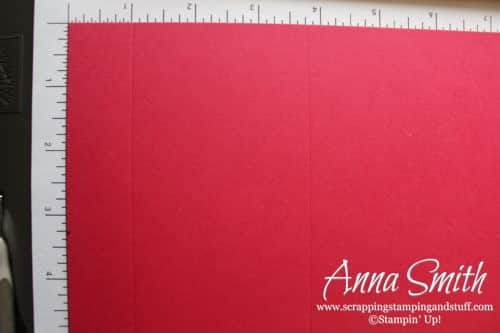
Begin with a piece of 12″x12″ Lovely Lipstick cardstock. Score it at 1″, 3 3/4″, 8 1/4″, and 11″.

Beautiful Stampin' Up! Climbing Roses card and birthday card organizer set. Includes photo tutorial for the card organizer!

Rotate the cardstock to the left (counter clockwise) ninety degrees and score at 3 1/4″ and 6″.

Beautiful Stampin' Up! Climbing Roses card and birthday card organizer set. Includes photo tutorial for the card organizer!

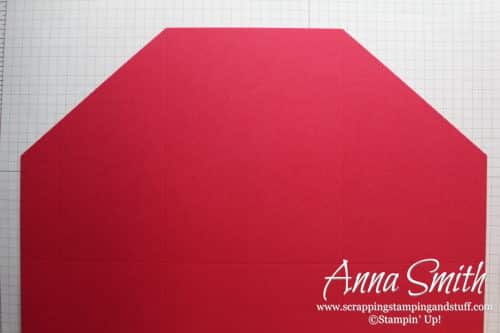
Again, rotate the cardstock to the left (counter clockwise) ninety degrees. Measure down from the top left corner 3 1/4″ and make a pencil mark.

Beautiful Stampin' Up! Climbing Roses card and birthday card organizer set. Includes photo tutorial for the card organizer!

Next, measure down from the top right corner 3 1/4″ and make a pencil mark.

Beautiful Stampin' Up! Climbing Roses card and birthday card organizer set. Includes photo tutorial for the card organizer!

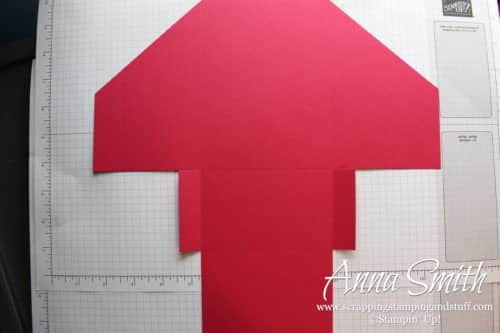
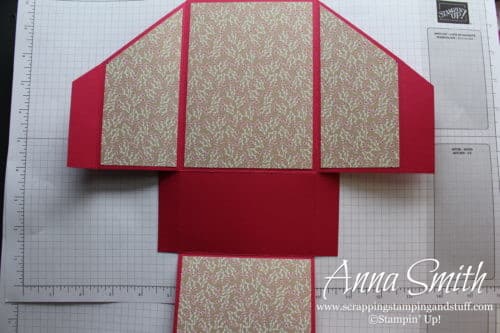
Next you will cut off the top corners. On each corner, cut from the inner score line down to the mark you created.

Beautiful Stampin' Up! Climbing Roses card and birthday card organizer set. Includes photo tutorial for the card organizer!

Cut off the bottom corners and also cut inwards from the left and right edges to create the flaps as shown.

Beautiful Stampin' Up! Climbing Roses card and birthday card organizer set. Includes photo tutorial for the card organizer!

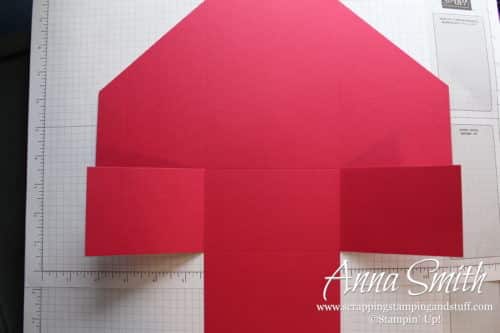
On the two flaps you just created, you need to make another score line about 3/4″ out from the middle section. Lay the paper back on the scoring board, and score a vertical line about 3/4″ out on each side.

Beautiful Stampin' Up! Climbing Roses card and birthday card organizer set. Includes photo tutorial for the card organizer!

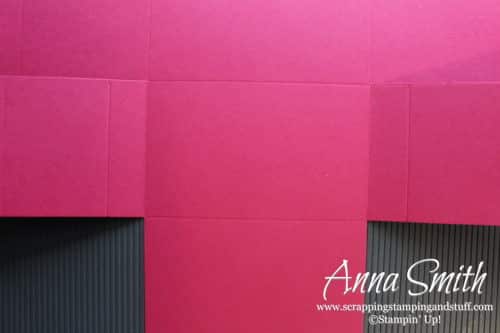
Now trim on the marks you just created.

Beautiful Stampin' Up! Climbing Roses card and birthday card organizer set. Includes photo tutorial for the card organizer!

Next you will cut designer paper to place on top. I suggest using paper that is not directional (does not have a ‘top’ or ‘bottom’). If you choose paper with a top and bottom, use care to make sure that it will be aligned the right way when the box is folded together. Cut pieces in the following sizes:

  • 1 front piece measuring 4 1/4″ x 3″
  • 1 back piece measuring 4 1/4″ x 5 3/4″
  • 2 side pieces measuring 2 1/2″ x 5 5/8″

Beautiful Stampin' Up! Climbing Roses card and birthday card organizer set. Includes photo tutorial for the card organizer!

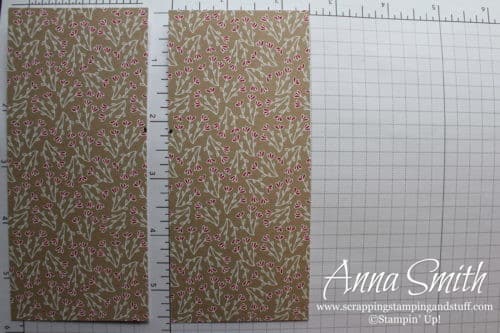
Now it’s time to trim the pieces you cut for the sides. Measure down 2 1/8″ on the left side of one piece and the right side of the other. Then trim from the opposite corner to the mark you made.

Beautiful Stampin' Up! Climbing Roses card and birthday card organizer set. Includes photo tutorial for the card organizer!

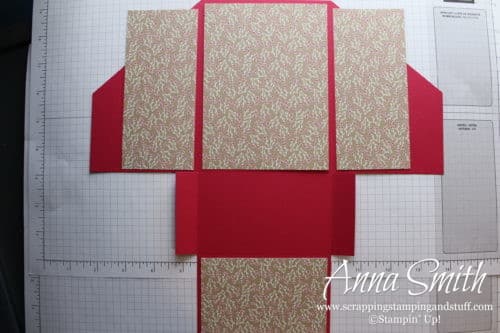
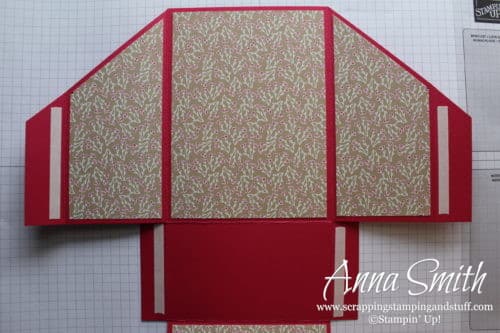
Now they should fit onto the box base as shown. Go ahead and attach the designer paper onto the base.

Beautiful Stampin' Up! Climbing Roses card and birthday card organizer set. Includes photo tutorial for the card organizer!

Place tear and tape adhesive on the flaps as shown. Keep it on the inner edge of the flaps, close to the score line.

Beautiful Stampin' Up! Climbing Roses card and birthday card organizer set. Includes photo tutorial for the card organizer!

Loosen up the score lines by folding them back and forth. Then you can assemble the box. Remove tape from one of the lower sections, and fold the box to adhere the adhesive. Then do the other flap on the bottom of the box. Next you can do the sides that attach to the front.

Beautiful Stampin' Up! Climbing Roses card and birthday card organizer set. Includes photo tutorial for the card organizer!

Now let’s look at the inserts for each month! I created a file which you are free to use. View it here. You need to print it double sided onto thick white cardstock, then cut the pages into quarters. I punched the tabs on top using the Circle Tab Punch. I stamped the abbreviation for each month using the Pick a Pennant stamp set, and then punched them with the 3/4″ Circle Punch.

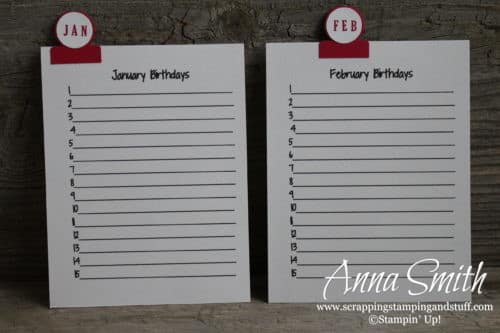
Here you can see the back side of January and February. If I have a chance sometime, I think I’ll punch a second label for each month so that one can be on the back side as well.

There you go! Happy creating!

Beautiful Stampin' Up! Climbing Roses card and birthday card organizer set. Includes photo tutorial for the card organizer!
Please make me your Stampin’ Up! demonstrator!

  • Please use hostess code WKM7TJFA when you order. With an order of $50+, you’ll receive Sale-a-bration benefits PLUS a link to access dozens of free stamping tutorials! See photo below!
  • Earn these items free during Sale-a-bration!
  • Keep track of your Stampin’ Rewards and earn free stamps from me!
  • When you order $150 or more, you’ll earn hostess credit through Stampin’ Up!

Use the links below to order and make this project yourself! 

Climbing Roses Cling Bundle

Climbing Roses Cling Bundle
[150603]

All My Love 12" X 12" (30.5 X 30.5 Cm) Designer Series Paper

All My Love 12″ X 12″ (30.5 X 30.5 Cm) Designer Series Paper
[148576]

In Color 2018–2020 12" X 12" (30.5 X 30.5 Cm) Cardstock

In Color 2018–2020 12″ X 12″ (30.5 X 30.5 Cm) Cardstock
[146974]

Shimmery White 8-1/2" X 11" Card Stock

Shimmery White 8-1/2″ X 11″ Card Stock
[101910]

Gold Foil Sheets

Gold Foil Sheets
[132622]

Versamark Pad

Versamark Pad
[102283]

Lovely Lipstick Classic Stampin' Pad

Lovely Lipstick Classic Stampin’ Pad
[147140]

Powder Pink Classic Stampin' Pad

Powder Pink Classic Stampin’ Pad
[147147]

Old Olive Classic Stampin' Pad

Old Olive Classic Stampin’ Pad
[147090]

Gold Stampin' Emboss Powder

Gold Stampin’ Emboss Powder
[109129]

Heat Tool

Heat Tool
[129053]

Embossing Buddy

Embossing Buddy
[103083]

Aqua Painters

Aqua Painters
[103954]

Big Shot

Big Shot
[143263]

Stampin' Trimmer

Stampin’ Trimmer
[126889]

Simply Scored

Simply Scored
[122334]

Bone Folder

Bone Folder
[102300]

Gold 3/8" (1 Cm) Metallic-Edge Ribbon

Gold 3/8″ (1 Cm) Metallic-Edge Ribbon
[144146]

Circle Tab Punch

Circle Tab Punch
[143754]

3/4" Circle Punch

3/4″ Circle Punch
[119873]

Pick A Pennant Photopolymer Stamp Set

Pick A Pennant Photopolymer Stamp Set
[146499]

SNAIL Permanent Adhesive

SNAIL Permanent Adhesive
[104332]

Liquid Multipurpose Glue

Liquid Multipurpose Glue
[110755]

Stampin' Dimensionals

Stampin’ Dimensionals
[104430]
Sharing is caring!

Filed Under: Cards, Gift Ideas Tagged With: 2019 occasions, all my love dsp, climbing roses, gifts, gold, love, pick a pennant, rose trellis thinlits, Valentine's Day

Previous Post: « Introducing Stampin’ Up! Cling Stamps!
Next Post: Sweet Scrapbook Layout with Stampin’ Up! Sweetest Thing »

Reader Interactions

Comments

  1. Carla Hundley says

    January 10, 2019 at 6:11 PM

    How fun! Wonderful
    idea of the card holder
    box. And beautiful papers.
    Carla from Utah

    Reply
    • Anna Smith says

      January 12, 2019 at 10:15 PM

      Thank you!

      Reply
  2. Jo Anne Hewins says

    January 10, 2019 at 8:57 PM

    Your projects are wonderful. Thanks for the directions for the organizer box! Love the gold embossing.

    Reply
    • Anna Smith says

      January 12, 2019 at 10:14 PM

      Thank you and you’re welcome!

      Reply
  3. Carol Payne says

    February 18, 2019 at 11:44 PM

    Great project, Anna! You’ve inspired my next class! Thanks for the tutorial too! With you permission, I will give you credit when I post my box on my blog later this week.

    Reply
    • Anna Smith says

      February 19, 2019 at 5:09 PM

      I love hearing that other demonstrators can use my projects! Yes, feel free to share on your blog!

      Reply

Leave a Reply Cancel reply

Your email address will not be published. Required fields are marked *

Recipe Rating


Primary Sidebar

Anna Helman

Independent Stampin' Up!® Demonstrator

  • Email
  • Facebook
  • Facebook Group
  • Instagram
  • Pinterest
  • RSS
  • Twitter
  • YouTube
Shop Stampin' Up!
Stampin' Up! catalogs
get updates
join Stampin' Up!
Stampin' Up! Rewards
Stampin' Up! special offers
Stampin' Up! clearance
Stampin' Up! 2025-2026 Annual Catalog
May 6, 2025 - May 4, 2026
View Online | Shop Online

Blog Archive

Categories

Footer

Important Links

  • Home
  • Shop Now
  • Get Updates
  • Join My Team
  • Rewards
  • Specials
  • Catalogs
  • Clearance

Anna Helman, Independent Stampin' Up!® Demonstrator

  • Email
  • Facebook
  • Facebook Group
  • Instagram
  • Pinterest
  • RSS
  • Twitter
  • YouTube

Get Ideas, Inspiration, and Special Offers!

Sign up to receive updates in your inbox

Thank you!

Please check your email for a special offer! 

.
All content on this blog is the property of Anna Helman, Stampin' Up!® Independent Demonstrator. Classes, services and projects offered here are not endorsed by Stampin' Up!® Projects, videos, photos, ideas and articles are shared for personal use only and may not be removed, duplicated or copied without permission. All artwork © Stampin' Up!®

Copyright © 2025 Anna Helman, handmake with love · Site Design by Catherine Carroll