I love this card. We made this at my last card class. Before class, I was looking at my supplies trying to decide what to make, and I picked out the Painted Petals stamp set because I love it so much and it’s only available through June 2. I wanted to highlight this set, so I grabbed it and got to work.
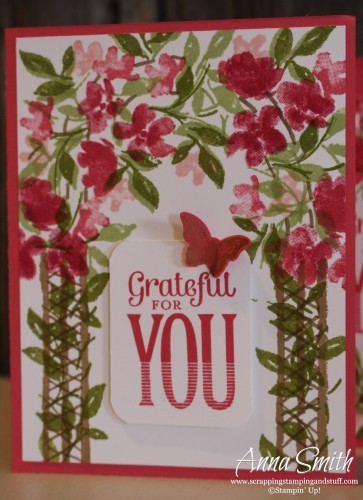
I started looking at the stamp set. REALLY looking at it. I often overlook stamps in a set for some reason. I guess certain stamps draw my attention and I end up ignoring others, so I really looked at the set. What caught my eye was the stamp with 3 long lines. What popped into my mind? A trellis! So that’s what I got to creating…
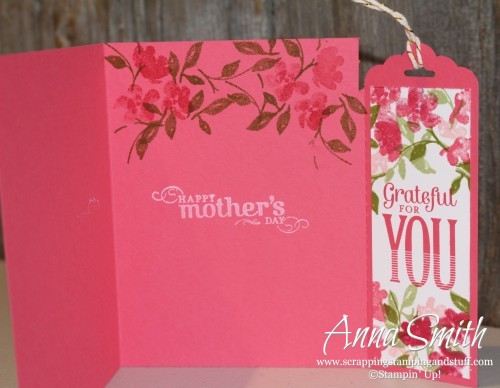
I knew ahead of time that I wanted to do a card with a removable bookmark. Our perforating blade is being retired and I wanted to show how to use it to make this type of card. Keep reading for instructions.
Here’s how to make the card:
- Start with a piece of 5 1/2″ x 10 1/2″ cardstock.
- Insert the top right corner into your scalloped tag topper punch. This will seem a little unconventional if you haven’t done it before. Carefully push it all the way up in and make sure it is straight and that the right side of your paper lines up with the right side of the guide. Then punch it. You might want to practice this step with a scrap piece of cardstock.
- Score your paper 4 1/4″ from the left side.
- Use the Stampin’ Trimmer with the rotary addition and perforating blade to perforate the edge of the bookmark, approximately 2″ from the right side.
- Cut two pieces of white cardstock sized 1 3/4″ x 4 5/8″ and 1 3/4″ x 2 1/4″ for the card front and bookmark. Decorate as you like and attach to the card.
- Use some baker’s twine or ribbon through the hole of your bookmark.
Here’s how I decorated my card:
- Stamp the ‘3 lines’ from the Painted Petals stamp set as the base of the trellis using Soft Suede ink. Then use a Soft Suede marker to draw in diagonal lines to make it look like a trellis.
- Stamp flower clumps using Melon Mambo ink.
- Fill in leaves on the trellis and between flowers with Wild Wasabi.
- Add more flowers with Blushing Bride.
- Highlight a few flowers by stamping over them again with Rose Red.
- Highlight some leaves by stamping over them again with Old Olive.
- Stamp ‘Grateful for You’ onto another piece of white cardstock, round the corners and attach with dimensionals.
- Stamp the butterfly from the Kinda Eclectic stamp set onto Melon Mambo cardstock using Versamark ink. Emboss with gold embossing powder, then punch out using the Bitty Butterfly punch and attach.
This would make a great card when you would like to give someone more than a card, but you don’t know what to get them or don’t have time to do so. I would love to receive this card myself (hint hint to all of you who know me)! Have fun!Built for Free Using: My Stampin Blog
Leave a Reply