• Nav Social Menu

    • Facebook
    • Facebook Group
    • Instagram
    • Pinterest
    • RSS
    • Twitter
    • YouTube

Handmake with Love

Anna Helman | formerly Scrapping, Stamping and Stuff

  • Blog
  • Start Here
    • About Me
    • Learn to Make Cards
    • Why Shop With Me?
    • Testimonials
    • Connect On Social
    • Get Email Updates
    • Stampin’ Up! Giveaway Winners
  • Products
    • Shop Now
    • Catalogs
    • Clearance
    • Why Choose Stampin Up?
    • Paper Pumpkin Kits
    • Product Shares
    • Rewards Program
    • Stamparatus
    • Cut And Emboss Machine
    • Mini Cut And Emboss Machine
    • Blends Alcohol Markers
    • Blending Brushes
  • Ideas
    • Video Tutorials
    • Project Gallery
    • Card Ideas
    • 3D Projects
    • Scrapbooking
    • Tips & Techniques
    • Kits
    • Learn to Make Cards
    • Printable Catalog Tabs
    • Social Media
  • Join
    • Join My Team
    • Stampin Up Demonstrator Resources
  • Classes
    • Classes in the Mail
    • In Person Events
  • Contact
    • Contact
    • Connect On Social

OSAT Blog Hop – Oh My Pumpkins and Pie

13 Oct

Hi everyone! Welcome to the October One Stamp at a Time Blog Hop. Our theme this month is Oh My, Pumpkins and Pie!

OSAT Blog Hop

For some reason, not much was striking me for the ‘Pumpkins and Pie’ theme. I love fall. I love pumpkins. I just couldn’t come up with a great ‘pumpkiny’ idea. However, I had made up the paper lantern  in the picture below, and I decided that it should count. It does have 3 little pumpkins on one side, therefore it is totally pumpkin-themed. Next I just needed to make a matching card. I’ll admit, the card is slightly less pumpkin-themed.

Stampin' Up! Spooky Fun and Halloween Scenes Card and 3D Paper Lantern Tutorial, with cookie cutter punch skeleton!

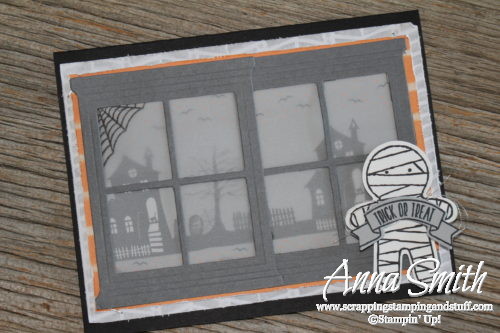
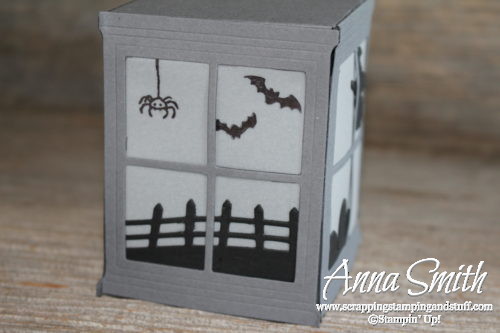
Let’s look at the card first. I used vellum behind the window frames to fade out the haunted house scene in the background, which is just a piece of paper from the Halloween Night designer paper pack.

Stampin' Up! Spooky Fun and Halloween Scenes Card and 3D Paper Lantern Tutorial, with cookie cutter punch skeleton!

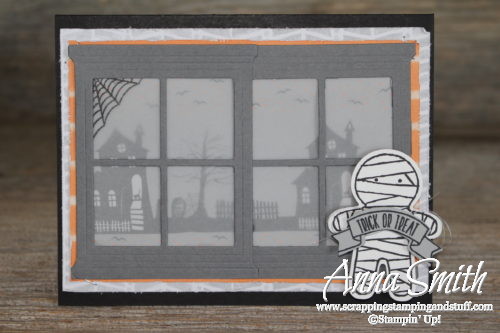
I’ve been wearing out my Cookie Cutter Builder Punch, and this card wouldn’t have been complete without a cookie cutter creature attached. I had a hard time choosing between the skeleton, vampire, and mummy, but clearly, I went with the mummy.

Stampin' Up! Spooky Fun and Halloween Scenes Card and 3D Paper Lantern Tutorial, with cookie cutter punch skeleton!

Now, on to the lantern. I’ve seen these made up for Christmas, but I thought it would be really fun to make a Halloween one. This was the project my stamp clubs made last month.

Stampin' Up! Spooky Fun and Halloween Scenes Card and 3D Paper Lantern Tutorial, with cookie cutter punch skeleton!

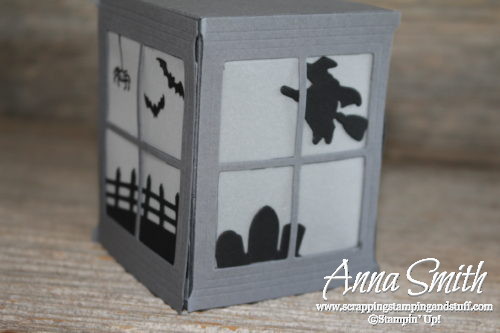
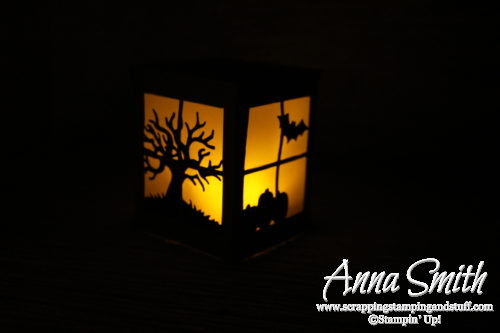
I used the Halloween Scenes edgelits dies for most of the silhouettes. The bats and spider shown below were stamped using the Spooky Fun stamp set, which comes together in a bundle with the edgelits dies for 10% off.

Stampin' Up! Spooky Fun and Halloween Scenes Card and 3D Paper Lantern Tutorial, with cookie cutter punch skeleton!

Now for the best part…

Stampin' Up! Spooky Fun and Halloween Scenes Card and 3D Paper Lantern Tutorial, with cookie cutter punch skeleton!

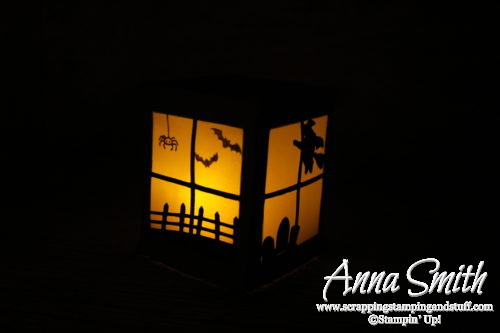
I used a battery operated tealight candle for the spooky glow. Would it be considered ‘stating the obvious’ to say that you probably shouldn’t light a candle to put inside it?

I think a few of these on a porch would be perfect for Trick-or-Treat night!

Stampin' Up! Spooky Fun and Halloween Scenes Card and 3D Paper Lantern Tutorial, with cookie cutter punch skeleton!

Continue reading below for instructions on how to make the lantern, and make sure to continue on to Melissa’s website to follow along with the hop!

OSAT Blog Hop

To make the lantern, you need:

  • 4 – Basic Gray Hearth and Home window die cuts
  • 1 – Basic Gray piece that measures 3 3/4″ x 3 3/4″
  • 4 – Basic Gray pieces that measure 1/2″ x 3 3/8″
  • 4 – Vellum pieces that measure 2 1/2″ x 3 1/4″

Stampin' Up! Spooky Fun and Halloween Scenes Card and 3D Paper Lantern Tutorial, with cookie cutter punch skeleton!

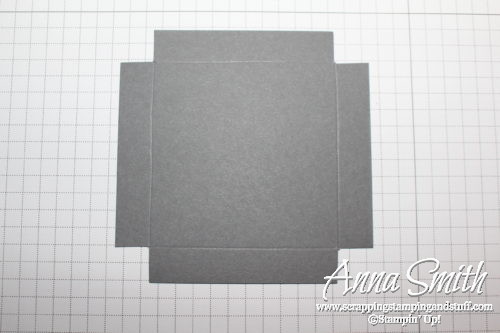
Begin by scoring the 3 3/4″ square 1/2″ from each side. Then, score the 1/2″ strips down the centers.

Stampin' Up! Spooky Fun and Halloween Scenes Card and 3D Paper Lantern Tutorial, with cookie cutter punch skeleton!

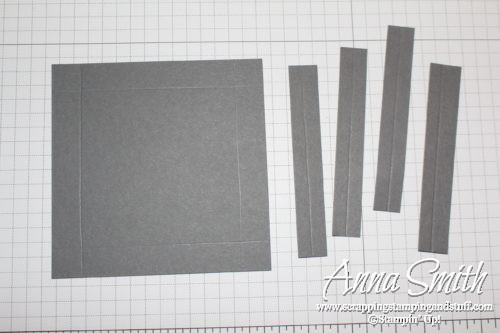
Trim the corners out of the square.

Stampin' Up! Spooky Fun and Halloween Scenes Card and 3D Paper Lantern Tutorial, with cookie cutter punch skeleton!

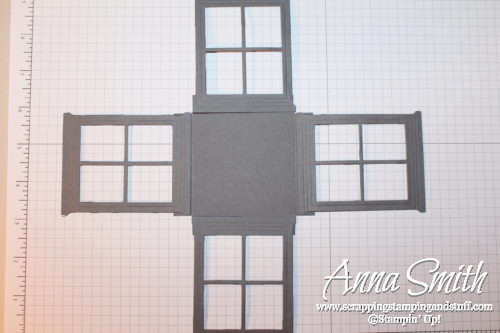
**Next, create your window scenes. Stamp on the vellum or attach die cuts as I did. Then place them behind the window frames before moving on to the next step.**

Attach window frames to the flaps on the square as shown below.

Stampin' Up! Spooky Fun and Halloween Scenes Card and 3D Paper Lantern Tutorial, with cookie cutter punch skeleton!

Next, fold two adjacent windows down, and attach them together at the corner using one of the 1/2″ strips. I would suggest using Tear & Tape adhesive on the 1/2″ strips. I used Fast Fuse, and as strong as it is, I wish I would have used something a tad stronger like Tear & Tape. Repeat until all four corners are secured.

If you make up any of these, I would love to see them!

Please shop with me and combine these offers to get great deals!

  • Use hostess code DP4EZK6D during the month of October and I will send you a free gift!
  • Keep track of your Stampin’ Rewards and earn free stamps from me!
  • Any purchase of $150 or more will earn you hostess credit through Stampin’ Up!
  • Join online stamp club and get free projects. Join now through October 15 and get bonus gifts!
  • During October, I’ll donate 10% of your purchase to the American Cancer Society!

Product List

Spooky Fun Photopolymer Bundle

Spooky Fun Photopolymer Bundle

[144437]

Cookie Cutter Builder Punch

Cookie Cutter Builder Punch

[140396]

Cookie Cutter Halloween Wood-Mount Stamp Set

Cookie Cutter Halloween Wood-Mount Stamp Set

[142252]

Cookie Cutter Halloween Clear-Mount Stamp Set

Cookie Cutter Halloween Clear-Mount Stamp Set

[142255]

Sweet Home Photopolymer Bundle

Sweet Home Photopolymer Bundle

[143516]

Hearth & Home Thinlits Dies

Hearth & Home Thinlits Dies

[139666]

Big Shot

Big Shot

[143263]

Halloween Night Specialty Designer Series Paper

Halloween Night Specialty Designer Series Paper

[142022]

Neutrals 8-1/2" X 11" Card Stock

Neutrals 8-1/2″ X 11″ Card Stock

[131191]

Vellum 8-1/2" X 11" Card Stock

Vellum 8-1/2″ X 11″ Card Stock

[101856]

Basic Black Archival Stampin’ Pad

Basic Black Archival Stampin’ Pad

[140931]

Silver Metallic Thread

Silver Metallic Thread

[138402]

Fine-Tip Glue Pen

Fine-Tip Glue Pen

[138309]

Tear & Tape Adhesive

Tear & Tape Adhesive

[138995]

SNAIL Permanent Adhesive

SNAIL Permanent Adhesive

[104332]

Stampin' Dimensionals

Stampin’ Dimensionals

[104430]

Simply Scored

Simply Scored

[122334]

Stampin' Trimmer

Stampin’ Trimmer

[126889]

Sharing is caring!

Filed Under: Cards, Other Projects Tagged With: cookie cutter builder punch, cookie cutter halloween, fall, gift, halloween, halloween night dsp, halloween scenes thinlits, hearth & home, home sweet home thinlits, spooky fun, sweet home, tutorial

Previous Post: « Tuesday Tip: How to Punch on Small Pieces of Paper
Next Post: Get $20 in Products with Online Stamp Club and Hang Your Stocking Christmas Card »

Reader Interactions

Comments

  1. melissa davies says

    October 13, 2016 at 6:57 AM

    Fabulous ideas using the window die cut! Thanks for the inspiration!

    Reply
    • Gale Smith says

      October 13, 2016 at 10:47 PM

      I followed your easy instructions to make this tonight! It is so cute. Thank you so much for sharing.

      Reply
  2. Tina Riddle says

    October 14, 2016 at 8:32 AM

    Wow Anna, how cute is that little lantern all lit up??? LOVE it!! Thanks for showing us how to make it! Your card is super adorable too!

    Reply
  3. Kayla McGinnis says

    October 15, 2016 at 10:26 PM

    Anna, your card is very sweet, and love your use of the vellum! BUT that lantern blew me away! AWESOME!!!!!

    Reply
  4. pauline vaughan says

    October 22, 2016 at 2:49 PM

    the lantern was great can’t wait to make one!

    Reply
    • Anna Smith says

      November 2, 2016 at 9:45 PM

      Thank you!

      Reply

Trackbacks

  1. Watercolor and Pumpkin and Pie, Oh My! New Fall Themed Blog Hop says:
    October 13, 2016 at 6:31 AM

    […] Anna Smith Melissa Davies Sara Levin Wynne Grob Kayla McGinnis Wendy Cranford Maria Willis Tina Rackley Riddle Renee Romain Ondrajka Andrea Tracy-Tucker Pam Staples Jeanna Bohanon Lisa Altman Lori Mueller Justin Krieger Dena Rekow […]

    Reply

Leave a Reply Cancel reply

Your email address will not be published. Required fields are marked *

Recipe Rating


Primary Sidebar

Anna Helman

Independent Stampin' Up!® Demonstrator

  • Email
  • Facebook
  • Facebook Group
  • Instagram
  • Pinterest
  • RSS
  • Twitter
  • YouTube
Shop Stampin' Up!
Stampin' Up! catalogs
get updates
join Stampin' Up!
Stampin' Up! Rewards
Stampin' Up! special offers
Stampin' Up! clearance
Stampin' Up! 2025-2026 Annual Catalog
May 6, 2025 - May 4, 2026
View Online | Shop Online

Blog Archive

Categories

Footer

Important Links

  • Home
  • Shop Now
  • Get Updates
  • Join My Team
  • Rewards
  • Specials
  • Catalogs
  • Clearance

Anna Helman, Independent Stampin' Up!® Demonstrator

  • Email
  • Facebook
  • Facebook Group
  • Instagram
  • Pinterest
  • RSS
  • Twitter
  • YouTube

Get Ideas, Inspiration, and Special Offers!

Sign up to receive updates in your inbox

Thank you!

Please check your email for a special offer! 

.
All content on this blog is the property of Anna Helman, Stampin' Up!® Independent Demonstrator. Classes, services and projects offered here are not endorsed by Stampin' Up!® Projects, videos, photos, ideas and articles are shared for personal use only and may not be removed, duplicated or copied without permission. All artwork © Stampin' Up!®

Copyright © 2025 Anna Helman, handmake with love · Site Design by Catherine Carroll