Don’t you love the items in your craft stash that only cost a few dollars but you use them over and over again? Today I want to share one of these with you. I mention this tool often in my videos, but today I’m giving it the entire spotlight and we’re going to talk about 12 ways to use to take your pick tool. Let’s get started.
Ways To Use The Take Your Pick Tool Video Tutorial
Watch along here as I demonstrate lots of great ways to use this tool!
What Is The Take Your Pick Tool?
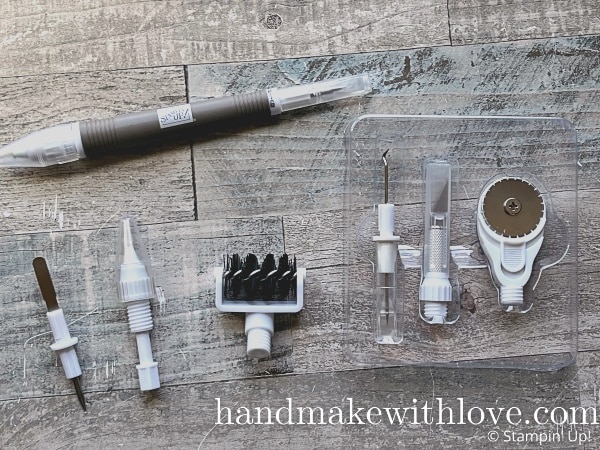
The Take Your Pick tool is a multipurpose tool that has two ends and several different attachments, which can be used in a lot of different ways on your craft projects. I’ll share more about the uses below.
What Tips Come Included?
The Take Your Pick tool comes with a putty tip, two stylus ends, a piercing tool and a spatula tip.
More options are available for purchase separately, so let me mention those as well.
What Attachments Are Available?
The attachments that are available for purchase separately include a die brush, replacement putty tips, and the crafter tip assortment. The crafter tip assortment includes a utility knife, two sharp pick tools, and a rotary perforating blade.
Introduction To The Tool
To learn more about the basics of the Take Your Pick Tool, take a look here. Now let’s look at some great ways to use it.
Ways To Use The Take Your Pick Tool
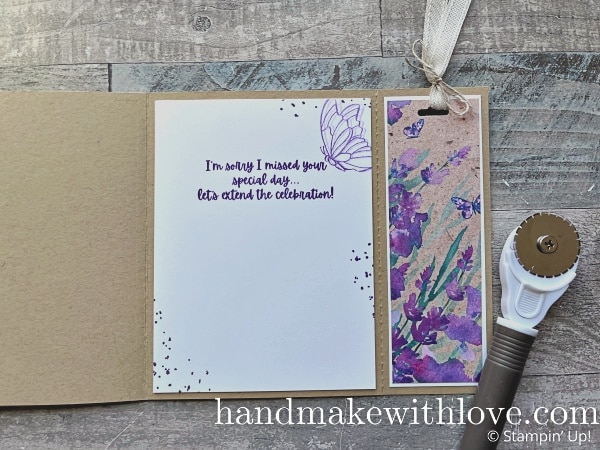
1. Use the rotary perforating blade to create ‘tear-off’ pieces
For the card I’m showing today, I created a tear-off bookmark. I used the perforating blade to ‘cut’ at the edge of the bookmark to make it easy to tear off. You could use the perforating blade in many ways, and one fun idea would be to create tickets with a removable stub.
2. Use a piercing tool to remove stubborn sticker backs
When I use adhesive sheets on the back of my die cuts, sometimes I have a hard time removing the paper backing. The piercing tip is perfect for this!
3. Use the piercing tip to remove small pieces from die cuts
You know what I’m talking about…when you have to poke all those little pieces out of a detailed die cut? The piercing tip is perfect for this, however, there is a better way which I will mention next.
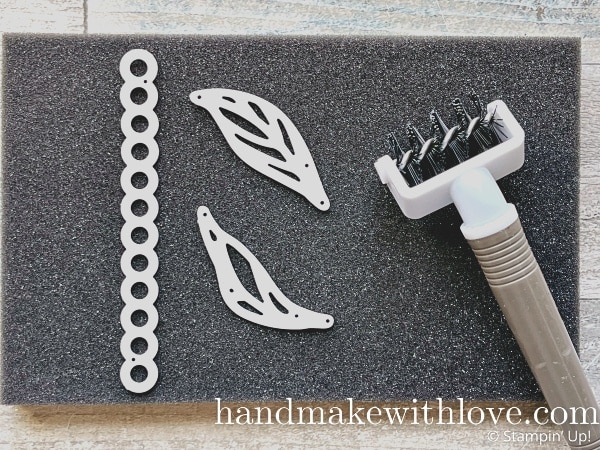
4. Use the roller brush for detailed die cuts
The roller brush is the perfect way to get all those little pieces out without having to poke each one out individually. Watch along with the video to see the proper way to use it or take a look here.
5. Use the pick tip with die cuts
If you use an electronic cutter like a Cricut or Scan & Cut that has an adhesive mat to hold your paper in place, the pick tip is perfect for removing small pieces from the mat.
6. Use the putty tip to pick up small pieces
If you ever have a hard time picking up small pieces of paper like tiny die cuts, the putty tip makes it quick and painless, especially when these pieces have glue on them!
7. Use the stylus tips for scoring
The stylus tips are great for scoring your projects to create folds or for decorative scoring. Get ideas for decorative scoring here.
8. Use the stylus tips for hand embossing
This is a creative way to add texture to your projects. To try hand embossing, place a punch or die cut upside down on a foam pad like this one, and use the stylus tip in a circular motion to apply pressure. This allows you to create custom embossing.
9. Lift a piece that was put in the wrong place
Don’t you hate when you attach something on your card in the wrong place? No worries. The spatula tip is perfect to insert between the layers and gently lift until the piece is removed. Now you won’t have torn and bent paper when you make a mistake!
10. Use the craft knife for cutting pieces out
Sometimes I want to remove a piece from the center of a piece of designer paper. I might want to cut it out and pop it up, or sometimes I want to create an opening to insert something into, such as a piece of paper or ribbon for weaving. Anytime you want to cut something out of the center of a paper, the craft knife is the easiest way to do so.
11. Applying dimensionals
This is life-changing if you have problems with your hands! You can insert the piercing tip into a foam dimensional, lift it off of the sheet, place it onto your project, and remove the paper backing all in one motion. I demonstrated this in today’s video.
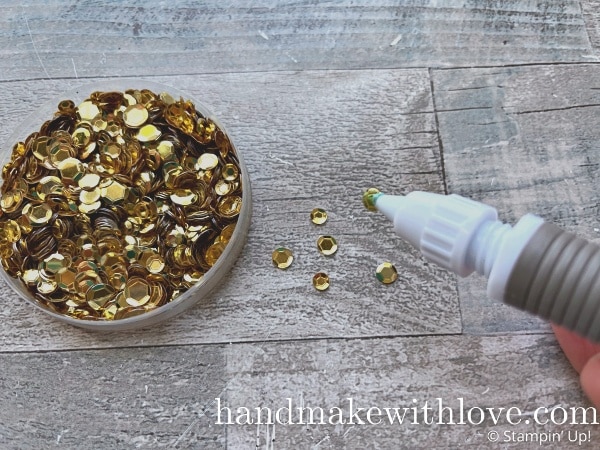
12. Applying sequins and gems
The putty tip is revolutionary for putting sequins and gems on your projects.
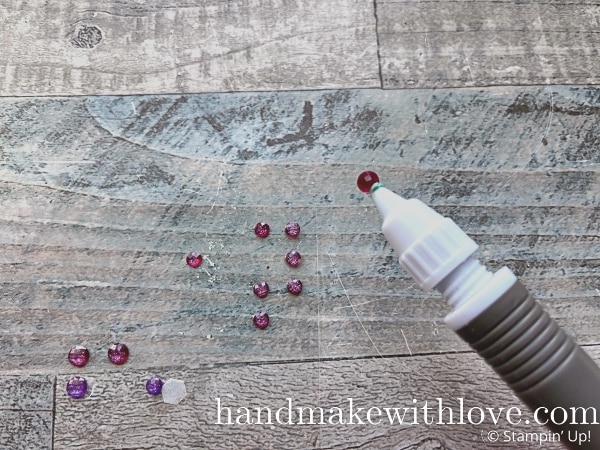
Whether they have adhesive on the back or not, there are several different techniques for applying them, which I also showed in the video. Make sure to watch along.
That’s a lot of great uses for one little tool! We haven’t even talked about today’s card yet, so let’s do that for a moment.
Stampin Up Coneflower Celebration Bundle
This is such a beautiful bundle, and I decided to highlight it on today’s project.
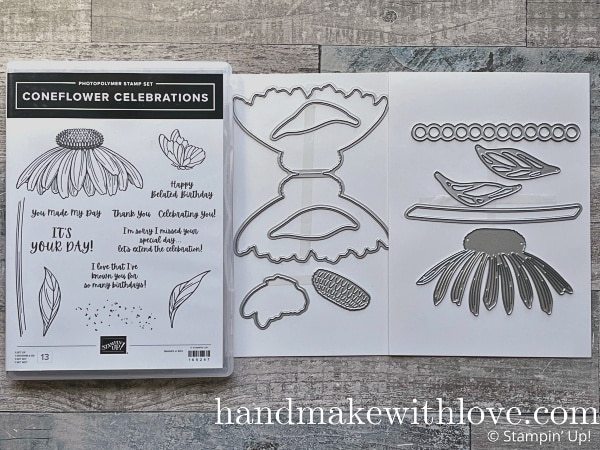
I was having a hard time deciding what color to make the coneflower until I saw my Perennial Lavender designer paper pack, and at that moment I knew it had to be purple!
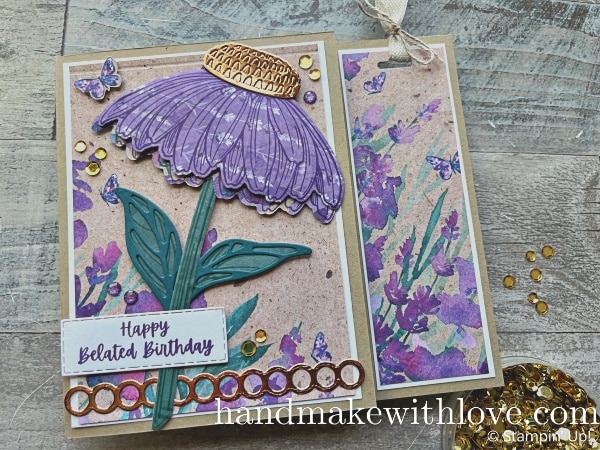
With the removable bookmark, this is both a card and gift and one. If you would like to create one of these cards, I’ll share the dimensions below.
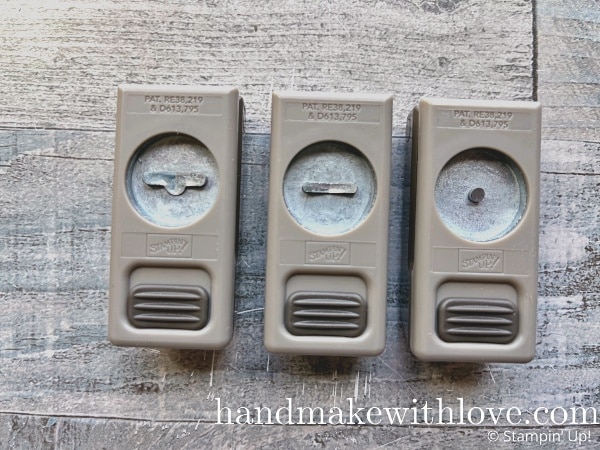
Before I do that, I want to show the Hole Punch Assortment that I used to punch the hole at the top of the bookmark. This is a really handy set of punches for tags, bookmarks, and created a hole to insert ribbon through on your cards.
Project Dimensions
To create this card, you’ll need a card base that measures 5 1/2″ x 10 1/2.” With the long edge at the top, score at 4 1/4″ and use the rotary perforating tip to perforate at the 8 1/2″ mark.
White cardstock: (2) 4″ x 5 1/4″, 1 3/4″ x 5 1/4″
Designer paper: 3 7/8″ x 5 1/8″, 1 5/8″ x 5 1/8″
Materials List
Use the link below to see and order supplies to make this project yourself!
Product List![Coneflower Celebration Bundle (English) [ 165251 ]](https://assets1.tamsnetwork.com/images/EC042017NF/165251s.jpg "Coneflower Celebration Bundle (English) [ 165251 ]")
![Coneflower Celebrations Photopolymer Stamp Set (English) [ 165247 ]](https://assets1.tamsnetwork.com/images/EC042017NF/165247s.jpg "Coneflower Celebrations Photopolymer Stamp Set (English) [ 165247 ]")
![Coneflower Celebrations Dies [ 165250 ]](https://assets1.tamsnetwork.com/images/EC042017NF/165250s.jpg "Coneflower Celebrations Dies [ 165250 ]")
![Textured Notes Dies [ 165555 ]](https://assets1.tamsnetwork.com/images/EC042017NF/165555s.jpg "Textured Notes Dies [ 165555 ]")
![Stampin' Cut & Emboss Machine [ 149653 ]](https://assets1.tamsnetwork.com/images/EC042017NF/149653s.jpg "Stampin' Cut & Emboss Machine [ 149653 ]")
![Perennial Lavender 12" X 12" (30.5 X 30.5 Cm) Designer Series Paper [ 162593 ]](https://assets1.tamsnetwork.com/images/EC042017NF/162593s.jpg "Perennial Lavender 12\" X 12\" (30.5 X 30.5 Cm) Designer Series Paper [ 162593 ]")
![Textured Metallic 12" X 12" (30.5 X 30.5 Cm) Specialty Paper [ 163772 ]](https://assets1.tamsnetwork.com/images/EC042017NF/163772s.jpg "Textured Metallic 12\" X 12\" (30.5 X 30.5 Cm) Specialty Paper [ 163772 ]")
![Basic White 8 1/2" X 11" Cardstock [ 166780 ]](https://assets1.tamsnetwork.com/images/EC042017NF/166780s.jpg "Basic White 8 1/2\" X 11\" Cardstock [ 166780 ]")
![Crumb Cake 8-1/2" X 11" Cardstock [ 120953 ]](https://assets1.tamsnetwork.com/images/EC042017NF/120953s.jpg "Crumb Cake 8-1/2\" X 11\" Cardstock [ 120953 ]")
![Take Your Pick [ 144107 ]](https://assets1.tamsnetwork.com/images/EC042017NF/144107s.jpg "Take Your Pick [ 144107 ]")
![Take Your Pick Putty Refill [ 150006 ]](https://assets1.tamsnetwork.com/images/EC042017NF/150006s.jpg "Take Your Pick Putty Refill [ 150006 ]")
![Take Your Pick Die Brush Tip [ 149655 ]](https://assets1.tamsnetwork.com/images/EC042017NF/149655s.jpg "Take Your Pick Die Brush Tip [ 149655 ]")
![Take Your Pick Crafter Tips [ 161602 ]](https://assets1.tamsnetwork.com/images/EC042017NF/161602s.jpg "Take Your Pick Crafter Tips [ 161602 ]")
![Hole Punch Assortment [ 165409 ]](https://assets1.tamsnetwork.com/images/EC042017NF/165409s.jpg "Hole Punch Assortment [ 165409 ]")
![Paper Trimmer [ 152392 ]](https://assets1.tamsnetwork.com/images/EC042017NF/152392s.jpg "Paper Trimmer [ 152392 ]")
![Bone Folder [ 102300 ]](https://assets1.tamsnetwork.com/images/EC042017NF/102300s.jpg "Bone Folder [ 102300 ]")
![Gorgeous Grape Classic Stampin' Pad [ 147099 ]](https://assets1.tamsnetwork.com/images/EC042017NF/147099s.jpg "Gorgeous Grape Classic Stampin' Pad [ 147099 ]")
![Adhesive Sheets [ 152334 ]](https://assets1.tamsnetwork.com/images/EC042017NF/152334s.jpg "Adhesive Sheets [ 152334 ]")
![Stampin' Seal+ [ 149699 ]](https://assets1.tamsnetwork.com/images/EC042017NF/149699s.jpg "Stampin' Seal+ [ 149699 ]")
![Stampin' Dimensionals [ 104430 ]](https://assets1.tamsnetwork.com/images/EC042017NF/104430s.jpg "Stampin' Dimensionals [ 104430 ]")
![Multipurpose Liquid Glue [ 110755 ]](https://assets1.tamsnetwork.com/images/EC042017NF/110755s.jpg "Multipurpose Liquid Glue [ 110755 ]")
![Loose Gold Sequins [ 165267 ]](https://assets1.tamsnetwork.com/images/EC042017NF/165267s.jpg "Loose Gold Sequins [ 165267 ]")
![Purple Fine Shimmer Gems [ 162611 ]](https://assets1.tamsnetwork.com/images/EC042017NF/162611s.jpg "Purple Fine Shimmer Gems [ 162611 ]")
![Basic Beige 3/8" (1 Cm) Bordered Ribbon [ 163788 ]](https://assets1.tamsnetwork.com/images/EC042017NF/163788s.jpg "Basic Beige 3/8\" (1 Cm) Bordered Ribbon [ 163788 ]")
![Linen Thread [ 104199 ]](https://assets1.tamsnetwork.com/images/EC042017NF/104199s.jpg "Linen Thread [ 104199 ]")
Learn To Make Cards
Shop Supplies
Rewards Program
Join My Amazing Team
Thanks for visiting to see today’s card and many ideas for how to use to Take Your Pick Tool!
[…] stamp your image of choice onto a piece of cardstock. Then use a craft knife to begin cutting out the areas you’ll want to ink with a single […]