Welcome friends! If you’ve been card making long, it’s likely that you’ve tried your hand at embossing once or twice. I just love to use embossed pieces on my cards because they add such a special touch. Today I’m excited to be sharing creative and new ways to use embossing folders for your paper craft projects. Let’s get started!
New Ways To Use Embossing Folders Video
Watch along here!
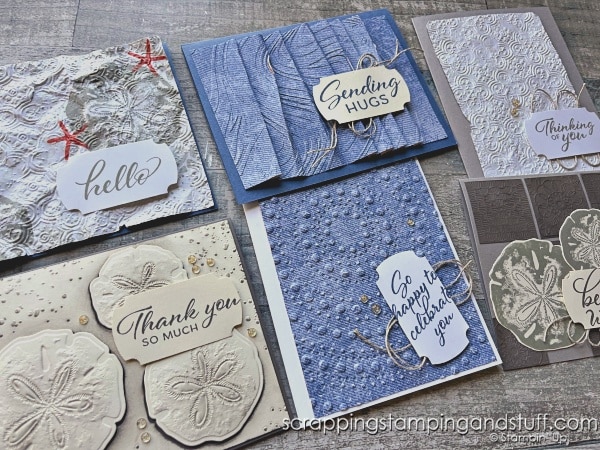
6 New Ways To Use Embossing Folders
Let’s take a look at these creative ways to use embossing folders on your projects.
1. Double Emboss
For this technique, you’ll emboss a piece of paper with one embossing folder, and then choose a different folder and emboss it a second time. This can create some really unique designs! I used the Dotted Circles and Cane Weave embossing folders for this card.
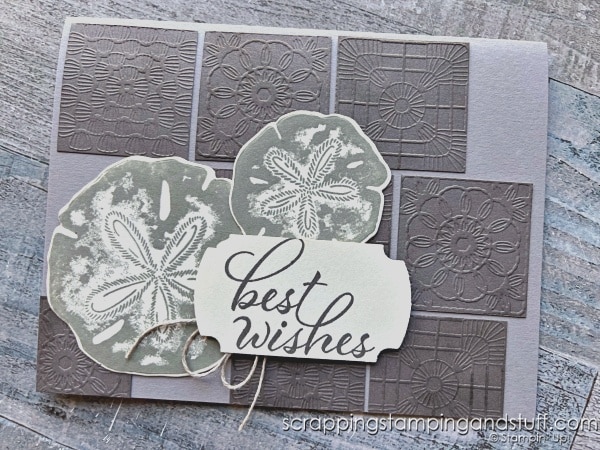
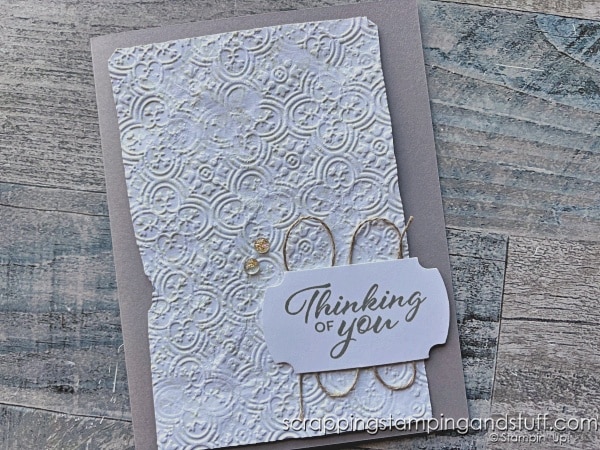
2. Emboss and Cut
To do this, you’ll emboss some cardstock and then cut the embossed piece into several sections. For my example below made with the Cute Crochet embossing folder, it made sense to cut it apart between the ’tiles’ but for another folder, you might cut along the lines of the pattern or outside of a fern or flower.
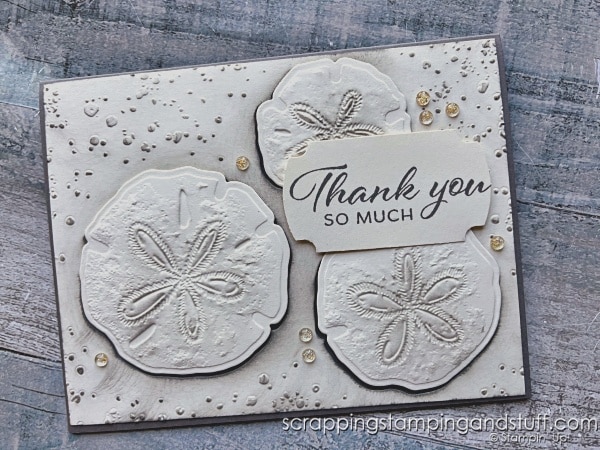
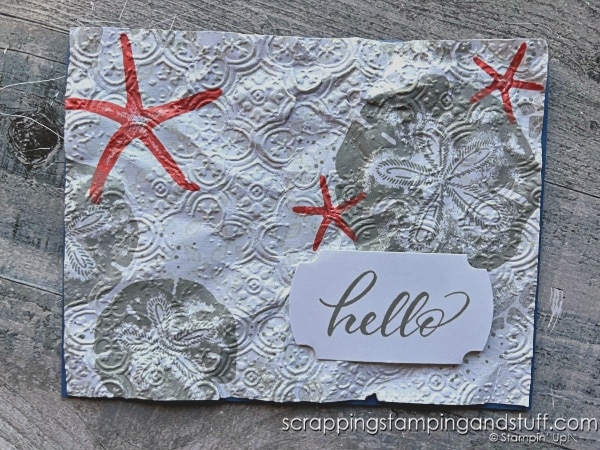
3. Blending Brushes
This isn’t a terribly creative idea, but it’s one of the best…use blending brushes to apply ink over top of your embossed design. Aren’t these sand dollars gorgeous?! I made them with the Seaside Wishes embossing folder. I have links to all of these products at the bottom if you want to see them.
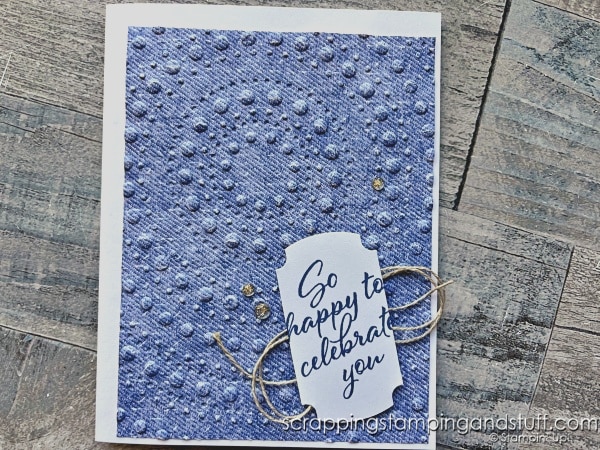
4. Crumple Then Emboss
Crumpling up your paper is a really fun thing to do if you’ve never tried it! I love the effect it creates by distressing the paper. For this sample, I crumpled my paper several times, flattened it back out, then embossed it with the Distressed Tile embossing folder. It’s so soft, it almost feels like old, worn fabric!
5. Emboss Then Crumple
If you emboss your paper first, then crumple, it creates a bit of a different effect. It will appear less soft and more crumpled. I used the same embossing folder as I did on the card shown above. If you’re curious, I stamped the images on this paper before I did any embossing or crumpling.
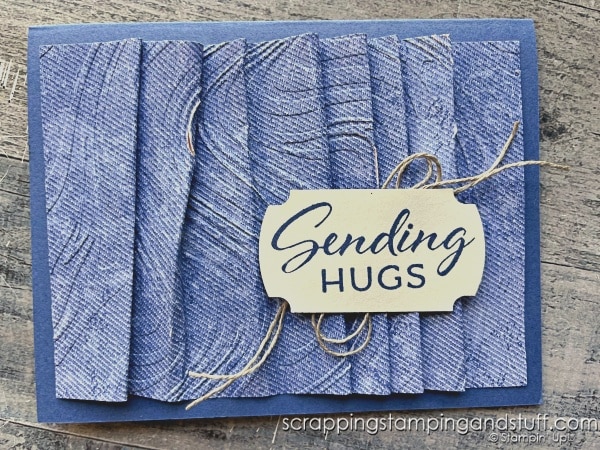
6. Folded Designs
Have you ever made a drapery fold card? I got the idea below from that technique. I embossed the paper which measured 3 3/4″ x 8 1/2″, with the So Swirly embossing folder, which is one of our large folders. Then I scored at 1″, 1 1/4″, 2″, 2 1/4″, 3″, 3 1/4″, 4″, 4 1/4″, 5″, 5 1/4″, 6″, 6 1/4″, 7″ and 7 1/4″. I folded on each line to get the design shown below. Actually, it was hard to tell where my score lines were because of the embossing, so the folding became pretty casual as you can see. You could definitely make the lines and folding more precise and evenly spaced if you prefer. I actually love the casual look for this particular card, and the texture is amazing!
What other ideas do you have for creative ways to use embossing folders? Share in the comments!
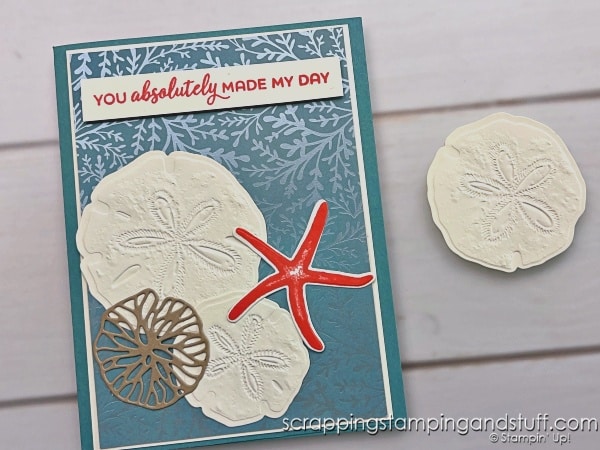
seaside wishes bundle
I must share the lovely Seaside Wishes bundle with you! It includes a stamp set, along with coordinating embossing folder and dies.

Here’s another card I made with this set, and you can see more about it here.
If you’re in the market for a die cutting and embossing machine, learn more about my favorite machine here.
Supply List
View and shop for the supplies I used with these links.
Product List![Seaside Wishes Bundle (English) [ 163498 ]](https://assets1.tamsnetwork.com/images/EC042017NF/163498s.jpg "Seaside Wishes Bundle (English) [ 163498 ]")
![Seaside Wishes Photopolymer Stamp Set (English) [ 163494 ]](https://assets1.tamsnetwork.com/images/EC042017NF/163494s.jpg "Seaside Wishes Photopolymer Stamp Set (English) [ 163494 ]")
![Seaside Wishes Hybrid Embossing Folder [ 163497 ]](https://assets1.tamsnetwork.com/images/EC042017NF/163497s.jpg "Seaside Wishes Hybrid Embossing Folder [ 163497 ]")
![Country Lace 12" X 12" (30.5 X 30.5 Cm) Designer Series Paper [ 163415 ]](https://assets1.tamsnetwork.com/images/EC042017NF/163415s.jpg "Country Lace 12\" X 12\" (30.5 X 30.5 Cm) Designer Series Paper [ 163415 ]")
![Misty Moonlight 8-1/2" X 11" Cardstock [ 153081 ]](https://assets1.tamsnetwork.com/images/EC042017NF/153081s.jpg "Misty Moonlight 8-1/2\" X 11\" Cardstock [ 153081 ]")
![Basic White 8 1/2" X 11" Thick Cardstock [ 159229 ]](https://assets1.tamsnetwork.com/images/EC042017NF/159229s.jpg "Basic White 8 1/2\" X 11\" Thick Cardstock [ 159229 ]")
![Gray Granite 8-1/2" X 11" Cardstock [ 146983 ]](https://assets1.tamsnetwork.com/images/EC042017NF/146983s.jpg "Gray Granite 8-1/2\" X 11\" Cardstock [ 146983 ]")
![Pebbled Path 8 1/2" X 11" Cardstock [ 161722 ]](https://assets1.tamsnetwork.com/images/EC042017NF/161722s.jpg "Pebbled Path 8 1/2\" X 11\" Cardstock [ 161722 ]")
![Very Vanilla 8-1/2" X 11" Cardstock [ 101650 ]](https://assets1.tamsnetwork.com/images/EC042017NF/101650s.jpg "Very Vanilla 8-1/2\" X 11\" Cardstock [ 101650 ]")
![Misty Moonlight Classic Stampin' Pad [ 153118 ]](https://assets1.tamsnetwork.com/images/EC042017NF/153118s.jpg "Misty Moonlight Classic Stampin' Pad [ 153118 ]")
![Pebbled Path Classic Stampin' Pad [ 161648 ]](https://assets1.tamsnetwork.com/images/EC042017NF/161648s.jpg "Pebbled Path Classic Stampin' Pad [ 161648 ]")
![Gray Granite Classic Stampin' Pad [ 147118 ]](https://assets1.tamsnetwork.com/images/EC042017NF/147118s.jpg "Gray Granite Classic Stampin' Pad [ 147118 ]")
![Calypso Coral Classic Stampin' Pad [ 147101 ]](https://assets1.tamsnetwork.com/images/EC042017NF/147101s.jpg "Calypso Coral Classic Stampin' Pad [ 147101 ]")
![Blending Brushes [ 153611 ]](https://assets1.tamsnetwork.com/images/EC042017NF/153611s.jpg "Blending Brushes [ 153611 ]")
![Stampin' Cut & Emboss Machine [ 149653 ]](https://assets1.tamsnetwork.com/images/EC042017NF/149653s.jpg "Stampin' Cut & Emboss Machine [ 149653 ]")
![Simply Scored [ 122334 ]](https://assets1.tamsnetwork.com/images/EC042017NF/122334s.jpg "Simply Scored [ 122334 ]")
![Labeled With Love Punch [ 163569 ]](https://assets1.tamsnetwork.com/images/EC042017NF/163569s.jpg "Labeled With Love Punch [ 163569 ]")
![Take Your Pick [ 144107 ]](https://assets1.tamsnetwork.com/images/EC042017NF/144107s.jpg "Take Your Pick [ 144107 ]")
![Iridescent Foil Gems [ 162842 ]](https://assets1.tamsnetwork.com/images/EC042017NF/162842s.jpg "Iridescent Foil Gems [ 162842 ]")
![Linen Thread [ 104199 ]](https://assets1.tamsnetwork.com/images/EC042017NF/104199s.jpg "Linen Thread [ 104199 ]")
![Stampin' Seal+ [ 149699 ]](https://assets1.tamsnetwork.com/images/EC042017NF/149699s.jpg "Stampin' Seal+ [ 149699 ]")
![Stampin' Dimensionals [ 104430 ]](https://assets1.tamsnetwork.com/images/EC042017NF/104430s.jpg "Stampin' Dimensionals [ 104430 ]")


Thanks for visiting to see ideas for new ways to use embossing folders along with these lovely cards created with the Stampin Up Seaside Wishes bundle!
Leave a Reply