• Nav Social Menu

    • Facebook
    • Facebook Group
    • Instagram
    • Pinterest
    • RSS
    • Twitter
    • YouTube

Handmake with Love

Anna Helman | formerly Scrapping, Stamping and Stuff

  • Blog
  • Start Here
    • About Me
    • Learn to Make Cards
    • Why Shop With Me?
    • Testimonials
    • Connect On Social
    • Get Email Updates
    • Stampin’ Up! Giveaway Winners
  • Products
    • Shop Now
    • Catalogs
    • Clearance
    • Why Choose Stampin Up?
    • Paper Pumpkin Kits
    • Product Shares
    • Rewards Program
    • Stamparatus
    • Cut And Emboss Machine
    • Mini Cut And Emboss Machine
    • Blends Alcohol Markers
    • Blending Brushes
  • Ideas
    • Video Tutorials
    • Project Gallery
    • Card Ideas
    • 3D Projects
    • Scrapbooking
    • Tips & Techniques
    • Kits
    • Learn to Make Cards
    • Printable Catalog Tabs
    • Social Media
  • Join
    • Join My Team
    • Stampin Up Demonstrator Resources
  • Classes
    • Classes in the Mail
    • In Person Events
  • Contact
    • Contact
    • Connect On Social

Stampin Up Inked & Tiled And A Simple One Sheet Wonder

17 Jun

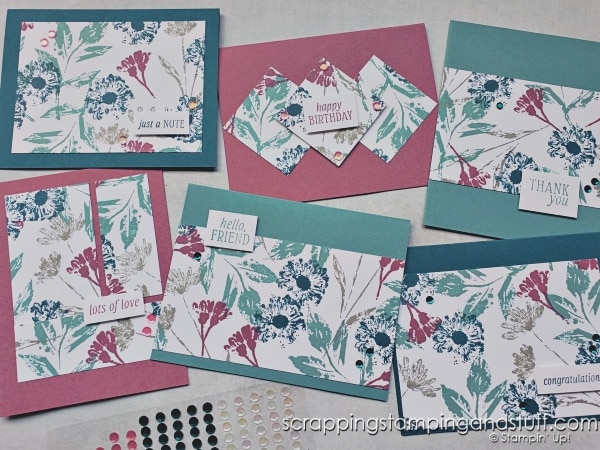
I love to include simple card making ideas mixed in with those that take more time and detail. Today’s one sheet wonder tutorial is a great project to make a stack of cards in no time, and they’re great for beginners as well. I’ll be using the Stampin Up Inked & Tiled stamp set to create my own designer paper, then I’ll cut it apart to make pieces for six different cards. Let’s take a look!

Click for the easiest one sheet wonder template you've ever seen! Start by stamping a piece of white cardstock, then cut into several pieces and mount them onto your card bases. You'll have a stack of cards in no time!

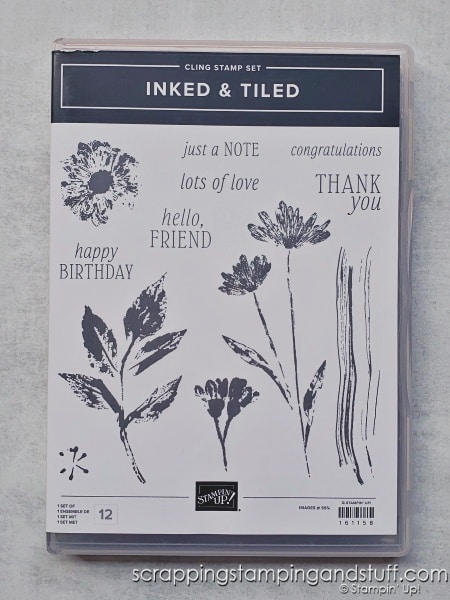
Stampin Up Inked & Tiled Stamp Set

I think this is such a nice stamp set. It’s one that, in my opinion, is perfect for building up a stamping collection because it includes nice, assorted greetings and also assorted image stamps.

Click for the easiest one sheet wonder template you've ever seen! Start by stamping a piece of white cardstock, then cut into several pieces and mount them onto your card bases. You'll have a stack of cards in no time!

One Sheet Wonder Template

To create these cards, begin by stamping a piece of 8 1/2″ x 11″ cardstock…or you can make it even easier and use a piece of printed paper! Cut your large piece into the pieces shown below.

Click for the easiest one sheet wonder template you've ever seen! Start by stamping a piece of white cardstock, then cut into several pieces and mount them onto your card bases. You'll have a stack of cards in no time!

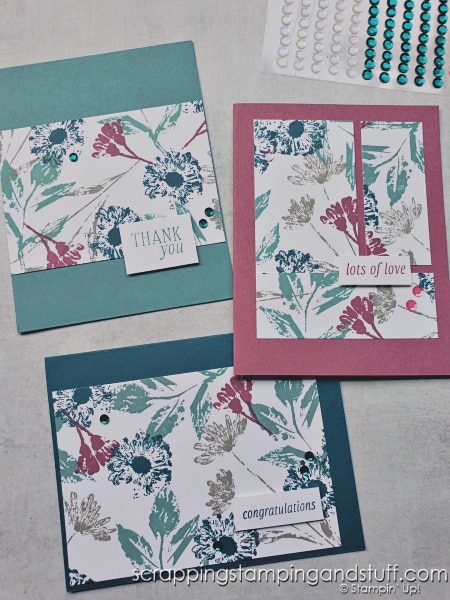
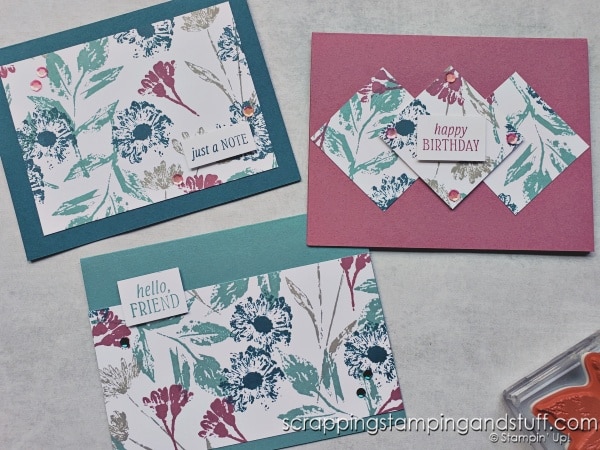
Inked & Tiled Card Samples

Here are the cards I created, and I’ve listed the size of the paper used on each.

Top left: 3″ x 4 1/4″

Bottom: 3 1/2″ x 5″

Right: 2″ x 3 3/4″, 1 1/4″ x 3″ and 1 1/4″ x 3 1/2″

Click for the easiest one sheet wonder template you've ever seen! Start by stamping a piece of white cardstock, then cut into several pieces and mount them onto your card bases. You'll have a stack of cards in no time!

Top left: 3 1/2″ x 4 3/4″

Bottom: 3″ x 5 1/2″

Right: 3 – 2″ x 2″ pieces

Click for the easiest one sheet wonder template you've ever seen! Start by stamping a piece of white cardstock, then cut into several pieces and mount them onto your card bases. You'll have a stack of cards in no time!

I finished making these cards and found one small piece I forgot to use! You can use it on another card project or add it as a bonus piece to one of these cards!

One Sheet Wonder Video Tutorial

Watch along here as I create these cards!

Supply List

Product List
Inked Botanicals Suite Collection (English)
[161172]
Inked & Tiled Bundle (English)
[161168]
Inked & Tiled Cling Stamp Set (English)
[161158]
Basic White 8 1/2" X 11" Thick Cardstock
[159229]
Pretty Peacock 8-1/2" X 11" Cardstock
[150880]
Moody Mauve 8 1/2" X 11" Cardstock
[161723]
Lost Lagoon 8-1/2" X 11" Cardstock
[133679]
Lost Lagoon Classic Stampin' Pad
[161678]
Pretty Peacock Classic Stampin’ Pad
[150083]
Gray Granite Classic Stampin' Pad
[147118]
Moody Mauve Classic Stampin' Pad
[161649]
Stampin' Dimensionals
[104430]
Stampin' Seal
Stampin' Seal
[152813]
Paper Trimmer
Paper Trimmer
[152392]
Bone Folder
Bone Folder
[102300]
Adhesive Backed Sequins Trio
[161206]
Add All to Cart

Learn To Make Cards
Shop Supplies
Rewards Program
Join My Amazing Team

Do you like the Inked & Tiled stamp set on these cards or would you use a different one?

Sharing is caring!

Filed Under: Gallery, Learn to Stamp Tagged With: #simplestamping, beginning, clean and simple, stampin up inked and tiled

Previous Post: « Stampin Up Hello Kiwi & Shadow Stamping Technique
Next Post: Stampin Up Gorgeously Made & Monochromatic Backgrounds With Die Cuts »

Reader Interactions

Comments

  1. Cathey Woody says

    June 17, 2023 at 8:41 AM

    Absolutely beautiful! You have a very creative gift and we are blessed to have you teaching us.

    Reply
    • Anna Helman says

      June 17, 2023 at 8:42 AM

      Thanks so much Cathey!

      Reply
  2. Melanie says

    June 17, 2023 at 8:58 PM

    The cards are so beautiful. I love easy and simple cards.

    Reply
    • Anna Helman says

      June 17, 2023 at 10:23 PM

      Thank you Melanie!

      Reply
  3. Jacqueline says

    June 26, 2023 at 3:22 AM

    Great idea. Thanks

    Reply
    • Anna Helman says

      June 26, 2023 at 7:58 AM

      You’re welcome Jacqueline!

      Reply
  4. Karen says

    July 27, 2023 at 3:51 AM

    Hi Anna! Great ideas! HOW did you get your paper cutter to be so user friendly? Is that an overlay created by you? Are you going to share how you created the design?Thank you in advance for all of your informative videos!

    Reply
    • Anna Helman says

      July 27, 2023 at 6:32 AM

      Thanks Karen! Here’s the link where I shared about my trimmer: https://www.handmakewithlove.com/what-are-the-lines-on-my-trimmer/

      Reply

Leave a Reply Cancel reply

Your email address will not be published. Required fields are marked *

Recipe Rating


Primary Sidebar

Anna Helman

Independent Stampin' Up!® Demonstrator

  • Email
  • Facebook
  • Facebook Group
  • Instagram
  • Pinterest
  • RSS
  • Twitter
  • YouTube
Shop Stampin' Up!
Stampin' Up! catalogs
get updates
join Stampin' Up!
Stampin' Up! Rewards
Stampin' Up! special offers
Stampin' Up! clearance
Stampin' Up! 2025-2026 Annual Catalog
May 6, 2025 - May 4, 2026
View Online | Shop Online

Blog Archive

Categories

Footer

Important Links

  • Home
  • Shop Now
  • Get Updates
  • Join My Team
  • Rewards
  • Specials
  • Catalogs
  • Clearance

Anna Helman, Independent Stampin' Up!® Demonstrator

  • Email
  • Facebook
  • Facebook Group
  • Instagram
  • Pinterest
  • RSS
  • Twitter
  • YouTube

Get Ideas, Inspiration, and Special Offers!

Sign up to receive updates in your inbox

Thank you!

Please check your email for a special offer! 

.
All content on this blog is the property of Anna Helman, Stampin' Up!® Independent Demonstrator. Classes, services and projects offered here are not endorsed by Stampin' Up!® Projects, videos, photos, ideas and articles are shared for personal use only and may not be removed, duplicated or copied without permission. All artwork © Stampin' Up!®

Copyright © 2025 Anna Helman, handmake with love · Site Design by Catherine Carroll