• Nav Social Menu

    • Facebook
    • Facebook Group
    • Instagram
    • Pinterest
    • RSS
    • Twitter
    • YouTube

Handmake with Love

Anna Helman | formerly Scrapping, Stamping and Stuff

  • Blog
  • Start Here
    • About Me
    • Learn to Make Cards
    • Why Shop With Me?
    • Testimonials
    • Connect On Social
    • Get Email Updates
    • Stampin’ Up! Giveaway Winners
  • Products
    • Shop Now
    • Catalogs
    • Clearance
    • Why Choose Stampin Up?
    • Paper Pumpkin Kits
    • Product Shares
    • Rewards Program
    • Stamparatus
    • Cut And Emboss Machine
    • Mini Cut And Emboss Machine
    • Blends Alcohol Markers
    • Blending Brushes
  • Ideas
    • Video Tutorials
    • Project Gallery
    • Card Ideas
    • 3D Projects
    • Scrapbooking
    • Tips & Techniques
    • Kits
    • Learn to Make Cards
    • Printable Catalog Tabs
    • Social Media
  • Join
    • Join My Team
    • Stampin Up Demonstrator Resources
  • Classes
    • Classes in the Mail
    • In Person Events
  • Contact
    • Contact
    • Connect On Social

Quick & Cute DIY Gift Pouch Tutorial

21 Sep

I’m doing something new today, and I’m excited that you’re here! What’s new, you ask? I’m sharing a project that was inspired by three other Stampin Up demonstrators. I love to take ideas from others and make them my own, and often I find that I make much more creative projects than I usually make when I do this. My project is a DIY gift pouch and it features a couple of fun techniques you should try at home. Take a look!

Click for this quick and easy diy gift pouch tutorial that you can make quickly with just one piece of 8 1/2" x 11" paper!

I want to mention that I got the tutorial for the cute pouch design from Candy Rattray. You can see her original project here. 

Now, let me share my tutorial with you!

DIY Gift Pouch Video Tutorial

To see how to create this cute pouch, watch along here.

Next I’ll share the materials list for what you need to create this project.

Cutting Dimensions

Here’s what you’ll need to create this little gift bag.

8 1/2″ x 11″ cardstock

2 7/8″ x 4 7/8″ cardstock, same color as base

3 3/4″ x 5 3/4″ designer paper

3 3/4″ x 3/4″ designer paper

2 3/4″ x 4 3/4″ white cardstock

DIY Gift Pouch Photo Tutorial

Here I’ll share how to create the base for this cute little gift pouch. Begin with a piece of 8 1/2″ x 11″ cardstock. Place it vertically on your scoring board or trimmer, and score at 1″. 

Click for this quick and easy diy gift pouch tutorial that you can make quickly with just one piece of 8 1/2" x 11" paper!

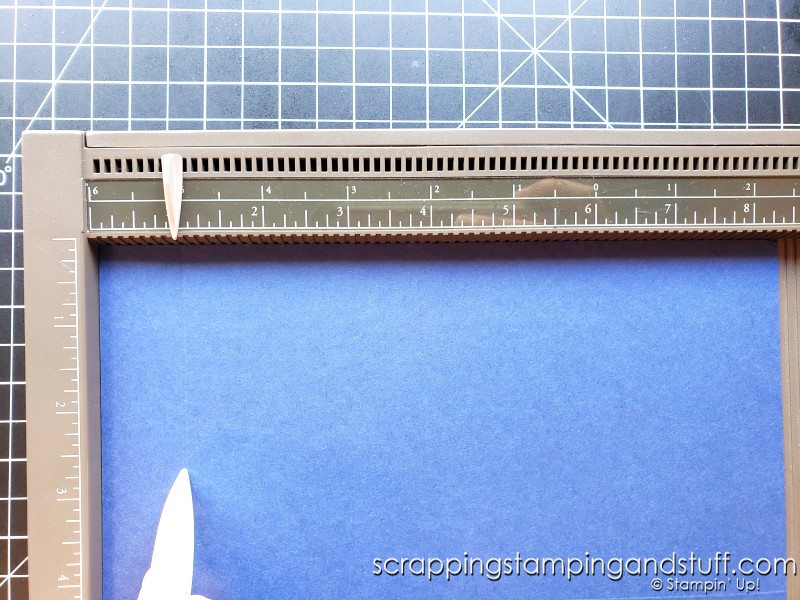
Turn it 90 degrees and score at 4 1/2″, 5 1/4″, 9 3/4″, and 10 1/2″. 

Click for this quick and easy diy gift pouch tutorial that you can make quickly with just one piece of 8 1/2" x 11" paper!

Fold on all score lines and trim out the notches shown. Then place a piece of Tear & Tape adhesive on the edge flap. 

Click for this quick and easy diy gift pouch tutorial that you can make quickly with just one piece of 8 1/2" x 11" paper!

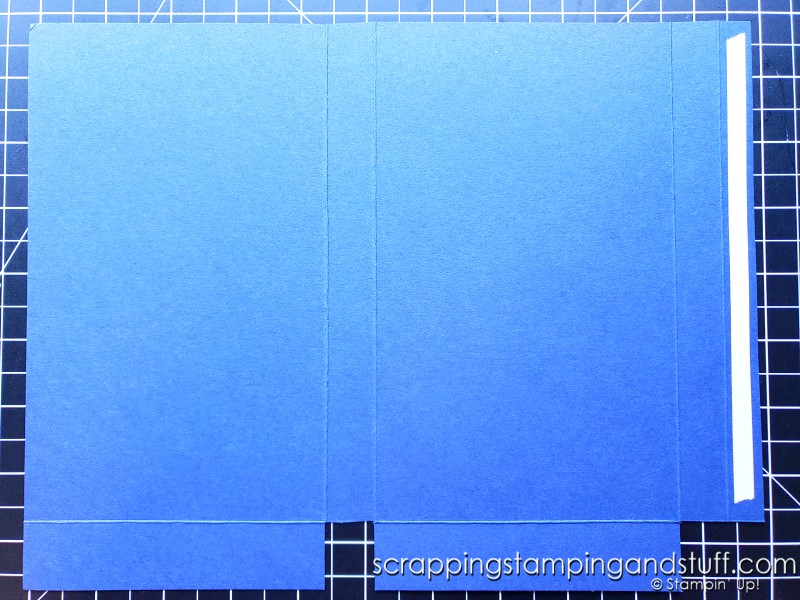
At this point you can remove the backing from the adhesive, and the pouch can be folded up. The two flaps at the bottom will be folded to the back side and stapled to hold them closed. Now decorate as desired! 

Like I mentioned, I used several techniques on the front of this project. I’ll share them in the sections below.

Technique 1: Blending & Splattering

I got this idea from Helen Read and you can see her project below. 

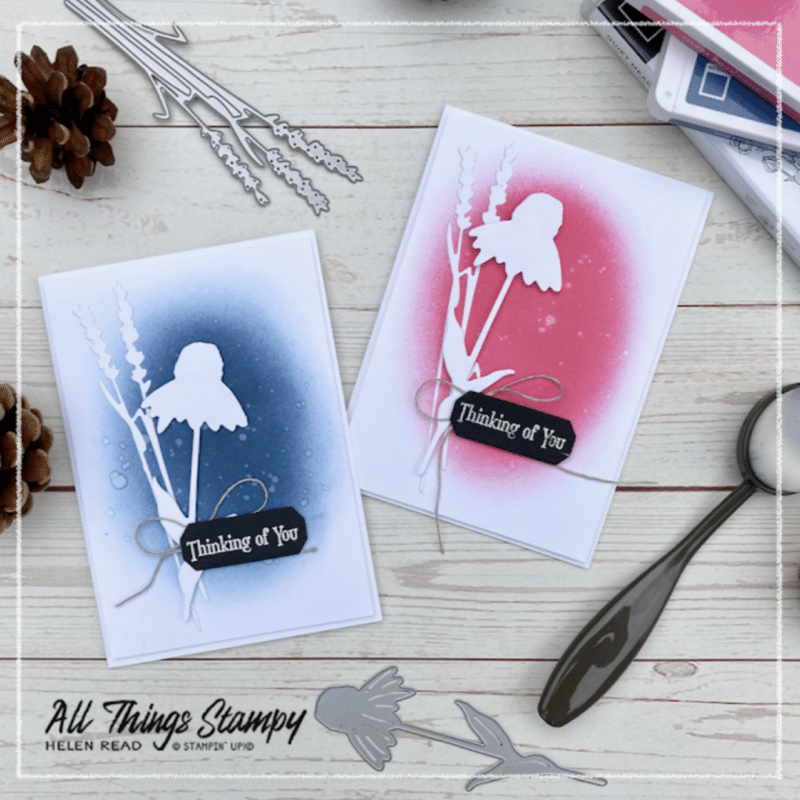
I began by blending Smoky Slate ink into the center of my white cardstock. Once I liked the look, I used a water painter to splatter water droplets over the top. I soaked up the excess water with a paper towel and let it dry before moving on to the next technique. 

Click for this quick and easy diy gift pouch tutorial that you can make quickly with just one piece of 8 1/2" x 11" paper!

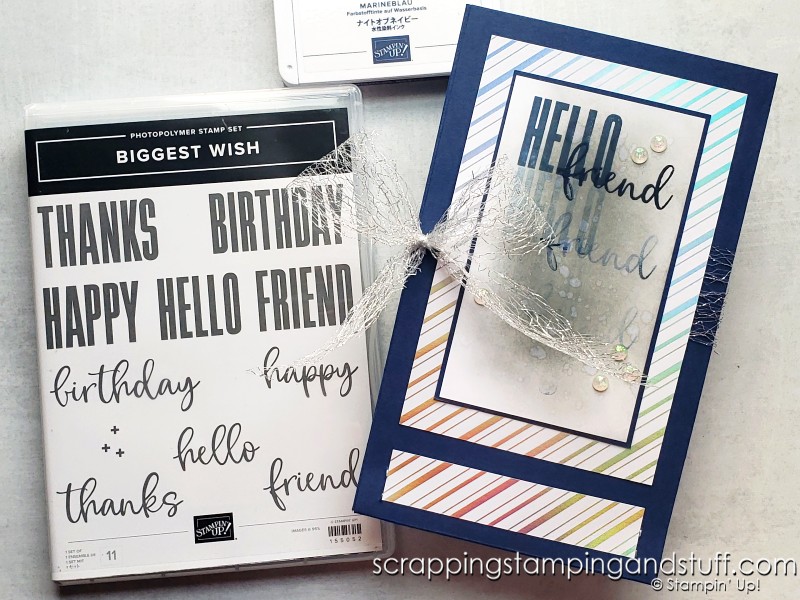
Technique 2: Stamparatus Hinge Step Stamping

I got the idea for this from a dear friend, Mary Knabe, and you can see her project that inspired me here. 

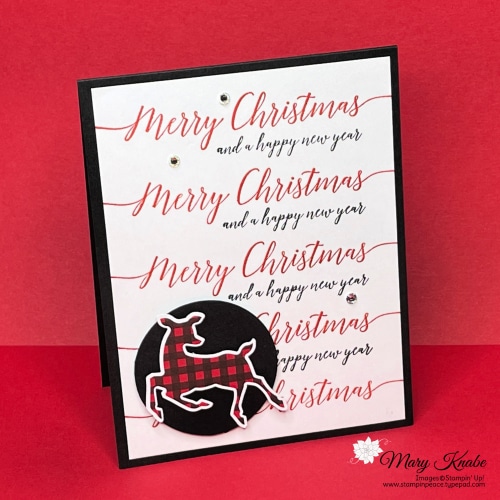
This is a technique that is only possible using the Stamparatus stamping platform. I’ve shared about hinge step stamping in the past, but it had been quite a while and I forgot about this technique until I saw the project Mary had shared recently! 

I used the Biggest Wish stamp set and my Stamparatus to create the ‘Hello Friend’ greetings that move down the front of the pouch. I chose not to reink my stamps between stampings, which created the ombre effect. 

Click for this quick and easy diy gift pouch tutorial that you can make quickly with just one piece of 8 1/2" x 11" paper!

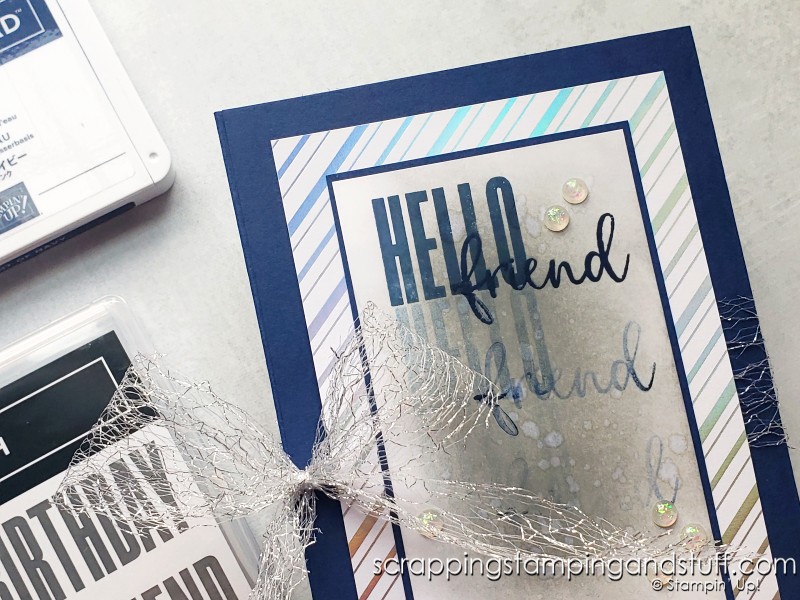
Do you like this technique? If so, you can see more about it in this blog post I shared about hinge step stamping.

Can your MISTI do this? If not, try this amazing step stamping technique with the Stampin Up Stamparatus today.

Supply List

Here are all the products I used on today’s cute gift pouch. Take a look at them using the links, and you can purchase them in my online store.

Product List
Biggest Wish Photopolymer Stamp Set (English)
[155052]
Whimsy & Wonder 12" X 12" (30.5 X 30.5 Cm) Specialty Designer Series Paper
[156329]
Stamparatus
Stamparatus
[146276]
Paper Trimmer
Paper Trimmer
[152392]
Simply Scored
Simply Scored
[122334]
Blending Brushes
Blending Brushes
[153611]
Bone Folder
Bone Folder
[102300]
Paper Snips
Paper Snips
[103579]
Water Painters
Water Painters
[151298]
Smoky Slate Classic Stampin' Pad
[147113]
Night Of Navy Classic Stampin' Pad
[147110]
Misty Moonlight Classic Stampin' Pad
[153118]
Night Of Navy 8-1/2" X 11" Cardstock
[100867]
Whisper White 8-1/2" X 11" Cardstock
[100730]
Metallic Mesh Ribbon
[153550]
Opal Rounds
Opal Rounds
[154289]
Tear & Tape Adhesive
[138995]
Stampin' Seal+
Stampin' Seal+
[149699]
Add All to Cart

Learn To Make Cards
Shop Supplies
Rewards Program
Join My Amazing Team

What do you think about today’s post? One project with three different sources of inspiration. It was a challenge, but it was fun. Thanks for visiting to see this DIY gift pouch! 

Sharing is caring!

Filed Under: Gallery, Gift Ideas Tagged With: 2021 July-December Holiday Mini Catalog, 2021-2022 Annual Catalog, Biggest Wish Stamp Set, gift wrap, gifts, stamparatus, treat holder, whimsy and wonder designer paper

Previous Post: « Stampin Up Frosted Gingerbread & Another Paper Scrap Card
Next Post: Team Craft Night Recap – Would You Like To Join Us? »

Reader Interactions

Comments

  1. Helen Read says

    September 21, 2021 at 6:22 AM

    Lovely projects! That water splattering technique is one of my favourites

    Reply

Leave a Reply Cancel reply

Your email address will not be published. Required fields are marked *

Recipe Rating


Primary Sidebar

Anna Helman

Independent Stampin' Up!® Demonstrator

  • Email
  • Facebook
  • Facebook Group
  • Instagram
  • Pinterest
  • RSS
  • Twitter
  • YouTube
Shop Stampin' Up!
Stampin' Up! catalogs
get updates
join Stampin' Up!
Stampin' Up! Rewards
Stampin' Up! special offers
Stampin' Up! clearance
Stampin' Up! 2025-2026 Annual Catalog
May 6, 2025 - May 4, 2026
View Online | Shop Online

Blog Archive

Categories

Footer

Important Links

  • Home
  • Shop Now
  • Get Updates
  • Join My Team
  • Rewards
  • Specials
  • Catalogs
  • Clearance

Anna Helman, Independent Stampin' Up!® Demonstrator

  • Email
  • Facebook
  • Facebook Group
  • Instagram
  • Pinterest
  • RSS
  • Twitter
  • YouTube

Get Ideas, Inspiration, and Special Offers!

Sign up to receive updates in your inbox

Thank you!

Please check your email for a special offer! 

.
All content on this blog is the property of Anna Helman, Stampin' Up!® Independent Demonstrator. Classes, services and projects offered here are not endorsed by Stampin' Up!® Projects, videos, photos, ideas and articles are shared for personal use only and may not be removed, duplicated or copied without permission. All artwork © Stampin' Up!®

Copyright © 2025 Anna Helman, handmake with love · Site Design by Catherine Carroll