• Nav Social Menu

    • Facebook
    • Facebook Group
    • Instagram
    • Pinterest
    • RSS
    • Twitter
    • YouTube

Handmake with Love

Anna Helman | formerly Scrapping, Stamping and Stuff

  • Blog
  • Start Here
    • About Me
    • Learn to Make Cards
    • Why Shop With Me?
    • Testimonials
    • Connect On Social
    • Get Email Updates
    • Stampin’ Up! Giveaway Winners
  • Products
    • Shop Now
    • Catalogs
    • Clearance
    • Why Choose Stampin Up?
    • Paper Pumpkin Kits
    • Product Shares
    • Rewards Program
    • Stamparatus
    • Cut And Emboss Machine
    • Mini Cut And Emboss Machine
    • Blends Alcohol Markers
    • Blending Brushes
  • Ideas
    • Video Tutorials
    • Project Gallery
    • Card Ideas
    • 3D Projects
    • Scrapbooking
    • Tips & Techniques
    • Kits
    • Learn to Make Cards
    • Printable Catalog Tabs
    • Social Media
  • Join
    • Join My Team
    • Stampin Up Demonstrator Resources
  • Classes
    • Classes in the Mail
    • In Person Events
  • Contact
    • Contact
    • Connect On Social

Arrow Fold Card Design – Perfect To Use That Paper Stash!

8 Jul

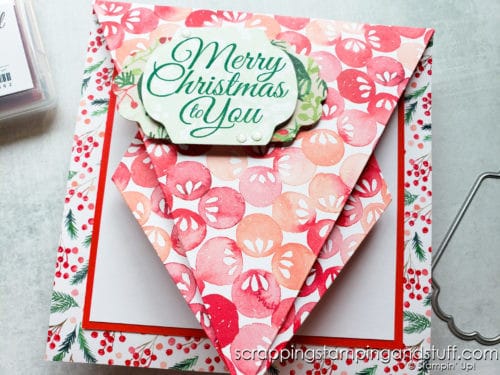
Today continues Christmas in July, so thanks for joining in! All this week I’m sharing projects made using our upcoming July-December 2021 Holiday Mini Catalog. Today, I have a fun arrow fold card to share. This card design is perfect for clearing out some of your paper stash, and if you’re a papercrafter, you probably have a big one! Because of this card’s size, it’s also perfect to slip directly into a Christmas or birthday gift. No envelope needed is needed, or you can create your own if you like. Let’s take a look at how to make this neat card.

This arrow fold card design is such a fun card fold to try, plus it's a great way to use up the paper in your stash!

Arrow Fold Card Video

Watching along is often the easiest way to learn to make fun fold cards. I hope you’ll join in!

How to Make An Arrow Fold Card

Below is a list of measurements and materials you’ll need to make today’s project.

Measurements:

  • 6″ x 12″ Piece of Designer Paper – I used a piece from the Painted Christmas pack
  • 5″ x 5″ Cardstock
  • 4 3/4″ x 4 3/4″ Cardstock

Additional Materials:

  • Holly Jolly Stamp Set
  • Seasonal Labels Dies

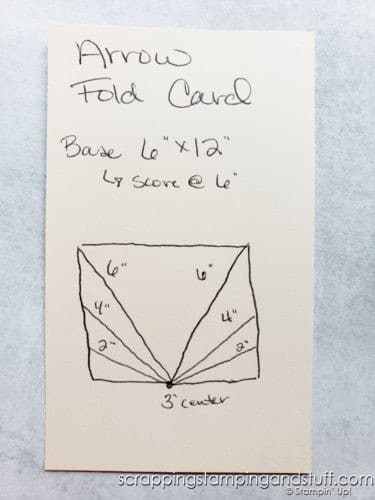
On your 6″ x 12″ base, score on the long side at 6″. Make a mark at 3″ on the side that will be the bottom edge. This is the center of the arrow. Next, along the sides, make marks at 2″, 4″ and 6″. Score from each of those marks to the 3″ center point.

This arrow fold card design is such a fun card fold to try, plus it's a great way to use up the paper in your stash!

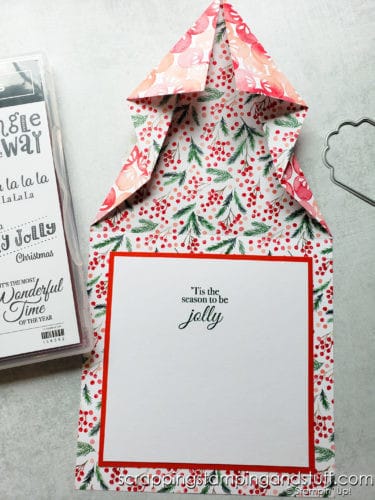
Lay your paper so the inside of the card is face up. Begin by folding in on the 6″ diagonal score line, fold the 4″ score line out and the 2″ score line in — accordion style. You can see how I did this step in the picture below. A bone folder is nice to have for this step to get crisp folds. You can use some cardstock to finish off the inside of the card and decorate the front as desired.

This arrow fold card design is such a fun card fold to try, plus it's a great way to use up the paper in your stash!

For a complete list of instructions, check out my video on how to make this adorable arrow fold card.

What do you think? Let me know what you think of this project by leaving a comment!

Don’t Miss Out!

Please make me your Stampin’ Up! demonstrator!  Earn rewards points towards free stamps PLUS a gift when you order using host code: JSUKR6CE. PLUS, with your first order, you’ll receive free catalogs in your thank you package!

Stampin Up Customer Rewards Host Code Free Gift With Order

Order These Supplies & Start Making This Arrow Card Today!

links coming soon!

You Might Also Like:

Mini Twist Fun Fold Card Design – Make It Today!

I hope you’ve enjoyed this arrow fold card design which is perfect for using up your designer paper stash!

Sharing is caring!

Filed Under: Gallery, Tutorials Tagged With: 2020-2021 Annual Catalog, 2021 July-December Holiday Mini Catalog, fancy fold, fun fold, holly jolly wishes stamp set, painted christmas dsp, seasonal labels dies

Previous Post: « Introducing Stampin Up Christmas Season – Christmas In July!
Next Post: Helman Family Vacation 2021 To Glacier, Mt. Rushmore and The Badlands »

Reader Interactions

Comments

  1. Kaye Jaeschke says

    July 14, 2021 at 8:02 AM

    Hi. Can you tell me what the markings are on your Trimmer pls?
    Thanks for your time

    Reply

Leave a Reply Cancel reply

Your email address will not be published. Required fields are marked *

Recipe Rating


Primary Sidebar

Anna Helman

Independent Stampin' Up!® Demonstrator

  • Email
  • Facebook
  • Facebook Group
  • Instagram
  • Pinterest
  • RSS
  • Twitter
  • YouTube
Shop Stampin' Up!
Stampin' Up! catalogs
get updates
join Stampin' Up!
Stampin' Up! Rewards
Stampin' Up! special offers
Stampin' Up! clearance
Stampin' Up! 2025-2026 Annual Catalog
May 6, 2025 - May 4, 2026
View Online | Shop Online

Blog Archive

Categories

Footer

Important Links

  • Home
  • Shop Now
  • Get Updates
  • Join My Team
  • Rewards
  • Specials
  • Catalogs
  • Clearance

Anna Helman, Independent Stampin' Up!® Demonstrator

  • Email
  • Facebook
  • Facebook Group
  • Instagram
  • Pinterest
  • RSS
  • Twitter
  • YouTube

Get Ideas, Inspiration, and Special Offers!

Sign up to receive updates in your inbox

Thank you!

Please check your email for a special offer! 

.
All content on this blog is the property of Anna Helman, Stampin' Up!® Independent Demonstrator. Classes, services and projects offered here are not endorsed by Stampin' Up!® Projects, videos, photos, ideas and articles are shared for personal use only and may not be removed, duplicated or copied without permission. All artwork © Stampin' Up!®

Copyright © 2025 Anna Helman, handmake with love · Site Design by Catherine Carroll