• Nav Social Menu

    • Facebook
    • Facebook Group
    • Instagram
    • Pinterest
    • RSS
    • Twitter
    • YouTube

Handmake with Love

Anna Helman | formerly Scrapping, Stamping and Stuff

  • Blog
  • Start Here
    • About Me
    • Learn to Make Cards
    • Why Shop With Me?
    • Testimonials
    • Connect On Social
    • Get Email Updates
    • Stampin’ Up! Giveaway Winners
  • Products
    • Shop Now
    • Catalogs
    • Clearance
    • Why Choose Stampin Up?
    • Paper Pumpkin Kits
    • Product Shares
    • Rewards Program
    • Stamparatus
    • Cut And Emboss Machine
    • Mini Cut And Emboss Machine
    • Blends Alcohol Markers
    • Blending Brushes
  • Ideas
    • Video Tutorials
    • Project Gallery
    • Card Ideas
    • 3D Projects
    • Scrapbooking
    • Tips & Techniques
    • Kits
    • Learn to Make Cards
    • Printable Catalog Tabs
    • Social Media
  • Join
    • Join My Team
    • Stampin Up Demonstrator Resources
  • Classes
    • Classes in the Mail
    • In Person Events
  • Contact
    • Contact
    • Connect On Social

Maui Swap – Masking, Blending & Gilded Leafing, Oh My!

19 May

Greetings from the airport! I’m currently en route to Maui, soon to be enjoying my Stampin Up incentive trip this week. Now don’t worry – I’m not blogging while I’m on vacation. I scheduled this week’s blog posts and videos ahead of time so that I can enjoy the week away. I’m so thankful and blessed to have earned this trip, and I want to thank those of you who support my SU business.

Those of us on the trip this week were able to sign up for an optional card swap, so of course I had to join in, and I want to share with you the card I created for this swap. I used some neat masking, blending and gilded leafing techniques on this card, so I’ll share them as well. Let’s take a look.

Take a look at this beautiful card project, full of techniques including masking, blending, and applying gilded leafing!

Masking, Blending and Gilded Leafing

For this card, I used several different techniques. Watch my video for all the fun tips and techniques that went into making this card.

Card Swap Measurements & Materials

Below is a list of measurements and other materials you can gather for this project.

Measurements:

  • 3 7/8″ x 5 1/2″ White Cardstock
  • 5 1/2″ x 8 1/2″ Pacific Point Card Base
  • 4″ x 5 1/2″ Balmy Blue Cardstock (optional)

Other Materials:

  • Scalloped Contours Dies
  • Washi Tape
  • Forever Fern Die Cuts
  • Pacific Point Ink
  • Blending Brushes
  • Sponge
  • Silicone Craft Sheet
  • Ribbon
  • Gilded Leafing
  • Multipurpose Glue
  • Mask of Your Choice

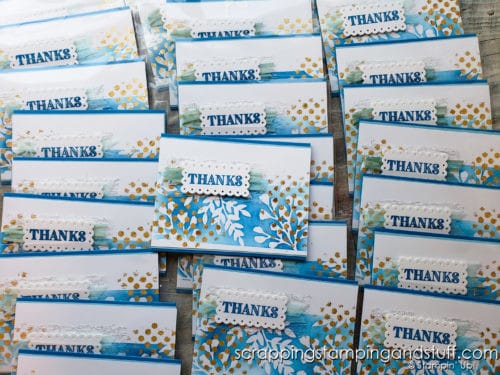
Here’s a picture of the finished project. I especially love the beautiful blue colors.

Take a look at this beautiful card project, full of techniques including masking, blending, and applying gilded leafing!

Video Tutorial

Here’s a link to my video. Check out all the fun techniques such as masking, blending and using gilded leafing. I shared a few handy tips as well!

Stay tuned for my upcoming blog posts because I’ll be sharing cards I receive from other demonstrators as a part of the swap!

Don’t Miss Out!

Please make me your Stampin’ Up! demonstrator!  Earn rewards points towards free stamps PLUS a gift when you order using host code: DB6NBYAV PLUS, with your first order, you’ll receive free catalogs in your thank you package!

Order These Products to Make My Card Swap Project:

Blending Brushes

153611

Gilded Leafing Embellishment

154560

Pattern Party Decorative Masks

144103

Scalloped Contours Dies

155560

Silicone Craft Sheet

127853

Whisper White 8-1/2" X 11" Cardstock

100730

Pacific Point 8-1/2" X 11" Cardstock

111350

Pacific Point Classic Stampin' Pad

147098

Multipurpose Liquid Glue

110755

Stamping Sponges

141337

You Might Also Like:

Stampin Up Basic Borders Dies & 6 Ways To Use Borders Dies

Thanks for joining me today. I hope you’ve enjoyed my Maui Card Swap project!

Sharing is caring!

Filed Under: Cards, Gallery Tagged With: Blending Brushes, card swap, cardmaking tips and tricks, forever fern, gilded leafing, Scalloped Contours Die, technique, tips and tricks

Previous Post: « Mini Twist Fun Fold Card Design – Make It Today!
Next Post: It’s Mushroom Hunting Time! »

Reader Interactions

Comments

  1. Katy O'Fleming says

    May 19, 2021 at 9:00 AM

    Beautiful card, Anna!!!!

    I have one question- how did you make that back of your fern leaves sticky?

    Thanks so much, Katy

    Reply

Trackbacks

  1. 50 Amazing Maui Swap Projects From Across The USA says:
    June 12, 2021 at 5:00 AM

    […] you remember, I made a technique-filled card for the card swap, and a lip balm holder with the Pansy Patch stamp and die set for the 3D swap. […]

    Reply

Leave a Reply Cancel reply

Your email address will not be published. Required fields are marked *

Recipe Rating


Primary Sidebar

Anna Helman

Independent Stampin' Up!® Demonstrator

  • Email
  • Facebook
  • Facebook Group
  • Instagram
  • Pinterest
  • RSS
  • Twitter
  • YouTube
Shop Stampin' Up!
Stampin' Up! catalogs
get updates
join Stampin' Up!
Stampin' Up! Rewards
Stampin' Up! special offers
Stampin' Up! clearance
Stampin' Up! 2025-2026 Annual Catalog
May 6, 2025 - May 4, 2026
View Online | Shop Online

Blog Archive

Categories

Footer

Important Links

  • Home
  • Shop Now
  • Get Updates
  • Join My Team
  • Rewards
  • Specials
  • Catalogs
  • Clearance

Anna Helman, Independent Stampin' Up!® Demonstrator

  • Email
  • Facebook
  • Facebook Group
  • Instagram
  • Pinterest
  • RSS
  • Twitter
  • YouTube

Get Ideas, Inspiration, and Special Offers!

Sign up to receive updates in your inbox

Thank you!

Please check your email for a special offer! 

.
All content on this blog is the property of Anna Helman, Stampin' Up!® Independent Demonstrator. Classes, services and projects offered here are not endorsed by Stampin' Up!® Projects, videos, photos, ideas and articles are shared for personal use only and may not be removed, duplicated or copied without permission. All artwork © Stampin' Up!®

Copyright © 2025 Anna Helman, handmake with love · Site Design by Catherine Carroll