Welcome! In case you haven’t heard, the 2021-2022 Annual Catalog was just released yesterday, and I’m so excited to share these new products with you! Have you had a chance to look through the catalog or shop online yet? If so, you may have seen the Stampin Up Pansy Patch stamp set, along with some coordinating items. It is my absolutely favorite in the new catalog, but I’ll admit I was a little overwhelmed when I opened the die set because of all the detailed parts. That’s why I wanted to hop on here and create this post. I’ve taken all the guess work out of how to use this amazing suite, so you can just enjoy stamping and creating. Let’s take a look!
First, let’s look at what comes in this neat set.
Stampin Up Pansy Petal Suite
Below is a photo of everything that comes with Stampin Up’s Pansy Petal Suite. It includes the Pansy Patch Stamp Set, Pansy Dies, Pansy Petals Designer Series Paper, and Bumblebee Trinkets. Let’s take a moment and talk about each product included in this suite.

Pansy Patch Stamp Set
The Pansy Patch stamp set is a gorgeous set that includes all the parts to make beautifully detailed large and small pansies. This set is a multi-step stamp set which means there are outline stamps, detail stamps and fill stamps for each flower. For this particular set, each size pansy has five stamps to make one flower head. That may sound like a lot, but it’s so easy to use. The Pansy Patch stamp set also includes birthday, hello, congratulations and thank you greetings.
Pansy Dies
The Pansy Dies comes with a lot of fun pieces. Essentially there are two parts to this die set. Some of the dies coordinate with the Pansy Petals Designer Series Paper as well as the stamp set. This means there’s a print in the paper collection and a stamp in the stamp set that coordinate perfectly with the dies to easily cut them out. This is true for both the pansies and the leaves. The other dies in this set are the details needed to cut out and build a beautifully designed pansy from just paper.
Pansy Petals Designer Series Paper
The Pansy Petals Designer Series Paper is such a beautiful arrangement of prints and colors. One side of each paper has a bright, bold print, while the other side is more subtle. It includes a nice mix of Stampin Up’s classic colors as well as the new 2021-2023 In Colors.
Bumblebee Trinkets
The Bumblebee Trinkets included in this suite are so cute. They are adorable little golden bees, just waiting to adorn your floral and nature paper projects. Keep scrolling to see how I used them on my card samples.
Pansy Patch Video
Below is a video introducing all the parts to Stampin Up’s Pansy Petals Suite, as well as the card projects I have created with it. Let’s take a look!
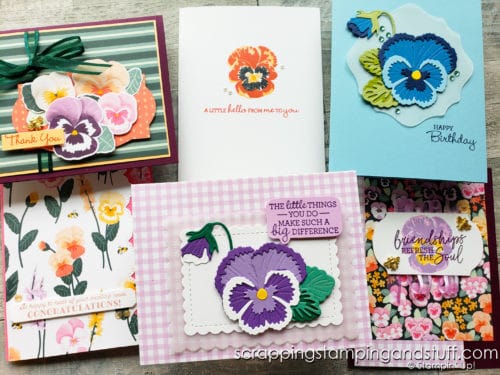
Keep reading to see photos of different ways I used this product suite.
5 Ways to Use Stampin Up’s Pansy Petals Suite
Next, let’s take a look at 5 different ways to use the Pansy Petal Suite.
1. Designer Paper Only
For this card, I simply used one of the prints from the designer paper collection. To give it more detail, I used Stampin Up’s new Borders Dies for a fun and interesting edge.

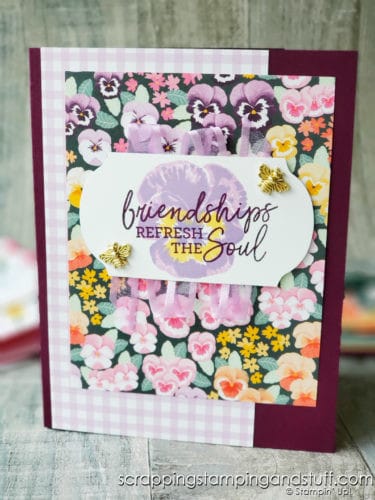
2. Designer Paper & Dies
To create this sample I used the designer series paper print that coordinates with the Pansy dies. There was no stamping involved in the card (well, just the greeting). All the flowers and leaves are from the designer paper and cut out with the coordinating dies! So easy!
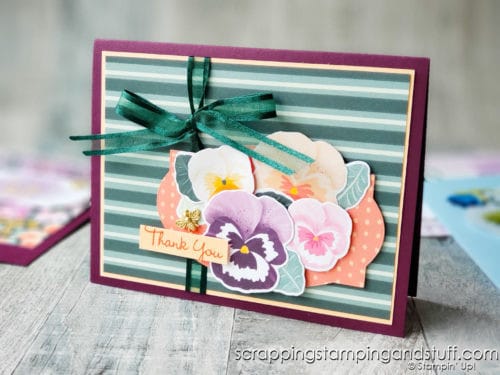
3. Stamps Only
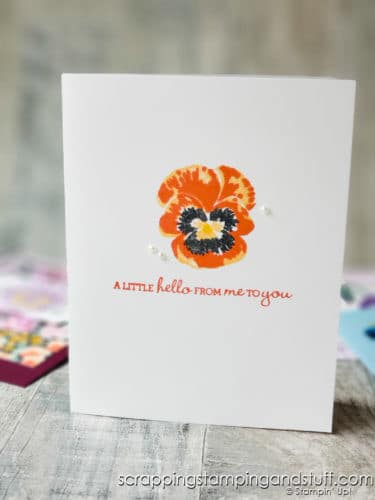
The flower in this card is made using just the stamps included in the Pansy Patch stamp set. As I said earlier, the stamp set comes with parts and details for two different size flowers. Flor this card, I used the large flower. I also used the sweet little Bumblebee Trinkets — aren’t they adorable?
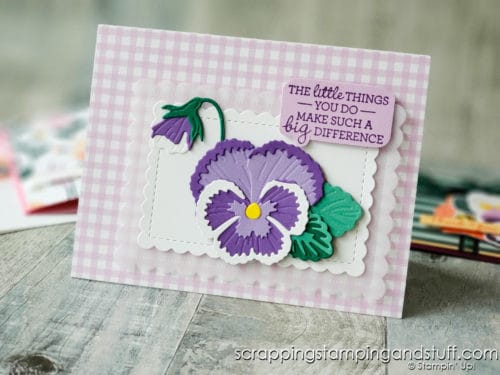
4. Dies Only
Here’s a sample created using just die cut paper. Isn’t this stunning?! The dies included in this set work perfectly together to create dimensional pieces with tons of detail.
I’m a purple girl, but in case you’re not, here’s a sample in blue. I just think these are so amazing!

5. Stamps & Dies
The last way you can use the Pansy Petals Suite is to stamp with the Pansy Patch stamp set, then use the same dies that coordinate with the designer paper to cut them out. This allows you to make flowers in any color, then cut them out easily. I didn’t create any samples using this method, but I hope to soon!
Now, I mentioned that when I opened the stamp and die sets that it took me a minute to figure out which stamps to use to make a pansy, and the same for the dies. Let me show you exactly how to do both.
How to Use the Stampin Up Pansy Patch Stamp Set
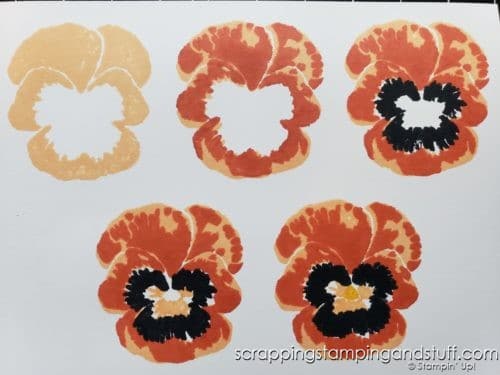
Next, I’m going to share with you how to use the Stampin Up Pansy Patch stamp set. Keep in mind there are parts for two different size flowers. For this example, I’m going to make a large flower. These are the stamps you will need:
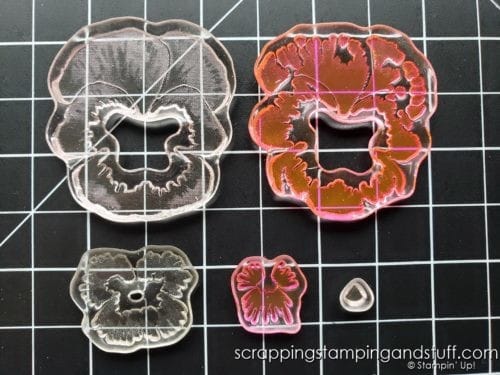
First, reach for the stamp with the largest coverage. Use your LIGHTEST color for this stamp, I used Pale Papaya. Next, use the overlay stamp. This stamp has a lot of coverage too, but not as much as the first stamp. You’ll want to stamp this one in a little darker color, I used Calypso Coral. The next stamp to use is the larger center stamp. I went bold and used black ink! Next, stamp the smaller center stamp, I used Pale Papaya again. The last stamp you’ll use to build the pansy is the tiny center piece. I used Daffodil Delight.
Here is the card I created using one of these pansies.
Now let’s talk about how to use the die set.
How to Use Stampin Up Pansy Dies
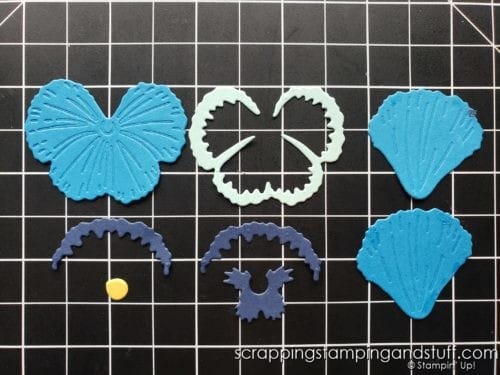
There are a ton of pieces and details that comes with the Pansy die set. Remember, there are essentially two different parts to this set. Some of the dies coordinate with the designer paper and stamped pansies. The other dies are to create a detailed flower from just paper. Let’s talk about the pieces you’ll need to create and build a pansy with just die cut paper.
Again, I will be creating the large pansy in this example. Here are the dies you will need:
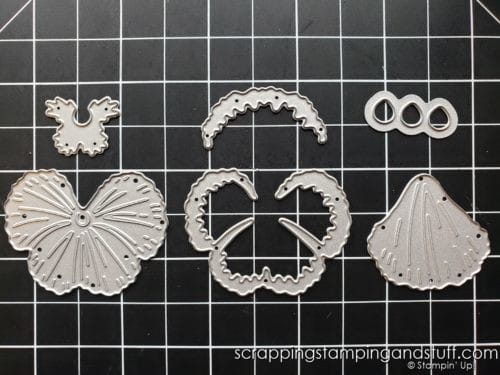
For most of the dies, you’ll only need one of each piece. The exceptions are for the top petals. You’ll need two of the top petal and the small narrow detail piece for the petal.
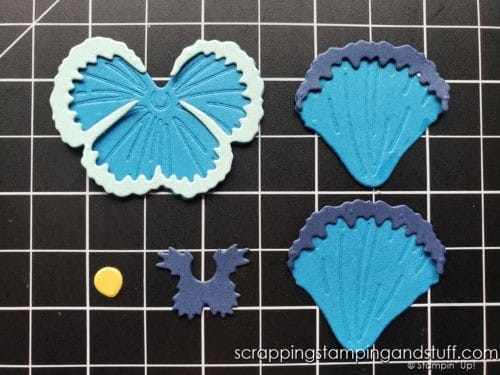
To attach the pieces together, start with the large piece for the bottom portion of the flower. Adhere the outer edge detail piece on top (see top left). Add the top petal details on top of the petals (see right).
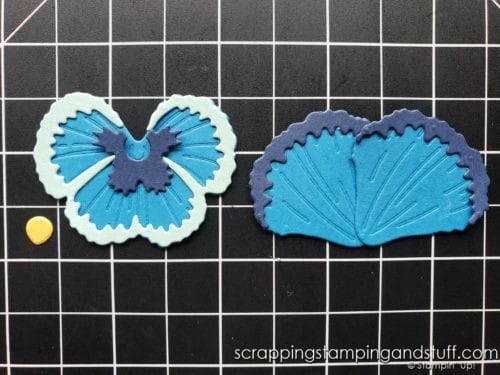
Next, glue or adhere the middle fill piece in the center of the flower. Attach the top petals together.
Lastly, attach the bottom of the flower over top of the top petals and add the small flower center. The Take Your Pick Tool is great for grabbing tiny pieces like these.
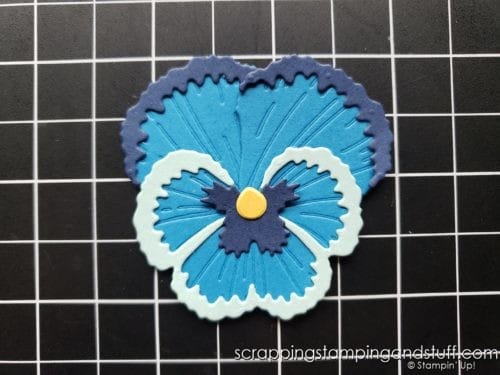
Here is a close up of the card created with this pansy. Just delightful!
Have you wondered at any point how to decide what colors to use for these stamps or dies? I definitely wondered that when I started using this set. I have a tip to share that may help!
How To Choose Your Colors
As promised, the tip I have for you today deals with color. Sometimes I have a hard time deciding which colors to use and how to coordinate them. What I did for today’s project was go straight to my Google search bar. I typed in the word ‘pansies’ and and then clicked on the ‘Images’ tab. Tons of beautiful pansy pictures popped up. I simply found my favorites and then chose the colors that looked like them. How easy is that?
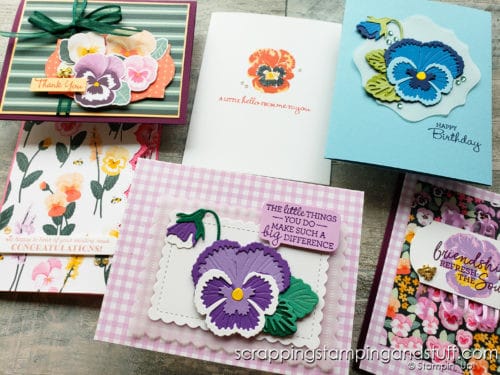
Here another look at all these beautiful cards. Do you have a favorite? If so, let me know which one you like best in the comments section.
Don’t Miss Out!
Please make me your Stampin’ Up! demonstrator! Earn rewards points towards free stamps PLUS a gift when you order using host code: DB6NBYAV PLUS, with your first order, you’ll receive free catalogs in your thank you package!

Order these Products and Make These Pansy Cards Yourself!:
")


 Designer Series Paper")

You Might Also Like:
Stampin Up Butterfly Brilliance Special Release Now Available!
Thanks for joining me today. I hope you’ve enjoyed my tutorial on how to use Stampin Up’s Pansy Patch stamp set.
This video was wonderful. I have been playing with this set since I got it in my preorder. Your cards are simply beautiful. Your blog is the first one I go to each morning for all your tips and demos. Thank you!
Thank you for the inspiration! I made three cards using all three of your ideas. I still need to play a tad more.
Beautiful. Thank You!
thanks so much for your video, i have been struggling with all the pansy parts and stamps! This really helped me, i am still a bit confused with the dies that match the stamps, will watch video again.
You’re welcome! Glad it helped!