Tell me, have you ever had a stamp that you couldn’t get to stick to your acrylic block? Stampin Up’s old clear-mount stamps had this problem, and if you’ve been stamping for a few years and used our stamps, you likely experienced what I’m referring to. It was really frustrating, and there were ways to combat the issue, but now we have an official solution to offer. Keep reading to learn how to make clear stamps stick to block using Stampin Up Cling Adhesive!
Why Clear Stamps Wouldn’t Stick
In the past, Stampin Up clear-mount rubber stamps didn’t cling well to acrylic blocks. The film used for the stickers labels just didn’t stick. I’m not a scientist so I can’t explain why. I just know they didn’t, and many of you know that too.
Previous Ways To Make Them Stick
There were lots of tricks to get the clear-mount rubber stamps to stick to blocks. Some folks used a plastic film over their blocks. Some left the sticker labels off of the stamps, which worked well, but it was hard to know if what you were stamping was straight. My personal method of choice was to rub the block back and forth across my thigh quickly to warm it up, then press hard onto the stamp to make it cling. Yes, you are allowed to laugh.
The Newest and Best Solution
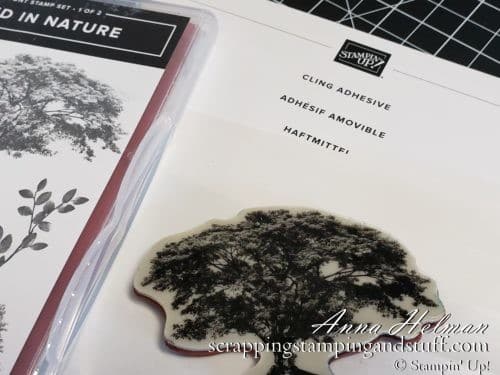
Houston, we no longer have a problem, we have a solution for how to make clear stamps stick to block! Stampin Up recently released cling adhesive, that can be used on the previous style of stamps to make them stick easily to your blocks!
How To Use Stampin Up Cling Adhesive
To use Stampin Up Cling adhesive, you’ll need to do the following.
For stamps that are larger than one adhesive strip:
- Remove the paper backing from one strip.
- Lay your stamp, rubber side up, on top of the adhesive strip.
- Peel the stamp off of the sheet.
For stamps that are smaller than one adhesive strip:
- With the paper backing still attached, trim an ahesive strip down until it is slightly smaller than the stamp.
- Remove the paper backing from the strip.
- Lay your stamp, rubber side up, on top of the adhesive strip.
- Remove the exposed side of the paper backing.
Tips For Using Cling Adhesive
- Make sure none of the adhesive strip lays outside the edge of the stamp. Ideally you want to keep the adhesive strips inside the edge of the stamps. Any adhesive laying outside of the stamp will make it very difficult to remove the stamp from the block.
- Do not get the adhesive strips mounted upside down on your stamp. I did this once, and the adhesive clung to my block when I pulled the stamp off.
To watch along as I show how to use cling adhesive, take a look at this video.
Thanks for visiting and make sure to stop back soon!
Please make me your Stampin’ Up! demonstrator! Order from me using the product links at the bottom! Earn rewards points towards free stamps PLUS a gift when you order using July host code: 6XFARQP4. PLUS, with your first order, you’ll receive free catalogs in your thank you package!
Sign Up For My Upcoming Virtual Card Classes!
Order the products I used and make this project yourself!


Hi – how do you store the stamps after you have applied the cling adhesive? Does the adhesive stay sticky if you just put them back in the DVD case they came in after the adhesive has been put on?
Hi Leigha, I store them the exact same way. I just stick the sticky label side against the back of the case!