• Nav Social Menu

    • Facebook
    • Facebook Group
    • Instagram
    • Pinterest
    • RSS
    • Twitter
    • YouTube
  • Blog
  • Start Here
    • About Me
    • Learn to Make Cards
    • Why Shop With Me?
    • Testimonials
    • Connect On Social
    • Get Email Updates
    • Stampin’ Up! Giveaway Winners
  • Products
    • Shop Now
    • Catalogs
    • Clearance
    • Why Choose Stampin Up?
    • Paper Pumpkin Kits
    • Product Shares
    • Rewards Program
    • Stamparatus
    • Cut And Emboss Machine
    • Mini Cut And Emboss Machine
    • Blends Alcohol Markers
    • Blending Brushes
  • Ideas
    • Video Tutorials
    • Project Gallery
    • Card Ideas
    • 3D Projects
    • Scrapbooking
    • Tips & Techniques
    • Kits
    • Learn to Make Cards
    • Printable Catalog Tabs
    • Social Media
  • Join
    • Join My Team
    • Stampin Up Demonstrator Resources
  • Classes
    • Classes in the Mail
    • In Person Events
  • Contact
    • Contact
    • Connect On Social

Handmake with Love

Anna Helman | formerly Scrapping, Stamping and Stuff

How To Attach Small Die Cuts Using Stampin Up Adhesive Sheets

30 Jun

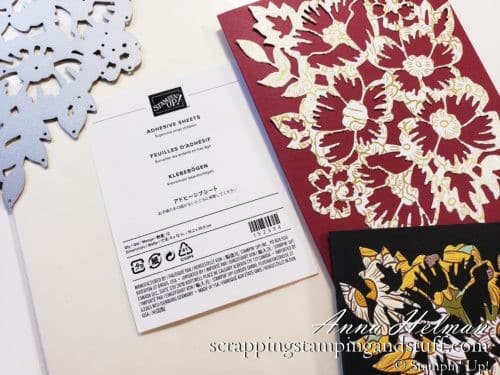
If you’ve done much cardmaking or scrapbooking, it is likely that you’ve wondered how to attach small die cuts to your projects. There are a few ways to do this, but I have a new favorite option using Stampin Up Adhesive Sheets, a new product in this year’s annual catalog. See that detailed flower die cut on the card below? I used Adhesive Sheets to turn it into a big sticker. Win!

How To Attach Small Die Cuts To Cards and Scrapbook Pages Using Stampin Up Adhesive Sheets

How To Attach Small Die Cuts…My Old Way

Back in the olden days, just a few weeks ago, my go-to method for attaching detailed die cuts was to place some Multipurpose Glue onto a silicone craft sheet, and use a sponge to apply just a very thin layer to the back of the die cut. You can see this technique in this video.

I may still choose to use this method in some cases, but now that Adhesive Sheets are here, I’ll be using them the majority of the time.

About Stampin Up Adhesive Sheets

Adhesive sheets are just that – a thin layer of adhesive between two layers of paper backing. They come in sheets that measure 6″ x 12″ with 12 of these included in one pack for a cost of $10.00. For the amount of headache they will save, this is totally worth it!

How To Attach Small Die Cuts To Cards and Scrapbook Pages Using Stampin Up Adhesive Sheets

How To Attach Small Die Cuts Using Stampin Up Adhesive Sheets

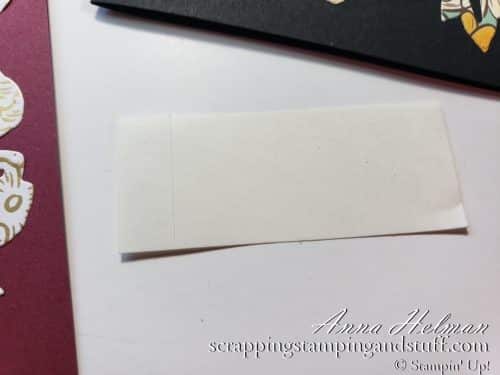
You’ll first need to trim the paper you’re planning to die cut to the appropriate size for the die. Next, you’ll need a piece of Adhesive Sheet trimmed just slightly smaller than the size of the paper. Look at the photo above and the piece of Adhesive Sheet that I trimmed down. Do you see that there is a small slit in the paper backing towards the left side? It’s important to keep one of these slits in the area you will be using to make it easier to remove the paper backing.

Next, remove the paper backing and place the adhesive side against the backside of the paper that you plan to die cut. Die cut the paper as normal. Remove the paper backing from your die cut, and stick it to your project just like a sticker. So easy!

Watch along in the video below as I show how to use adhesive sheets.

I hope today’s post was helpful and that it helped you learn how to attach small die cuts to your projects. Do you have other papercrafting dilemmas that you would like solutions for? Let me know and I’ll do my best to answer them!

Please make me your Stampin’ Up! demonstrator! Order from me using the product links at the bottom! Earn rewards points towards free stamps PLUS a gift when you order using June host code: YYUMNHJJ. PLUS, with your first order, you’ll receive free catalogs in your thank you package!

Pick A Free Bundle In June Only

Stampin Up Pick A Free Bundle Starter Kit Promotion

Sign Up For My Upcoming Virtual Card Classes!

Join In With This Fun Folds Virtual Card Class! Let's Get Together Online And Stamp!

Order the products I used and make this project yourself!

Adhesive Sheets

Adhesive Sheets
[152334]

Many Layered Blossoms Dies

Many Layered Blossoms Dies
[153582]

Ornate Garden Specialty Designer Series Paper

Ornate Garden Specialty Designer Series Paper
[152488]

Sharing is caring!

Filed Under: Featured Products, Gallery Tagged With: 2020-2021 Annual Catalog, cardmaking tips and tricks

Previous Post: « Stampin Up Tasteful Touches – 3 Simple Card Designs
Next Post: Stampin Up Playful Pets Makes Adorable Fur Baby Cards »

Reader Interactions

Trackbacks

  1. Stampin Up Pretty Pumpkins Joy Fold Card says:
    September 14, 2021 at 5:00 AM

    […] detailed die cuts such as these, I have several tips to take a look at. You an attach them using adhesive sheets or even your tape […]

    Reply
  2. Stampin Up Frosted Gingerbread & Another Paper Scrap Card says:
    September 18, 2021 at 5:00 AM

    […] the detailed die cuts on this card, I attached them using adhesive sheets, which turn your die cuts into stickers. This is SO helpful. You can hear more about this in my […]

    Reply

Leave a Reply Cancel reply

Your email address will not be published. Required fields are marked *

Recipe Rating


Primary Sidebar

Anna Helman

Independent Stampin' Up!® Demonstrator

  • Email
  • Facebook
  • Facebook Group
  • Instagram
  • Pinterest
  • RSS
  • Twitter
  • YouTube
Shop Stampin' Up!
Stampin' Up! catalogs
get updates
join Stampin' Up!
Stampin' Up! Rewards
Stampin' Up! special offers
Stampin' Up! clearance
Stampin' Up! 2025-2026 Annual Catalog
May 6, 2025 - May 4, 2026
View Online | Shop Online

Blog Archive

Categories

Footer

Important Links

  • Home
  • Shop Now
  • Get Updates
  • Join My Team
  • Rewards
  • Specials
  • Catalogs
  • Clearance

Anna Helman, Independent Stampin' Up!® Demonstrator

  • Email
  • Facebook
  • Facebook Group
  • Instagram
  • Pinterest
  • RSS
  • Twitter
  • YouTube

Get Ideas, Inspiration, and Special Offers!

Sign up to receive updates in your inbox

Thank you!

Please check your email for a special offer! 

.
All content on this blog is the property of Anna Helman, Stampin' Up!® Independent Demonstrator. Classes, services and projects offered here are not endorsed by Stampin' Up!® Projects, videos, photos, ideas and articles are shared for personal use only and may not be removed, duplicated or copied without permission. All artwork © Stampin' Up!®

Copyright © 2025 Anna Helman, handmake with love · Site Design by Catherine Carroll